How Can We Help?
Table Maintenance
Overview
Use the Table Maintenance window to add tables to the database and to review existing system tables. You can add several types of tables such as User Code tables, Entity Code tables, People tables, Admin. Tracking tables and Industry Standard Codes.
You can also add codes to the code tables. You select predefined codes from Codes Lists when you enter codes into code fields on windows.
To open the Table Maintenance window, go to the Maintenance zone and under the Maintenance menu, select the Table Maintenance option.
Global and Code Level Search
In the latest release version, a new search option has been introduced in the Table Maintenance screen under the Maintenance zone of DXC Assure Claims. With this enhancement, the tables in the Table Maintenance screen can now be searched at a button click. The search option available at the top left corner will remain collapsed by default. Clicking on the Search button ![]() opens an Advanced Search
opens an Advanced Search ![]() option that has 4 fields, namely, Code Table, Code Only, Description Only and Code & Description.
option that has 4 fields, namely, Code Table, Code Only, Description Only and Code & Description.
Note:
Only one search option can be selected at a time. Any alphanumeric value or special characters can be entered in the search field to perform the search.

The search options are discussed in detail below:
Code Table: The Code Table search option searches the table codes and displays the results as per the search term.
Code Only: With this option, the search can be performed only on the code and the code text. The result will be displayed as per the code entered in the search box.
Description Only: With this, the search can be performed on the Base Language Description column only.
Code & Description: This search option allows search to be performed on the code as well as description.
The search will be displayed considering all types of tables, that is, User Code Table, System Table, People Table, Admin Tracking, Entity Code and Industry Standards Table. Each table type has an initial/icons and these initials are displayed adjacent to the search result that specifies the respective table type. The initials for the table type are specified below:
U – User Code Table
I – Industry Standard Code Table
S – System Code Table
A – Admin Tracking Table
P – People Code Table
E – Entity Code Table
Along with this, the search term entered in the search box can be deleted by clicking on the sign at the top right corner.

Additionally, the number of records displayed for the search performed can be configured from General System Parameter Setting > System Setting > Number of Records per Page. In case, the number of records is more than the display limit, then, a More button will appear. Clicking on the More button will popup search result screen with all the possible records. The number displayed adjacent to the More option denotes the number of records having the search string entered.
Types of Tables in the Table Maintenance Window
The various tables in the Table Maintenance window are displayed in the dropdown menu as shown in the image below.
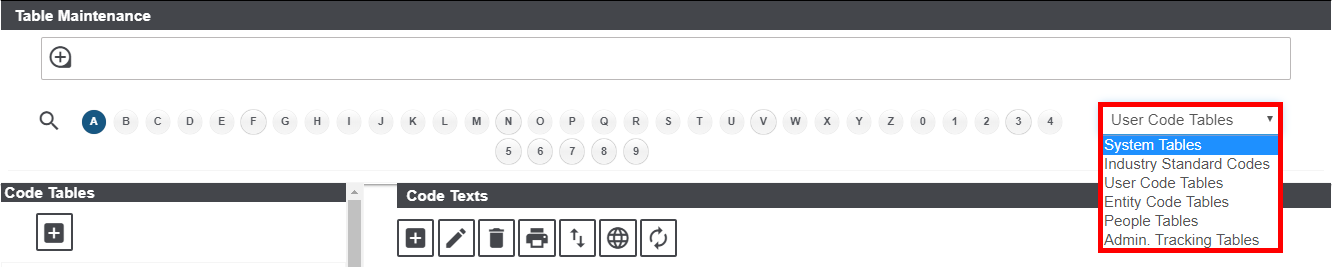
These tables are discussed in details below:
System Tables: Select System Tables to display a list of all the system tables. You can only display system table properties, you cannot edit or create new system tables.
User Code Tables: Select User Code Tables to display a list of existing code tables (also called codes lists). You can create new code tables or edit existing code tables. Once you create a code table, you can add codes to the code table in the Code Text section on this window.
Entity Code Tables: Select Entity Code Tables to display a list of existing entity type tables. You can create new entity type tables or edit existing entity type tables. Once you create an entity type table, you can add entities to the entity type table on the Entity window.
People Tables: Select People Tables to display a list of existing people type tables. You can create new people type tables or edit existing people type tables. Once you create a people type table, you can add persons to the people type table using the People Maintenance window.
Administrative Tracking Tables: Select Administrative Tracking Tables to display a list of existing Administrative Tracking tables. Administrative Tracking Tables are customized tables you create to track specific information within the application.
Industry Standard Codes: Select Industry Standard Codes to display a list of existing Industry Standard Code tables. Industry Standard Codes are NCCI or CS code tables.
Code Texts Section
Code Texts section is displayed in the right-hand section of the Table Maintenance window. This section displays all the entered Code Texts in a tabular form.
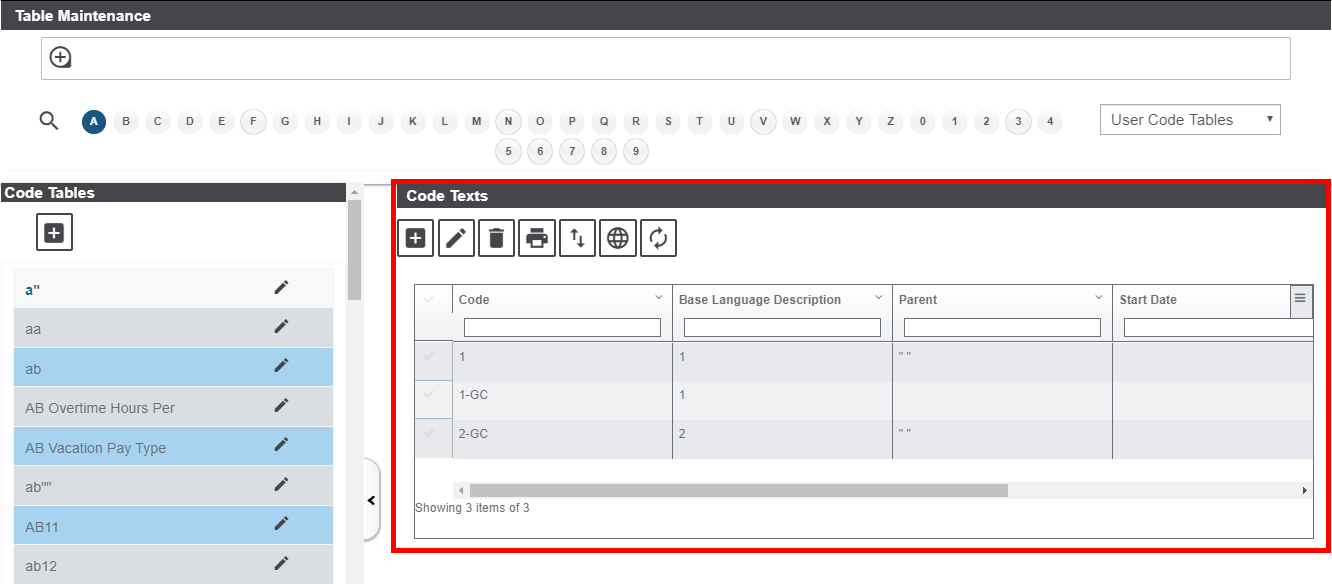
The toolbar buttons offered in the Code Texts section are discussed below:
Add Code: Select to open the Enter Code Detail Window that lets you add a new code. The fields details of Enter Code Detail Window are discussed in the later section.
Edit Code: The Edit button enables you to make changes in the entered code.
Delete: Select the code that is to be deleted and click on the Delete button to remove it from the code table.
Print: Select the code and click on the Delete button to print it.
Import Codes: Select to open the Codes Import window and import the codes in the open Code Selection window to a different location. The fields details of Code Import Window are discussed in the later section.
Additional Language Code: Select the code in which an additional language description is to be added and click on the Additional Language Code button to pop open the Additional Language Codes window. The fields details of Additional Language Codes Window are discussed in the later section.
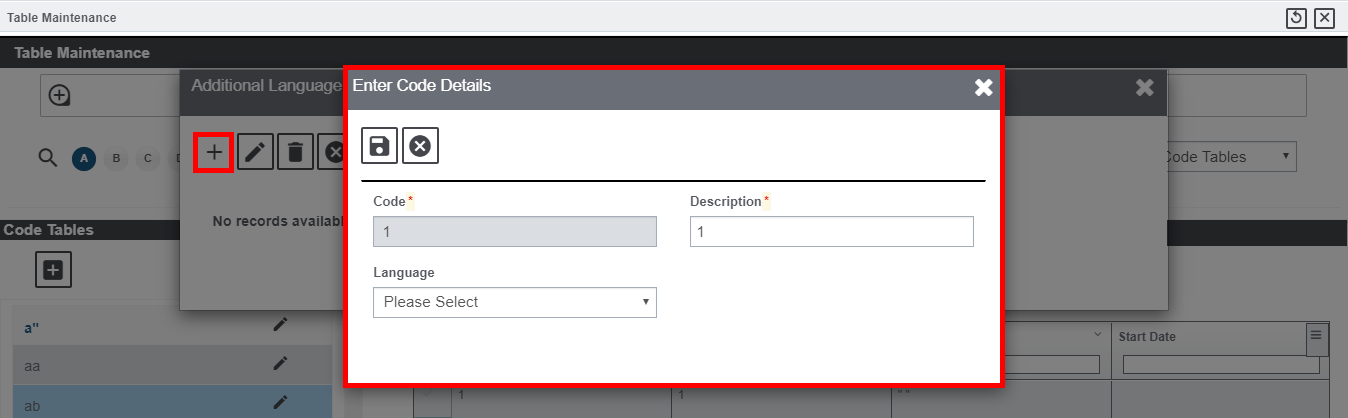
Enter Code Detail Window
To open the Code Details Window from the Table Maintenance window, select the Add Code button, or select a code link to edit it.
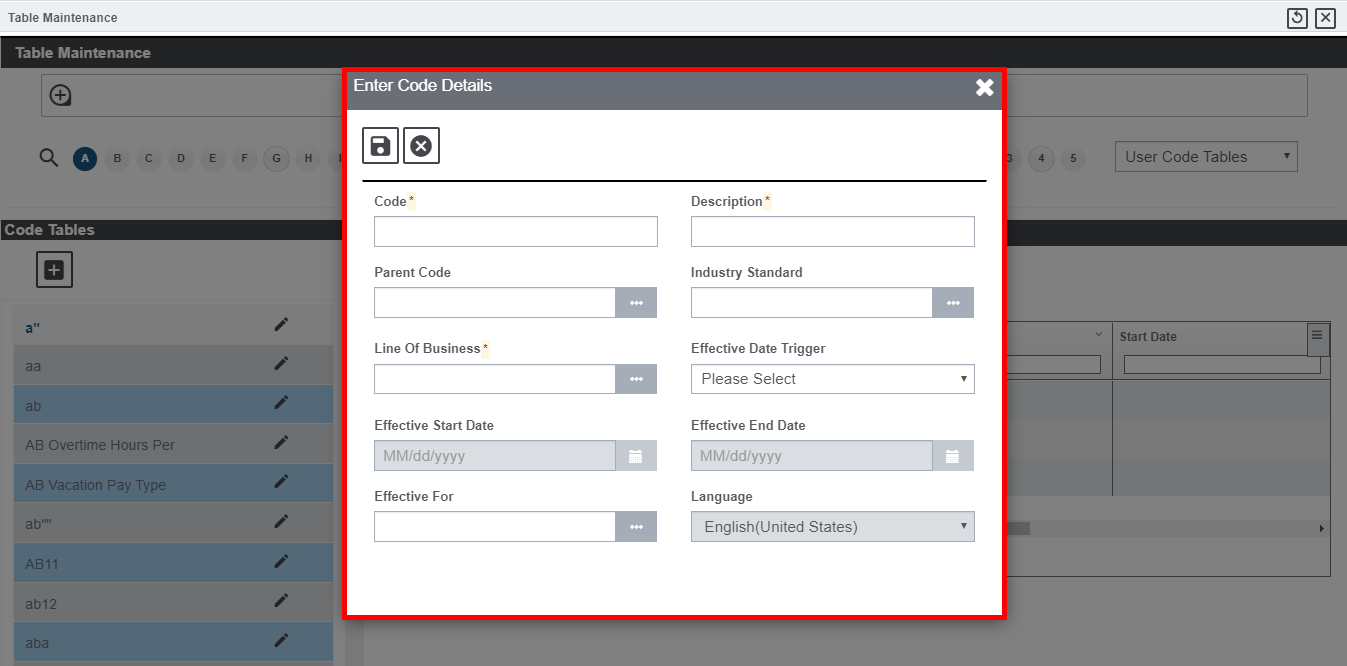
Field definitions:
Code: Enter a name for the code you are creating.
Description: Enter a description for the code you are creating.
Parent Code: If the code is a subset of another code, select the ![]() button to open the Code Texts window and select the parent code.
button to open the Code Texts window and select the parent code.
Industry Standard: If the code uses NCCI or CS codes, select the ![]() button to open the Code Texts window and select the appropriate Industry Standard table.
button to open the Code Texts window and select the appropriate Industry Standard table.
Line of Business: Select the ![]() button to open the Code Texts window and select the line of business.
button to open the Code Texts window and select the line of business.
Effective Trigger Date: From the drop down list, select the type of date trigger for the code.
Effective Start Date: If the code is only effective between a certain date range, enter the start date.
Effective End Date: If the code is only effective between a certain date range, enter the end date.
Effective For: Select the ![]() button to open the Org Hierarchy window and select the organization level for which the code is effective.
button to open the Org Hierarchy window and select the organization level for which the code is effective.
Codes Import Window
Use the Codes Import window to import code tables in the form of SQL text files. Importing code table files can help you save the time in creating code tables and adding code values to the tables.
To open the Code Import Window from the Table Maintenance window, on the Code Texts tab, select the Import Codes button.
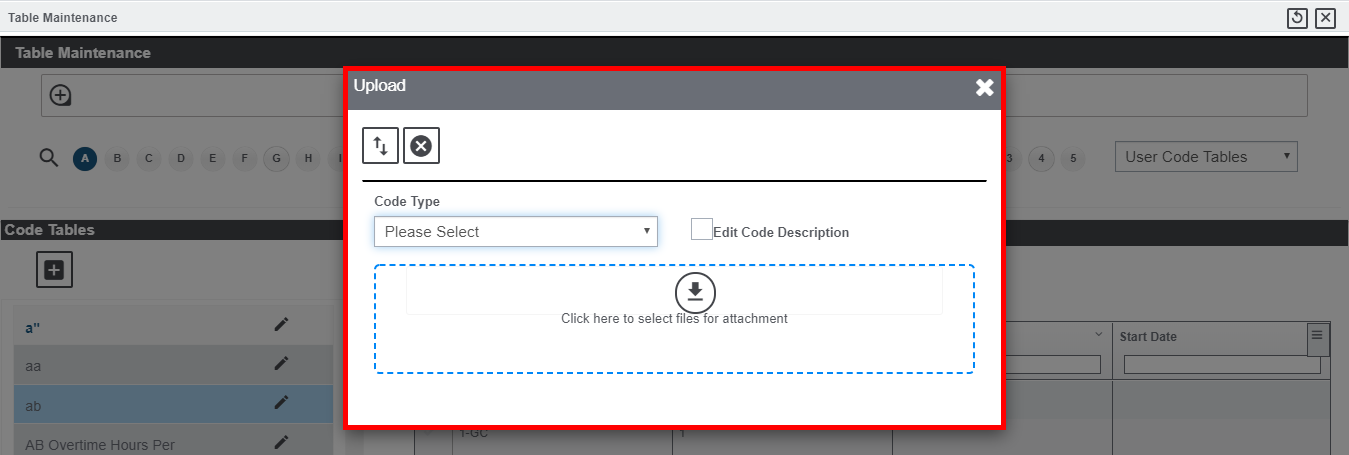
Field definitions:
Code Type: Select the code table type you want to import the code table as.
File: Select the Browse button to open a file browser and then select the code table file you want to import.
Edit Code Description: Select the checkbox if you want to edit the codes in the code table after importing the file.
Import: Select to Import the code table from the code table file.
Additional Language Codes Window
The Additional Language Codes Window enables you to add an additional language description in a given code. To open the Additional Language Codes Window from the Table Maintenance window, on the Code Texts tab, select the Additional Language button. This opens the Additional Language Codes window. Select the + sign to open Enter Code Details window add a new language code.
Field Description:
Code: Enter the language code.
Description: Enter the language description.
Language: Select the language from the dropdown list.
Code Texts Display Table
The code texts will be displayed in the tabular as shown below:
The various columns of the Code Texts table are discussed below:
Code: Displays the code.
Description: Displays the code description. Select the description link to open a window that lets you edit the selected code.
Parent: If the code is a subset of another code, displays the parent code.
Start and End Dates: If the code is only effective between a certain date range, displays the Start and End dates for the date range.
Organization: If the code can only be used for certain organizations in the organizational hierarchy, displays the effective organization.
Enter Table Detail Window
Use the Enter Table Detail window to create or edit User Code tables, Entity Code tables, People tables, Admin. Tracking tables and Industry Standard Codes. To open the Enter Table Detail window from the Table Maintenance window, select the Add Table button or the + sign.
Note: You cannot create or edit system tables, you can only display system table properties.
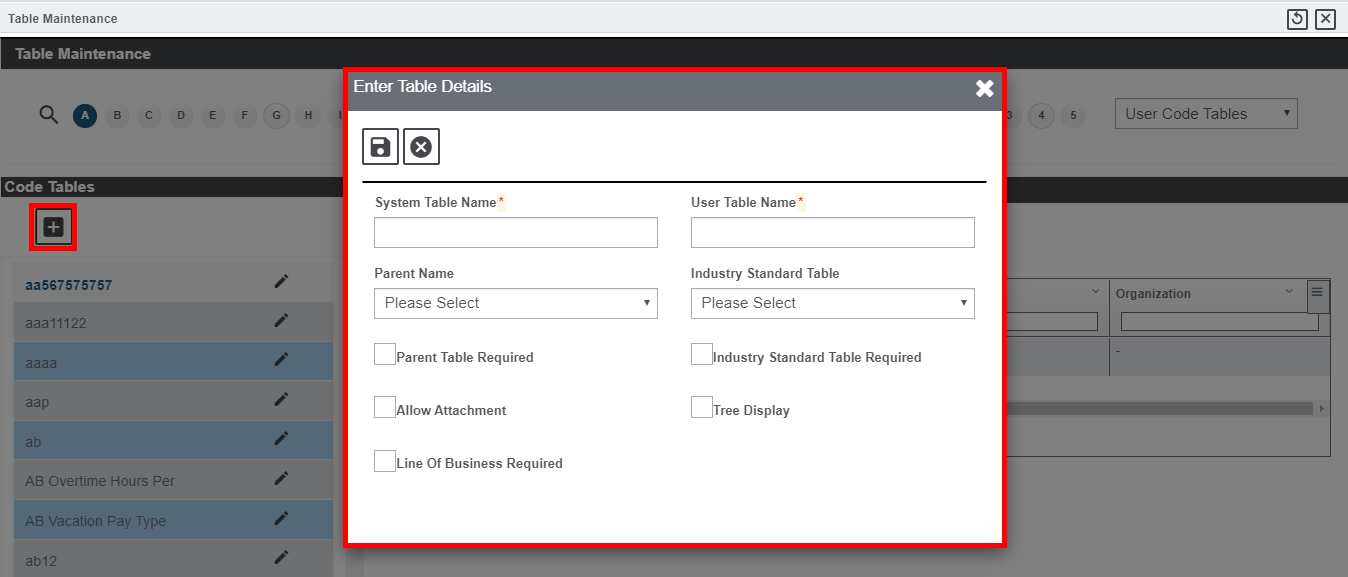
Field definitions:
System Table Name: Enter the System Table with which you want to associate the table you are creating.
User Table Name: Enter a name for the table you are creating.
Parent Name: From the drop down list, select the parent table you want to associate with the table you are creating. The table you create will be a subset of the parent table.
Industry Standard Table: From the drop down list, select the appropriate Industry Standard table if the table you are creating uses NCCI or CS codes.
Allow Attachments Select the check box if you want to allow attachments.
Parent Table Required: Select the check box if you want the user to complete fields in the parent table before completing this table.
Industry Standard Table Required: Select the check box if you want the user to enter appropriate Industry Standard table.
Allow Attachment: Select the checkbox if you want to enable attachment in the table.
Tree Display: Select the check box if you want to display the new table in a tree view in relation with the parent table.
Line of Business Parent Required: Select the check box if you want the user to select a line of business before completing this table.