How Can We Help?
Security Management System
Security Management System (SMS) Screen
The SMS screen of Assure Claims manage the security and risks systematically across the application. The SMS screen offers numerous options to protect the various processes of the application and assign control of the same to the users accordingly. For this, the roadmap of the processing that is critical to the organization is created, the risk associated to them can be analyzed.
The main toolbar of the SMS screen sports various button.
![]()
The functionalities of these toolbar options offered by screen are discussed in details below.
Add New User
DXC Assure Claims supports multiple users by seperating the User Account and application data. To create a New User, select the Add New User button from the toolbar. The User Settings screen will open that includes two tabs: User Settings and Allowed/Assigned Data Source To Login.
User Settings Screen: User Settings Tab
The basic infromation of the users are mentioned in this tab. The mandatory fields of the screen are discussed below:

Last Name*: Enter the last name of the user in this field.
First Name*: Enter the first name of the user in this field.
Title: Enter a unique title for the user.
Address: Enter the address of the user in this field.
City, State, Zip, Country: Enter the City, State, zipcode and country of the user.
Language: Select the language from the dropdown list.
Company: Enter the company name of the user.
Email: Enter the email address of the user in this field.
Manager: Select the reporting manager of the user from the dropdown list.
Home Phone, Office Phone: Enter the Home and Office phone numbers in the respective fields.
Permit to access Security Management System: If this checkbox is selected, then, the user will have an access to the Security Management System screen of Assure Claims.
Permit to access User Privileges Setup: If selected, the user will be able to access the User Priviledge Setup screen of the Security zone.
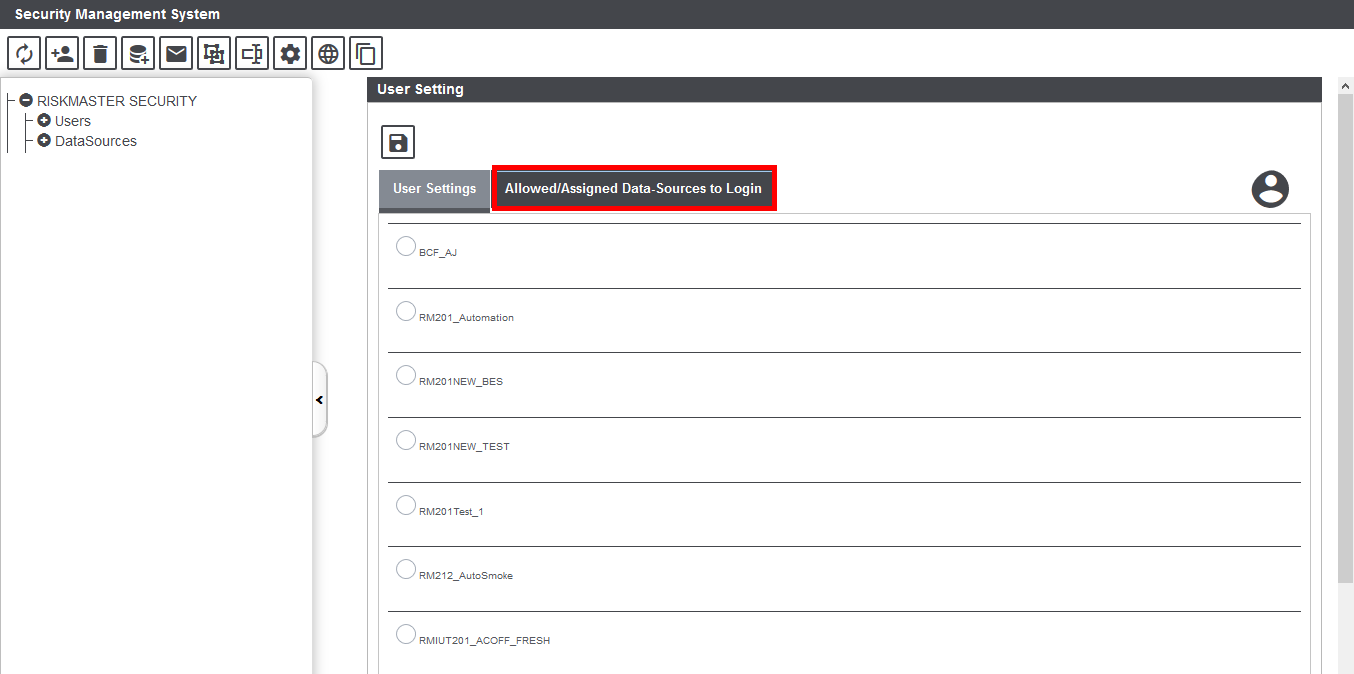
User Settings Screen: Allowed/Assigned Data Source To Login
The Allowed/Assigned Data Source To Login tab lists out all the Data Sources. Select the radio button of the relevant DSN that is to be assigned to the user and save.
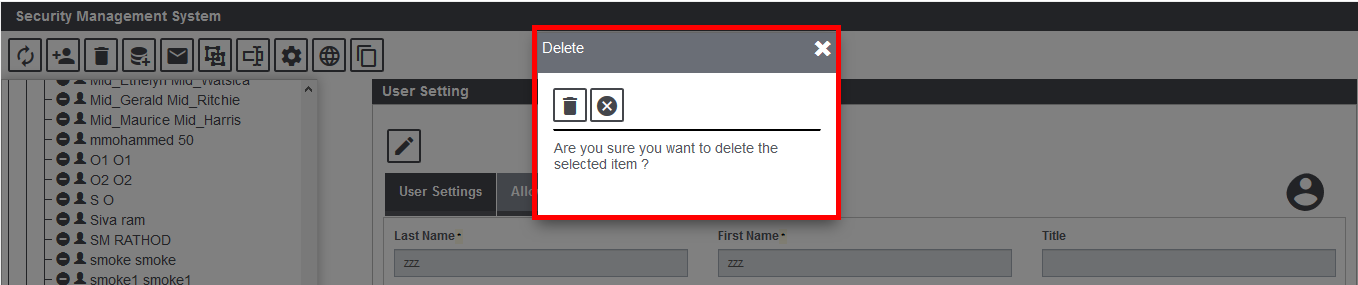
Delete Selected Item
The SMS screen of Assure Claims enables the deletion of all the items created including Data Source, User, Module Group and others. To delete an item, select the same followed by the Delete Selected Item ![]() icon from the toolbar. A confirmation message pops up as shown.
icon from the toolbar. A confirmation message pops up as shown.
Data Source
Data Source is a name given to the connection set up to a database from a server. It is, in short, a connection with Assure Claims and your database. The application offers an option to create and manage multiple data sources at a few button clicks.
Add a New Data Source
On the SMS screen, select Add New Data Source ![]() button to open the corresponding window. Follow the steps mentioned below to complete the process of new Data Source creation:
button to open the corresponding window. Follow the steps mentioned below to complete the process of new Data Source creation:
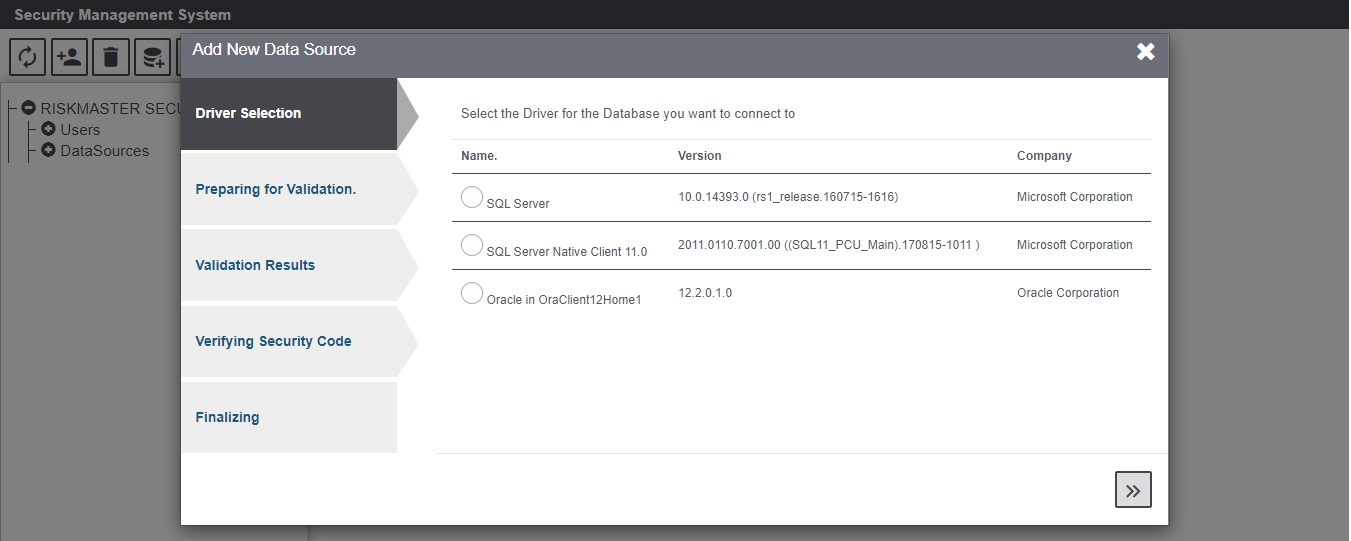
1. Select the Driver Selection.
Select the required ODBC driver from the options available which you want to use to create DSN and select the Next ![]() button.
button.
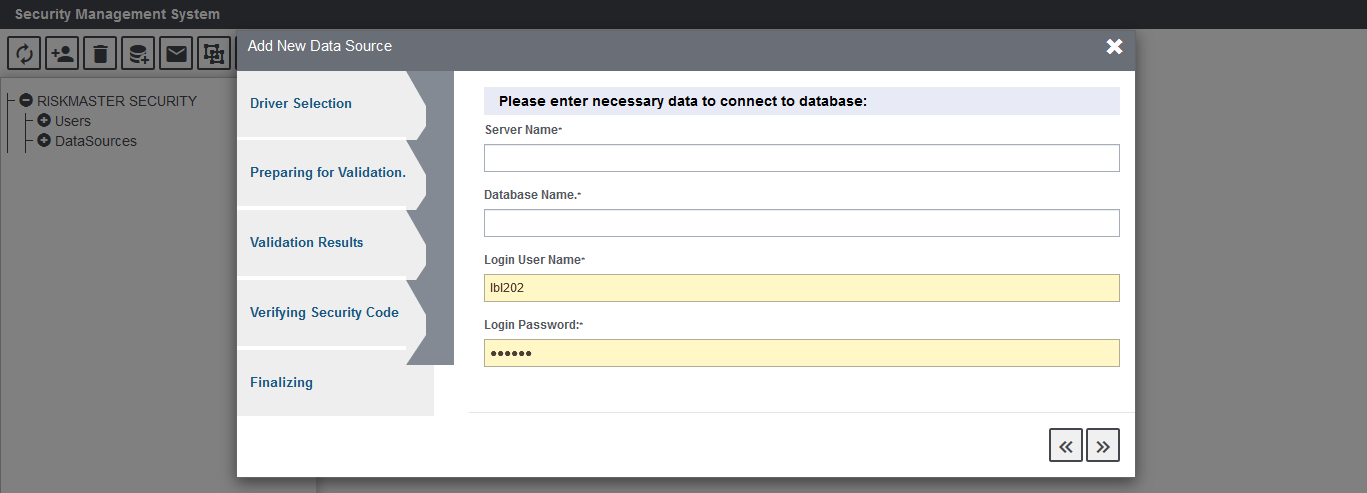
2. Preparing for Validation
Enter the details to connect to the database server as shown in table below:
Server Name: Enter the name of the database server
Database Name: Enter the database name which you want to connect to
Login User Name: Enter the username used to connect to database
Login Password: Enter the password to connect to database.
Click the Next ![]() button.
button.
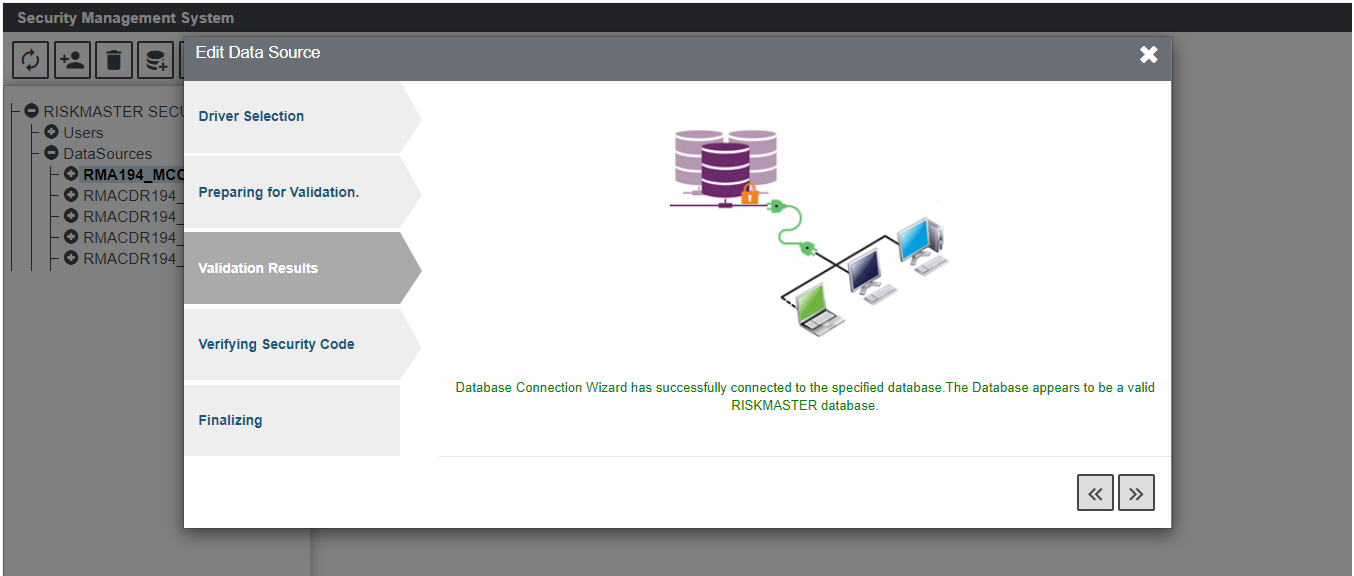
3. Validation Result
Once the details are filled in the previous step, Database Connection Wizard will now try to connect and validate the database you have selected. Click Next ![]() to start the connection and validation process.
to start the connection and validation process.
4. Verifying Security Code
Enter the required data to verify the security code. First, enter a unique name for the database connection, then, enter the code provided by the product support to activate licenses and click on the Finish button.

Once the information is validated the data source will be saved. Select Finish ![]() button to complete the process.
button to complete the process.
Set E-mail Options
Improving upon the emailing options using SMTP (Simple Mail Transfer Protocol) existent, Assure Claims enhances the functionality by introducing support for multiple Email APIs provided by independent service providers Mailgun and SendGrid.
For this, select the Set E-mail Options ![]() button from the toolbar to pop open the correcsponding window.
button from the toolbar to pop open the correcsponding window.
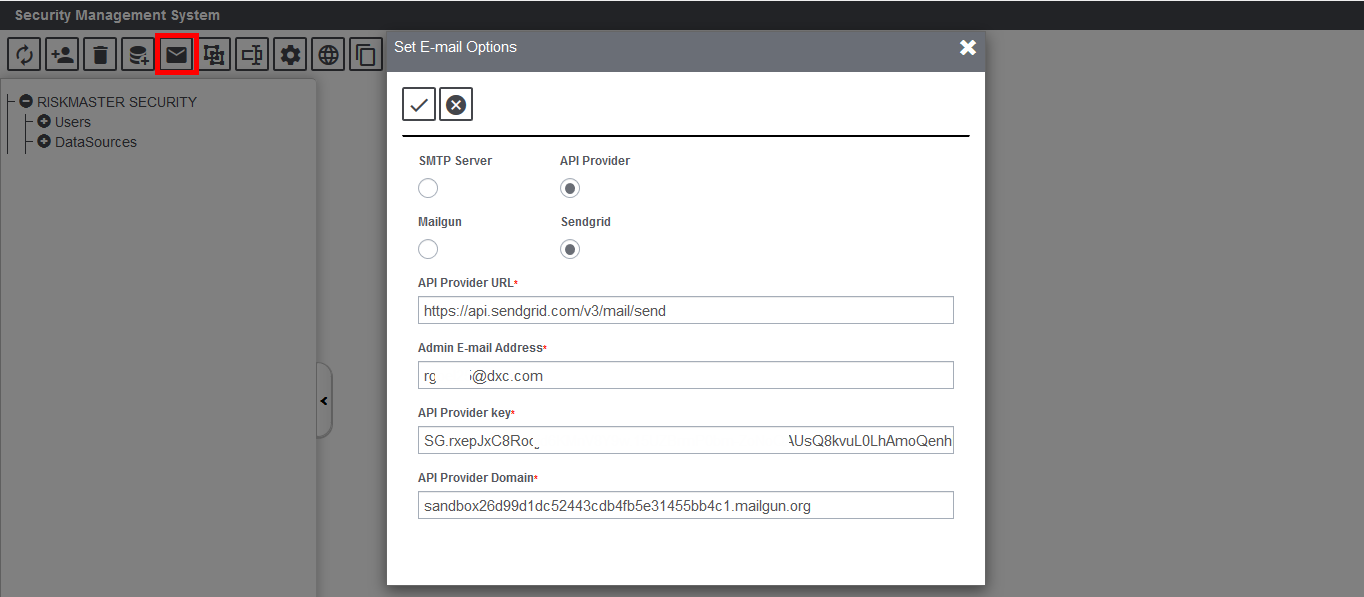
To Avail the functionality, select API Provider (radio button). Under this, there are two more radio buttons for the supported API service providers, namely:
- Mailgun
- SendGrid
Select the relevant option and fill the mandatory fields:
API Provider URL: Enter the API Provider URL in this field.
Admin E-mail Address: Enter a relevant email address of the admin.
API Provider Key: Enter the API Provider Key provided by the operator.
API Provider Domain: Enter the domain address of the API Provider in this field.
Module Group
Assure Claims offers an option to create Module Group for the DSNs. For this, select a DSN for which the module group is to created followed by the Add New Module Group ![]() button from the toolbar. This will pop open the Enter New Group Name window.
button from the toolbar. This will pop open the Enter New Group Name window.
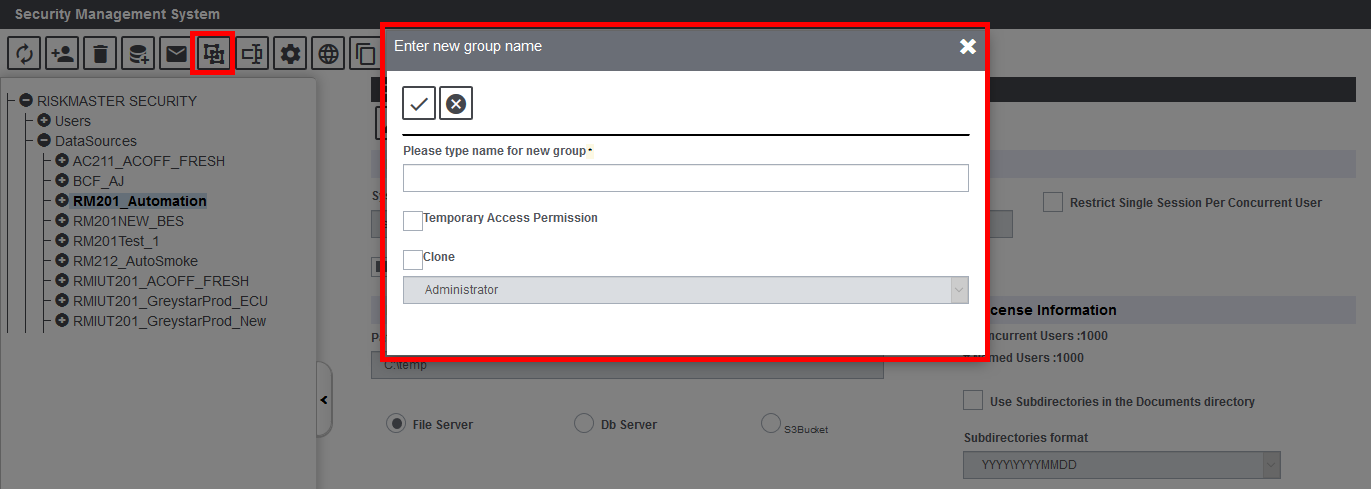
Please Type name for new group*: Enter a name for the module group in this field.
Temporary Access Permission: Select the checkbox to enable Temporary Access feature for the created module group. That is, if the checkbox is selected, then, you will be able to securely share the modules included in the module group with your third-party business partners without giving them login access to DXC Assure Claims.
Clone: If the checkbox is selected, then, the option to clone the module group will be enabled.
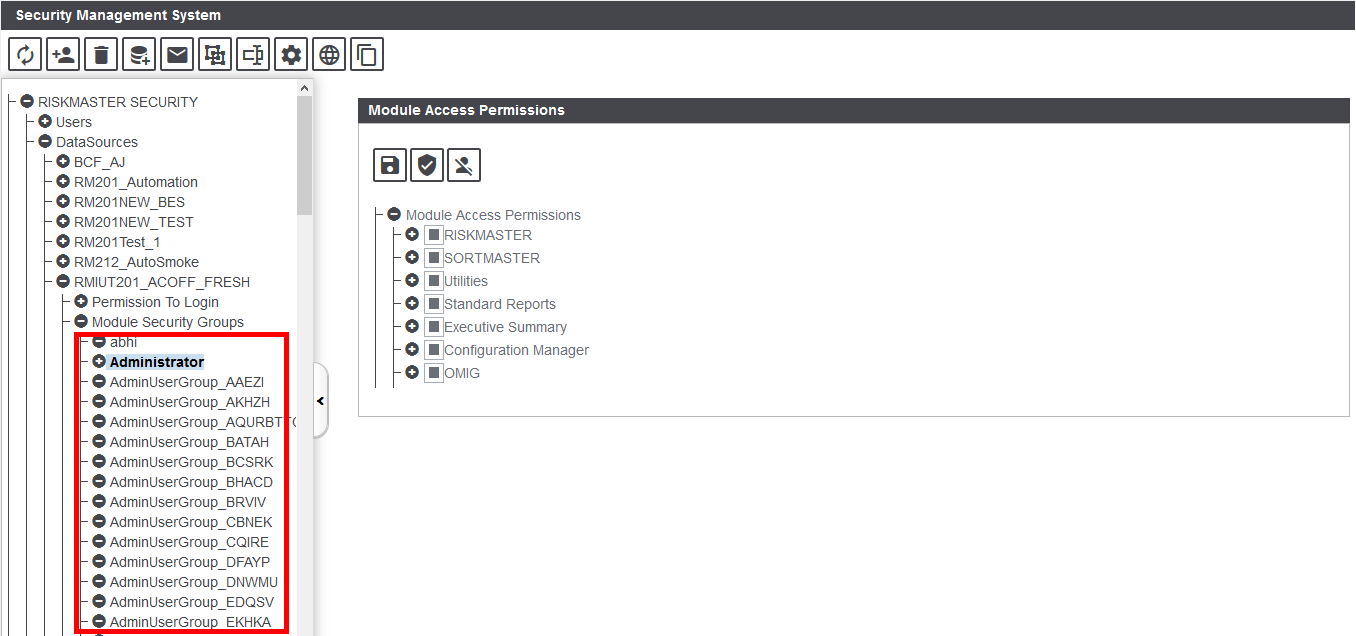
The module group created here will be visible on the left hand pane of the screen. For this, expand the DSN for which the group was created followed by the Module Security Group node. The module group will be visible in this section.
Rename Module Group
The module groups can be renamed as required. To avail this feature, expand the corresponding DSN of the module group, followed by the Module Security Group node. Then select the module group that is to be renamed and click on the Rename Module Group ![]() button from the toolbar. This will pop open the Rename Module Name window.
button from the toolbar. This will pop open the Rename Module Name window.
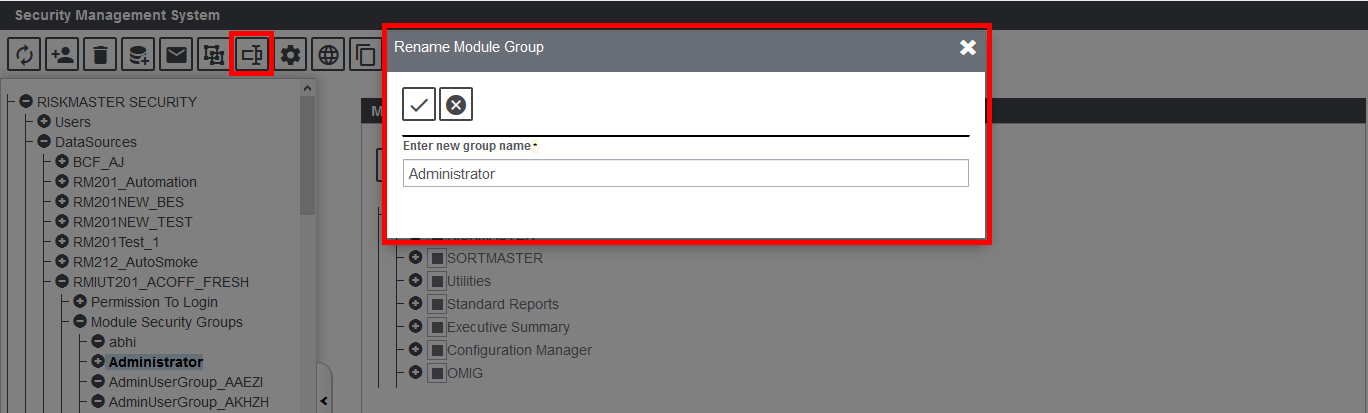
Enter the new name of the module and save. The changes will be reflected in the left-hand pane of the screen.
Authentication Provider Settings
Assure Claims allows importing the IdP Metadata from XML files. These XML files can be uploaded into the system and their metadata will automatically get populated in the respective fields.
For this, select the Authentication Provider Settings ![]() from the toolbar of the SMS screen.
from the toolbar of the SMS screen.
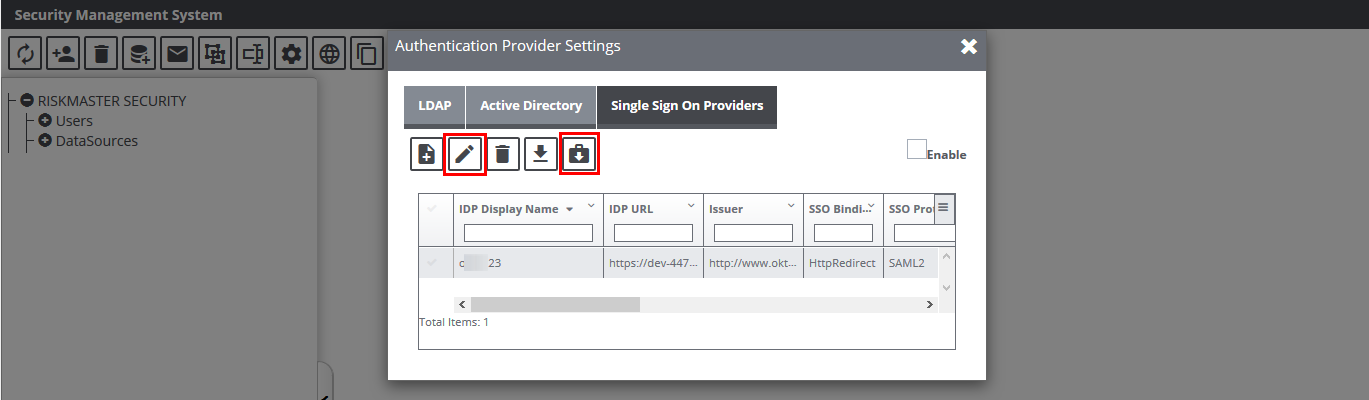
In the Authentication Provider Settings popup, select Single Sign On Provider.
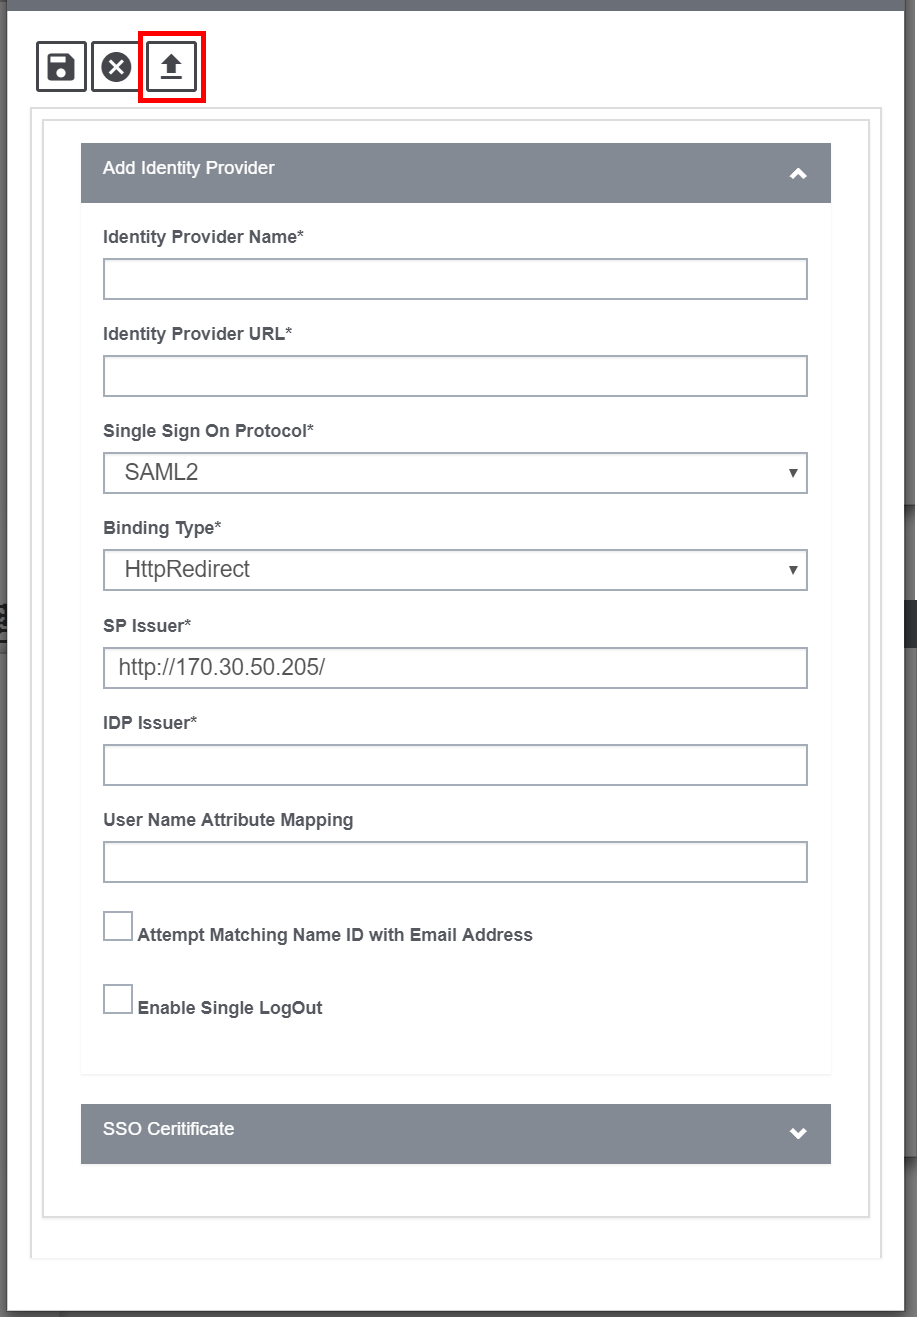
Click on the Add or “+” sign on the top left section to the Add new Identity Provider and SAML Settings.
On the Add Identity Provider window, select the import button and upload the IdP. Earlier, the Identity Provider URL, SP Issuer, IdP Issuer and Single Logout URL fields were provided manually. Now, relevant data is auto populated in respective fields by selecting an XML file and uploading it into the system.
* Features involve additional cost/ consulting/ agreement/licensing considerations. Please reach out to Assure Claims Support or your Assure Claims Sales Representative for more information.
Auto Generation of Self Signed Certificates (SSO)
Security Assertion Markup Language (SAML) allows Identity Providers (IdP) to pass authorization credentials to service providers which allows the use of one set of credentials to log into many different websites. SAML is the link between the authentication of a user’s identity and the authorization to use a service.
Generation of SSO
Earlier, SSO certificates were generated manually. Now, the application’s efficacy has been enhanced with the introduction of a new feature to auto-generate Self-signed Certificate.
To use this feature, go to Single Sign On Providers (tab), select SSO Certificate accordion.
The Identity Provider details can now be entered by simply uploading an XML file as discussed in the Importing SAML Identity Provider (IdP) Metadata from Files module above.
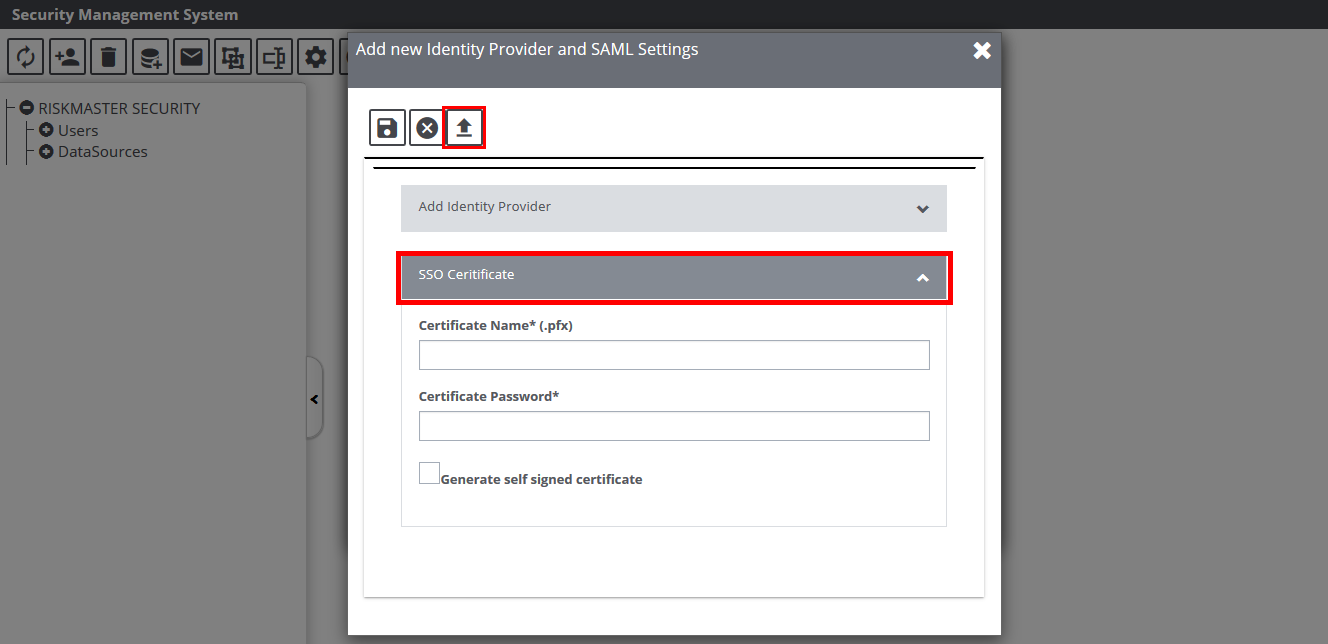
Upon expanding the SSO Certificate option, the following new fields are displayed.
- Certificate Name: Enter the name of the certificate.
- Certificate Password: Enter a unique certificate password.
- Generate Self Signed Certificate: Select this checkbox to enable autogeneration of self-signed certificates.
- OpenSSI Exe Path: Enter the path where the SSL folder is executed.
- Certificate will generate here: The selfsigned certificates will appear in the path mentioned in this field.
- Certificate Validity Days: The user can enter the valdiation period for the generated SSL Certificate.
The SSO certificate will be created and saved in the path specified above.
Once the process is complete, a new Identity Provider will be created, details of which can be edited and downloaded (in .pfx format) by clicking on the respective buttons as shown.
* Features involve additional cost/ consulting/ agreement/licensing considerations. Please reach out to Assure Claims Support or your Assure Claims Sales Representative for more information.
Altrenately, the IdP (Identity Provider) Metadata can be manually fed into the system as well. For this, on the Authentication Provider Settings, select the LDAP tab. Enter the following information:
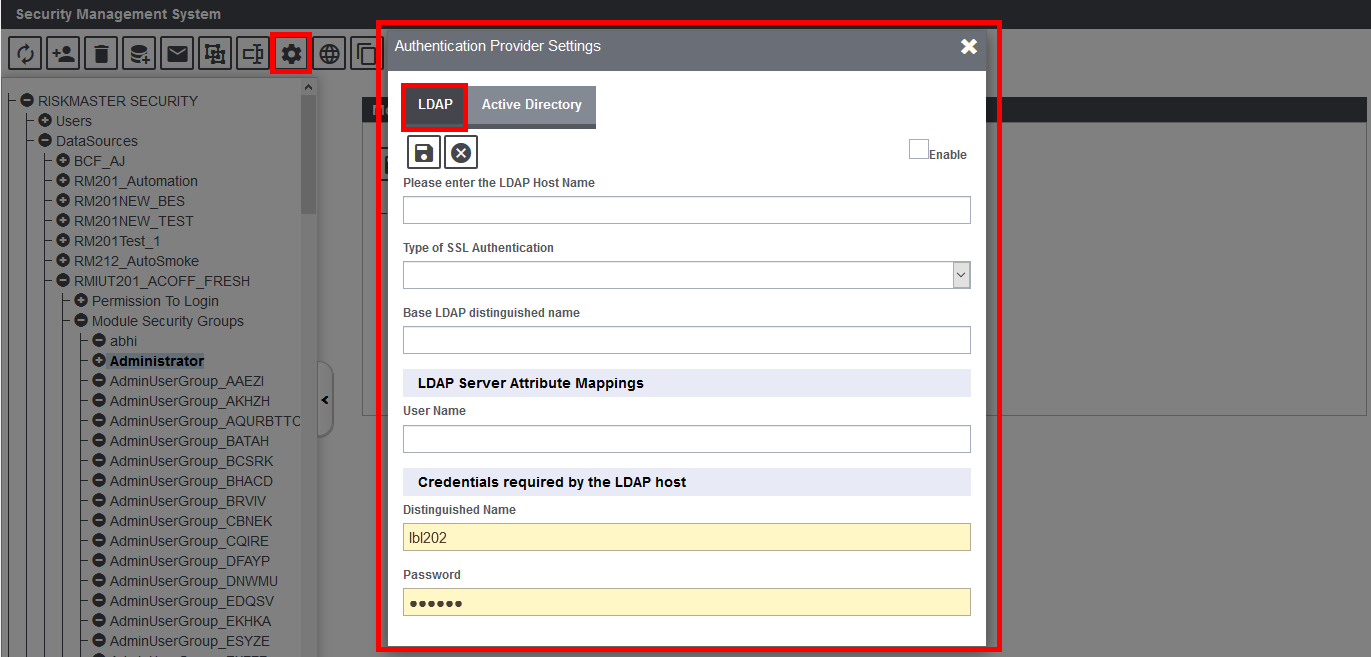
Please enter the LDAP Host Name: Enter the LDAP Host Name in this field.
Type of SSL Authentication: Select the SSL Authentication option from the dropdown list.
Base LDAP distinguished name: Enter the an unique name Base LDAP.
LDAP Server Attribute Mappings
User Name: Enter the user name here.
Credentials required by the LDAP host
Distinguished Name: Enter a unique name for LDAP host.
Password: Enter a password here.
On the Active Directory tab, enter the following information:
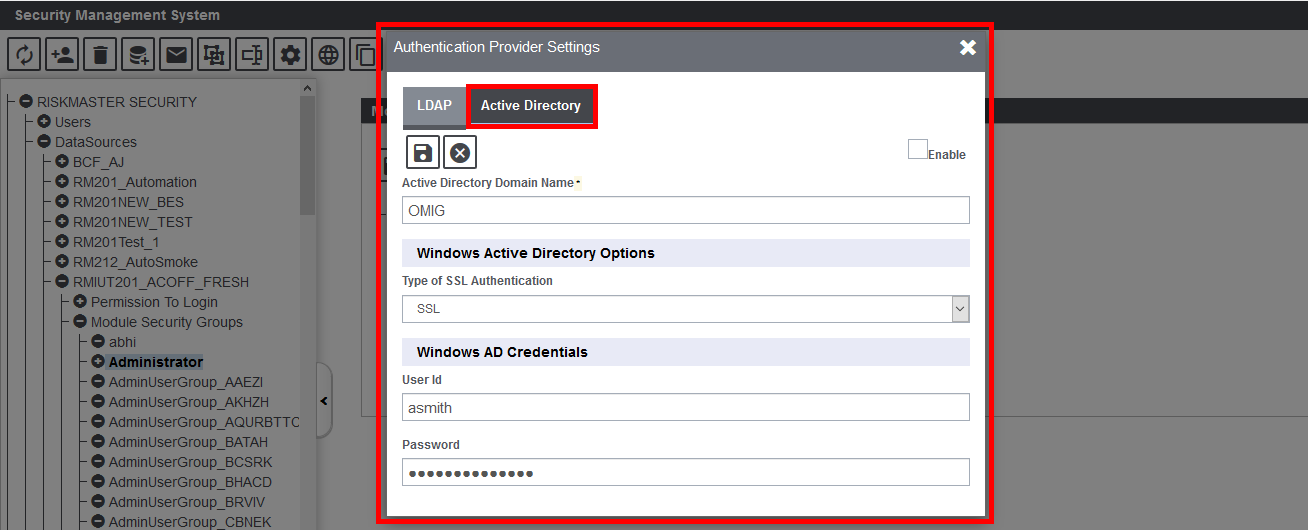
Active Directory Domain Name*: Enter the Active Directory Domain Name. This is a required field.
Windows Active Directory Options
Type of SSL Authentication: Select the SSL Authentication type from the dropdown list.
Windows AD Credentials
User Id: Enter the User ID.
Password: Enter the password.
MultiLanguage Date Format
Select the Multilanguage Date Format ![]() button on the toolbar menu to open the respective screen. The Date Formats in the various languages are listed in here as shown below:
button on the toolbar menu to open the respective screen. The Date Formats in the various languages are listed in here as shown below:

To change the date format, select the Edit button corresponding to each one to open the window as shown below. Make the necessary changes and save.

Cloning Module Security Groups
The need for providing the ability to copy a Module Security Group from one Data Source Name (DSN) to another within the same Security DSN has been addressed in the current release version of Assure Claims.
A new toolbar button Copy Module Group Across DSN ![]() has been added on the Security Management System screen.
has been added on the Security Management System screen.
Selecting this button opens the Copy Module Group Across DSN popup wizard which can be used to copy a Module Security Group from one DSN to another within the same Security DSN.

Copy Module Group –popup wizard
The wizard has the following elements:
Command Buttons
- Accept
- Cancel
Dropdowns
- Select Source DSN
- Select Destination DSN
Checkboxes
- Copy Users
- Overwrite Existing Groups in Destination DSN
Note:
- Respective Module Security Groups are available under both source & destination DSNs.
- Lists of Module Security Groups are displayed for copying when the source & destination DSNs are selected.
- Module Security Groups can be overwritten if the group’s name exists on the target DSN.
- Users can also be copied from one DSN to the other for the selected Modules Security Groups.
Once the process is completed, the Module Groups Report is generated which shows the names of copied groups, permissions and users.