How Can We Help?
Payment Parameter
Payment Parameter Screen
The Payment Parameter screen offers an amalgamation of setups pertaining to Financials and Funds associated with DXC Assure Claims.
Since the Legacy Utilities zone has been deprecated effective release version 23.1 and will sunset completely in the future release, the Payment Parameter can be accessed via the Configuration Manager zone. As all administrative settings and controls previously available in the Utilities zone are now available in the Configuration Manager zone, DXC recommends using the latter for all administrative purposes.
Prerequisite SMS (Security Management System) Settings
To get the Payment Parameter Setup option displayed on the Configuration Manager zone, a few one-time setting needs to be done. For this, go to Security zone > SMS > Module Access Permission > expand the Configuration Manager node > Payment Paramete Setup. The node includes two checkboxes, View and Update. Select the View checkbox to get the option displayed under the System Parameters Setup section on the menu page. Based on the SMS permission, the module will be displayed on the menu screen as shown below. If the checkbox, Update, is enabled, then, the Add, Delete and Save button will be displayed, as and when required, on the respective screen.
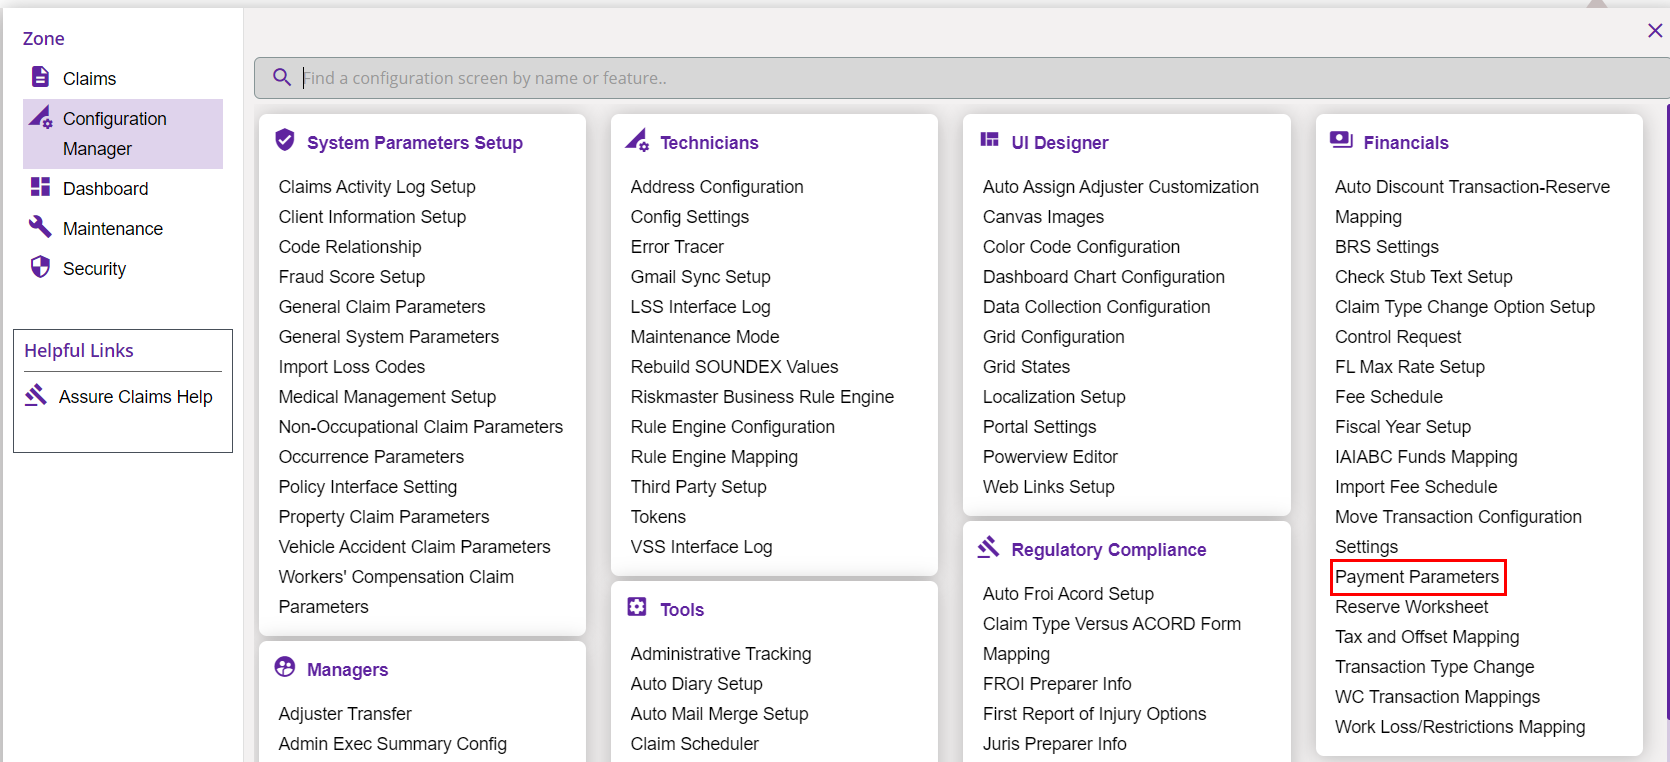
Select the link highlighted in the above screenshot to get redirected to the respective screen. The various settings of the window are discussed in detail below.
Select the Payment Parameter Setup setting tab
The Payment Parameter Setup window includes four different sections/tabs. The various setting tabs are listed in the dropdown. In order to know more about any particular tab, select the same from the dropdown list to get redirected to the corresponding section.
1.0 Check
1.1 Check Output
The various controls and settings in this section are discussed below.
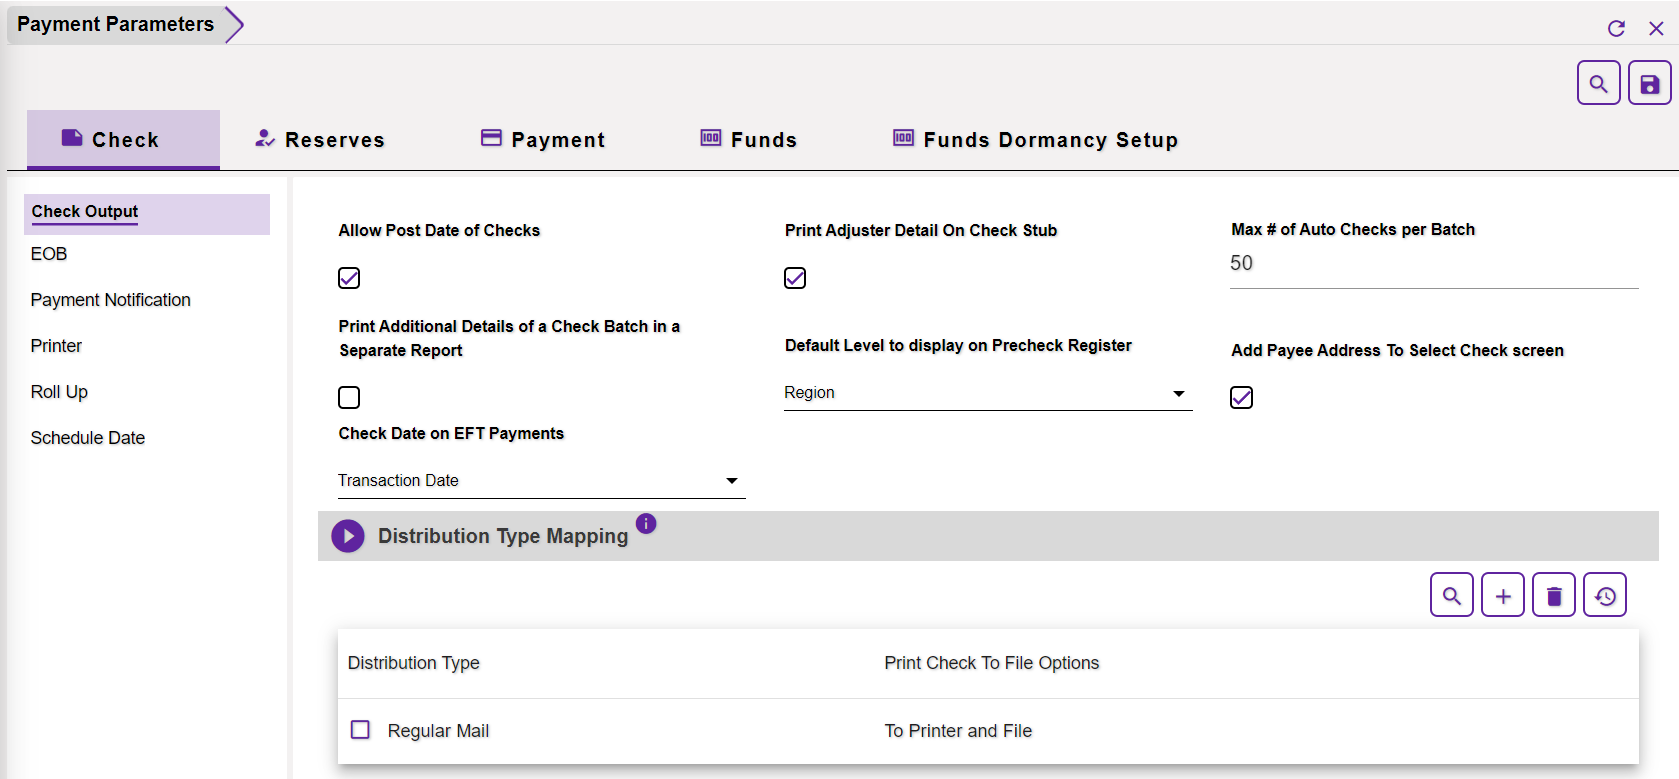
Allow Post Date of Checks: If this setting is enabled, then, the user will be allowed to create New Payment with a future date. In case, this checkbox is unchecked, then, an error will be thrown if a payment with future date is made.
Print Adjuster Detail On Check Stub: If this setting is selected, then, the Adjuster details will be printed on the Check Stub.
Max # of Auto Checks per Batch: The users will be able to create Auto Check per Batch field as per the limit set in this field.
Print Additional Details of a Check Batch in a Separate Report: If selected, the additional details of the check batch will be printed in a separate report.
Default Level to display on Precheck Register: Select the Organizational Hierarchy Level in this field. The level selected here will be displayed as the default level in the Pre-check Register window.
Add Payee Address To Select Check screen: If selected, the address of the Payee will be displayed on the selected Check screen.
Check Date on EFT Payments: If this checkbox is enabled, the Check Date will be displayed on the EFT (Electronic Funds Transfer) payments.
1.1.1 Distribution Type Mapping
The Distribution Type Mapping section is displayed followed to the fields mentioned above. The section features the existing maps. To remove an existing Distribution Type map, select the corresponding checkbox followed by the Delete ![]() button from the toolbar.
button from the toolbar.
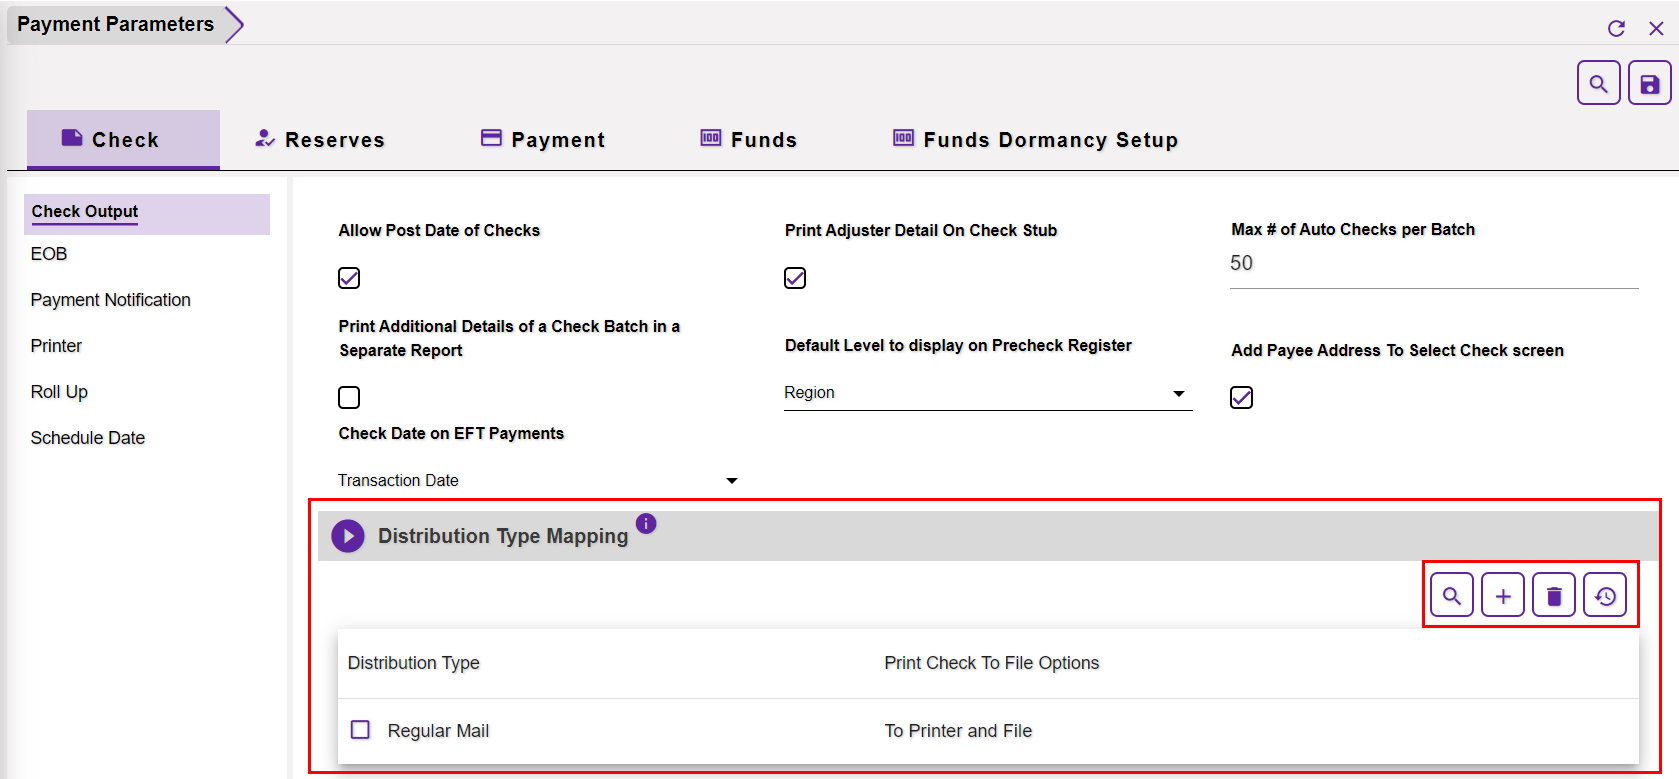
To add a new one, select the Add ![]() button from the toolbar at the top right corner of the section. This will expand a new section. Select the relevant Distribution Type and Print Check To File Options from the respective dropdown fields.
button from the toolbar at the top right corner of the section. This will expand a new section. Select the relevant Distribution Type and Print Check To File Options from the respective dropdown fields.
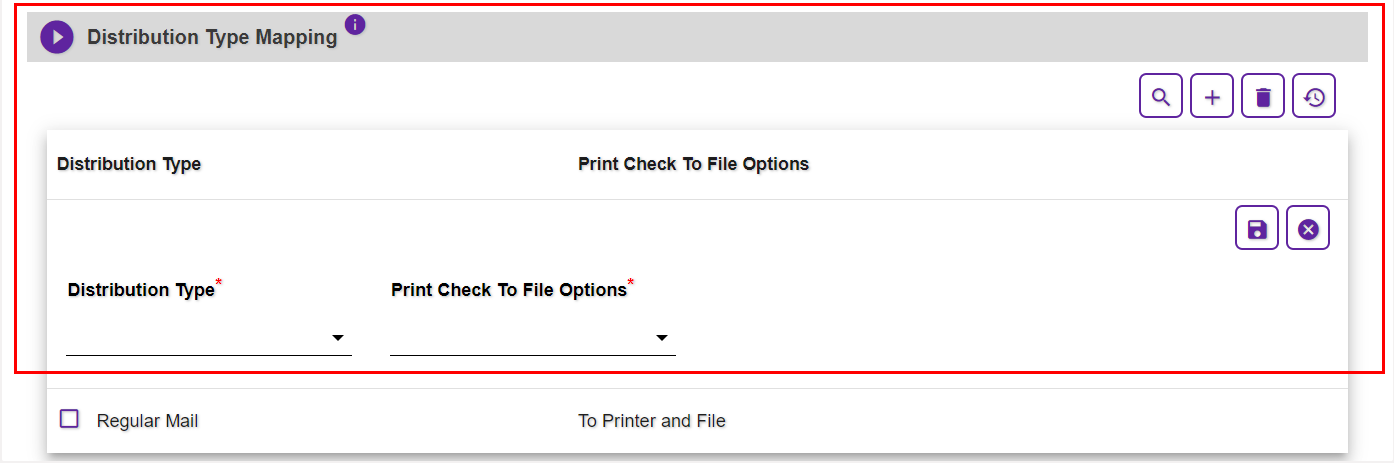
Select the Refresh ![]() button to view the changes made.
button to view the changes made.
1.2 EOB
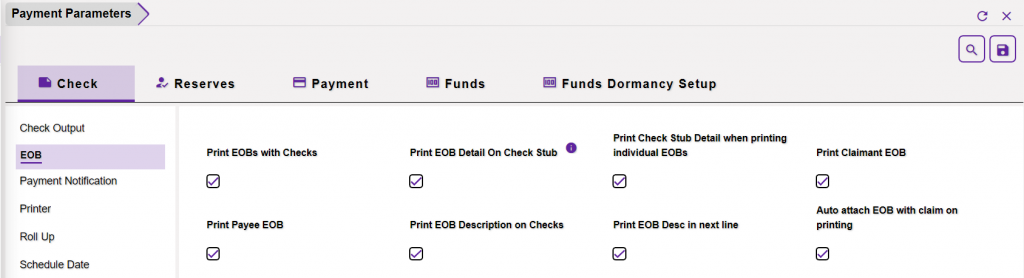
Print EOBs With Checks: Once this setting is selected, printing EOBs (Explanation of Benefits) with check will be enabled on the New BRS Split screen. Click on the Print Check button to expand it with Check and EOB hyperlinks. Clicking on the EOB option will print the same with the Checks.
Print EOB Detail On Check Stub: If this field is selected, then, the EOB details will be printed on the Check Stub.
Please Note: If this checkbox is selected, then, the setting labelled, Roll Up Checks to the same payee, in the Roll Up section will be disabled.
Print Check Stub Detail when printing individual EOBs: Select the checkbox to print the stub details on the printed EOBs.
Print Claimant EOB: If this field is selected, then, Claimant EOB details will get printed on the on Financial Reserve screen.
Print Payee EOB: Similarly, If this field is selected, then, Payee EOB details will get printed on the on Financial Reserve screen.
Print EOB Description on Checks: If this option is selected, then, the description of EOB will be printed on the checks.
Print EOB Desc in next line: If this option is selected, then, the EOB description will be printed in the next line.
Auto attach EOB with claim on printing: If enabled, the EOB will be automatically attached to the Claim when the Claim is printed.
1.3 Payment Notification
The Payment Notification section of the Check tab lists out all the Payments pertaining to the various Line of Business.
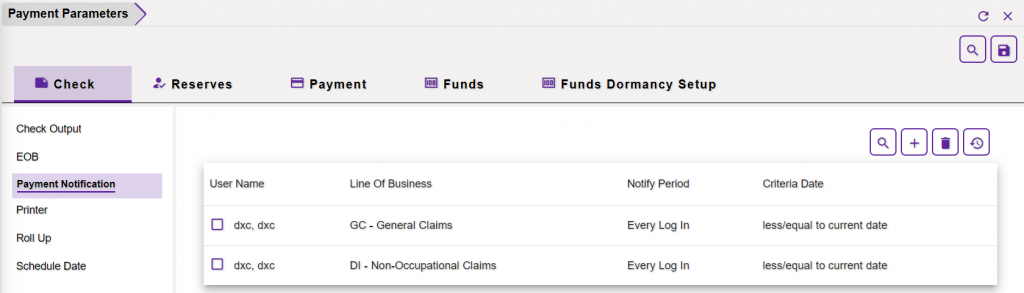
To add a new Payment, select the Add ![]() button from the toolbar at the top right corner of the section. This will expand a new section as shown below.
button from the toolbar at the top right corner of the section. This will expand a new section as shown below.
Fill in relevant data in the fields as mentioned below:
- Line of Business: Select the Line of Business from the dropdown list for which the payment notification is to be created.
- User To Notify: Select the users that are to be notified with the created notification.
- Notify Period: Select the period of time within which the notification is to be sent to users.
- Criteria Date: Select the date criteria that are to be considered before sending the notifications.
The created payment notifications will be displayed in the tabular form as shown below:

On a similar line, to remove an existing payment, select the adjacent checkbox followed by the Delete ![]() button.
button.
1.4 Printer
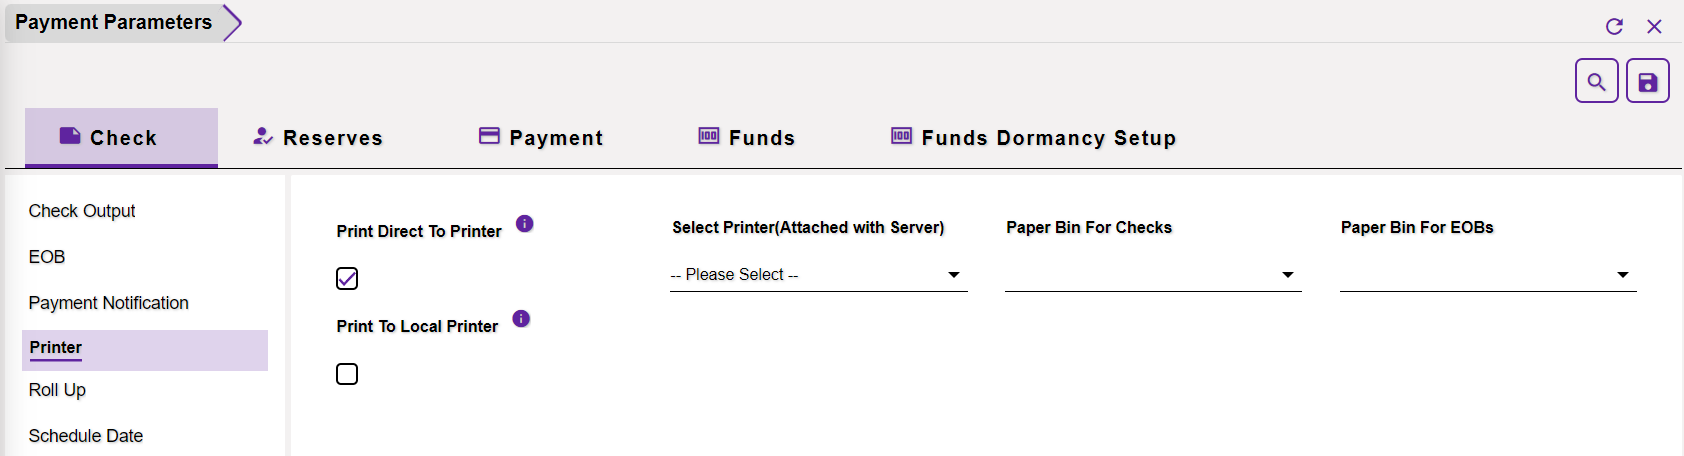
Print Direct To Printer: Enable the setting and the auto-mail merge will directly get printed via the printer. Once this checkbox is selected, the following fields will appear in editable mode. Otherwise, the following fields will appear as read-only.
Select Printers (Attached with Server): The various printers that can be attached to the server are listed in the dropdown list of this field. Select the relevant printer as per your business requirement and the same will be linked to the server. If this field is selected, the setting labeled, Print To Local Printer will get disabled and vice-versa.
Paper Bin For Checks: This field will be enabled once, the Print Direct To Printer field is selected. It will be disabled by default. Select the required paper bin for the checks from the dropdown list.
Paper Bin For EOBs: Additionally, this field will remain disabled until the checkbox of the Print Direct To Printer field is selected. Once it is enabled, select the required paper bin for the EOBs from the dropdown list.
Print To Local Printer: Enable this option and the checks will be directly local printer.
1.5 Roll Up
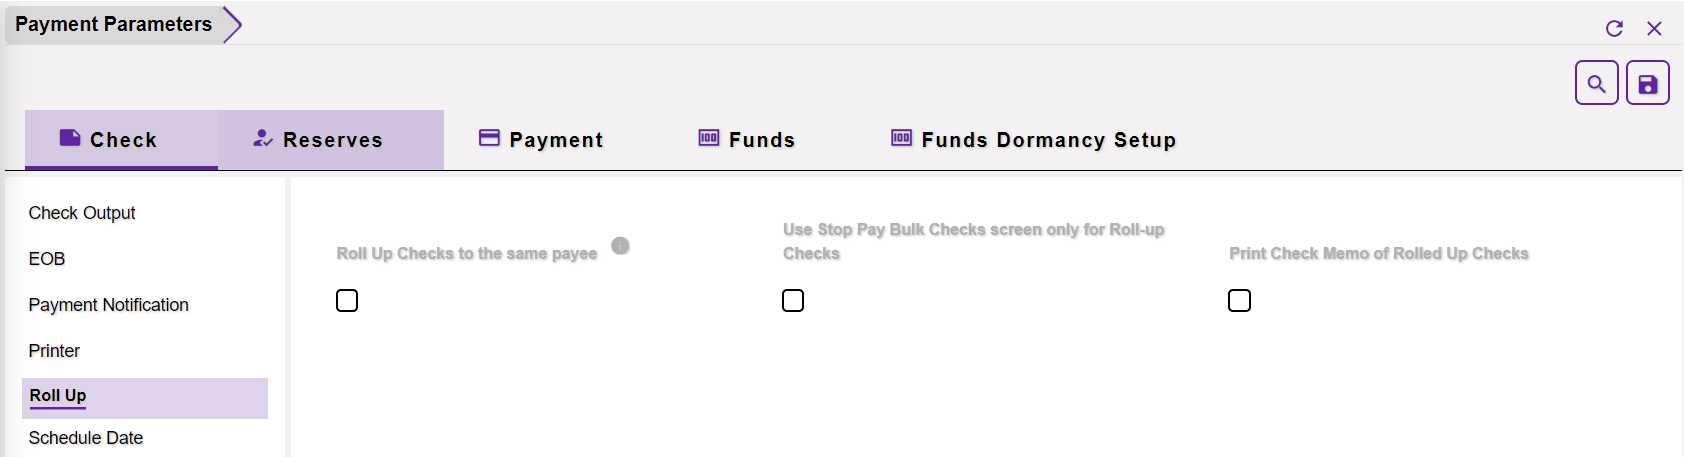
Roll Up Checks to the same payee: If the checkbox of this setting is selected, then, Assure Claims will add up all checks to the same payee and print one check for the total amount made out to the single payee. If one of the checks is voided from the rolled-up checks, then, the application voids all the checks in the roll-up.
Please Note: This setting is enabled only if the field labeled, Print EOB Detail On Check Stub, is disabled from the EOB section of the window. Once Roll Up Checks to the same payee setting is enabled, the following fields will become editable.
Use Stop Pay Bulk Checks screen only for Roll-up Checks: If selected, Stop Pay Bulk Checks will be applicable for the Roll-up Checks only.
Print Check Memo of Rolled Up Checks: If this field is selected, then, the Check Memo of Rolled Up checks will be printed.
1.6 Schedule Date
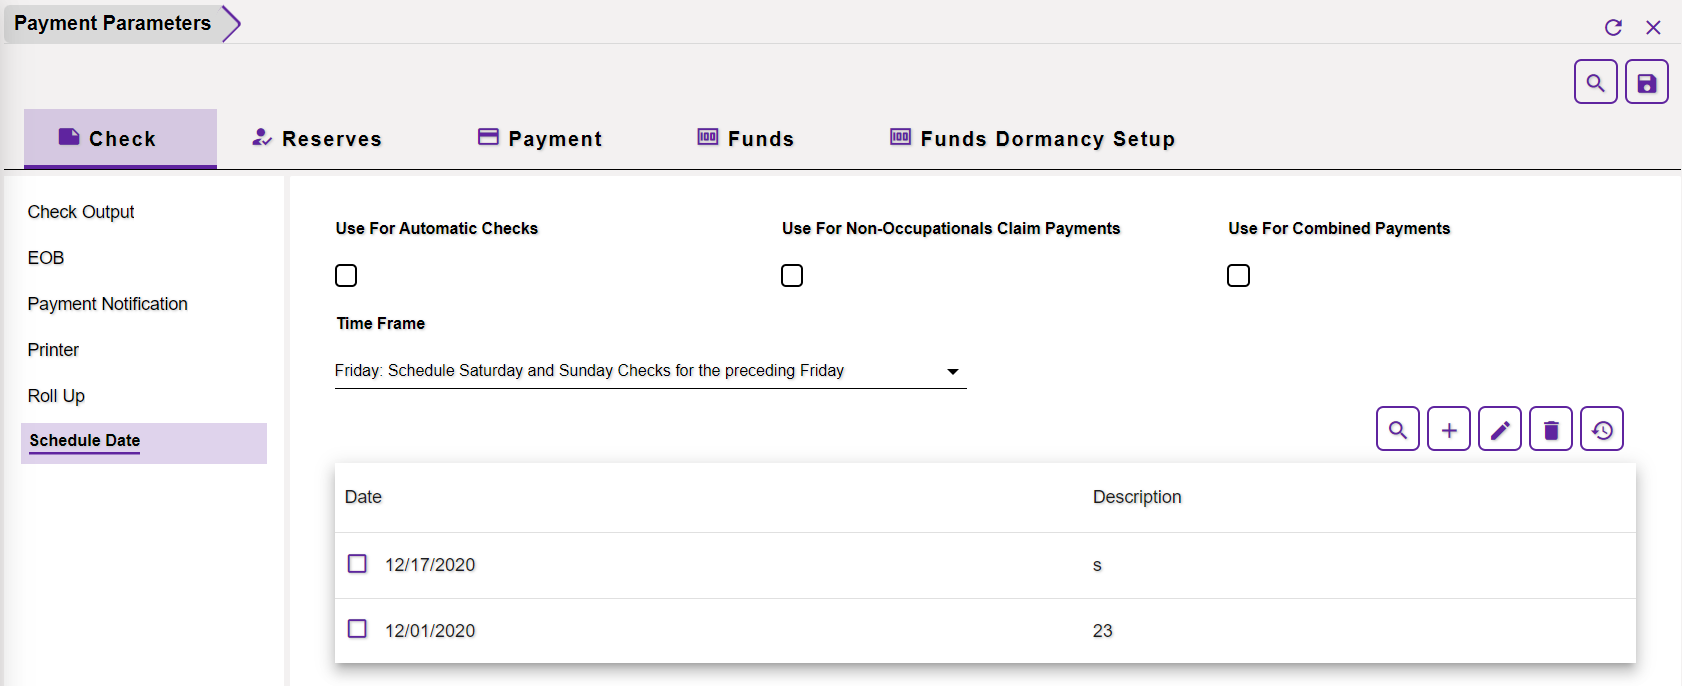
Use For Automatic Checks: Select the checkbox to add the Schedule Dates and Holidays while calculating print dates.
Note: If the Use For Automatic Checks checkbox is selected, then, another check box is added on the Schedule Automatic Check Processing: Scheduled Checks tab and is selected by default to give user the permission to use the Schedule Dates and Holidays while calculating print dates or not. Also, allow the user to have the option of having the current batch omitted from having the print date adjusted due to Schedule Dates, by not selecting this check box.
Use For Non-Occupational Claim Payments: Select the check box to add the Schedule Dates and Holidays while calculating print dates.
Note: If you select the Use For Non-Occupationals Claim Payments check box then another check box is added on the Non-Occ Payments window and is selected by default to give user the permission whether to use the Schedule Dates and Holidays while calculating print dates or not. Also, allow the user to have the option of having the current batch omitted from having the print date adjusted due to Schedule Dates, by not selecting this check box.
Use For Combined Payments: Select the check box to add the Schedule Dates and Holidays while calculating print dates.
Note: If you select the Use For Combined Payments check box then another check box is added on the Combined Payments form and selected by default to give user the permission whether to use the Schedule Dates and Holidays while calculating print dates or not. Also allow the user to have the option of having the current batch omitted from having the print date adjusted due to Schedule Dates, by not selecting this check box.
Time Frame: Select anyone from the option mentioned below to print the payment on the selected day if the print date falls on the weekend. The following options are displayed in the dropdown list.
- Friday: Schedule Saturday and Sunday Checks for the preceding Friday
- Monday: Schedule Saturday and Sunday Checks for the following Monday
- Saturday: Schedule Sunday Checks for the preceding Saturday
- Thursday: Schedule Saturday and Sunday Checks for the preceding Thursday
For Example: In case, the checkbox, Use for Non-occupational Claim, is selected and the Time Frame option is selected as Friday: Schedule Saturday and Sunday checks for the preceding Friday, then, in that case, if the print date falls on Saturday then it should print on preceding Friday only.
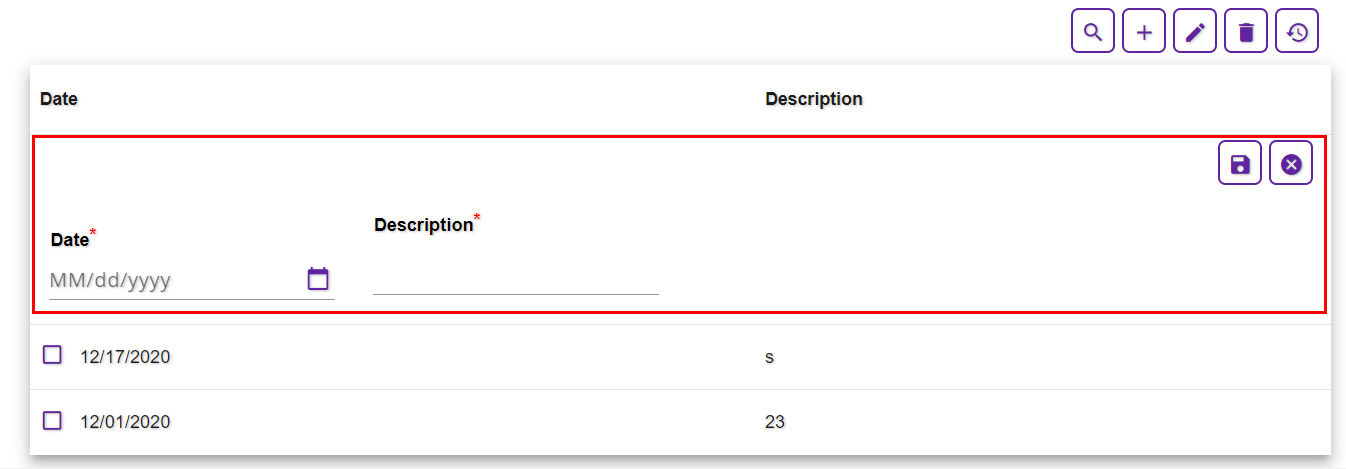
The Date and corresponding Description of the Time Frame can be viewed in the following section. In order to add a new one, select Add ![]() button from the toolbar. This will expand a new section as shown below. Select the Date and Descriptions in the respective fields.
button from the toolbar. This will expand a new section as shown below. Select the Date and Descriptions in the respective fields.
2.0 Reserves
2.1 More Configurations

Prevent Back-Dating of Reserves: If the option is selected, then, the Reserves with back-date will not be allowed to be created.
Prevent Modifying Reserves to Zero: If this setting is selected, a Claim Reserve cannot be changed to zero.
Prevent Modifying Reserves less than Paid: If this setting is selected, then, editing a Claim Reserve and changing its amount to less than the Paid amount will not be allowed.
Show Orphaned Reserve Records (i.e. reserve types not defined in Line of Business Setup): If your organization defined Reserve Types in the past that it no longer uses, select this check box to display on the window which opens when you select the Financials tab, the reserve types you do not use anymore.
Allow Summary For Booked Reserve Only: If enabled, the summary will only be displayed for the booked reserves.
Use FNOL Reserve: If this setting is enabled, then, Add FNOL Reserve option will be displayed on the Claim screen. The First Notice of Loss (FONL) is the initial report made to an insurance provider following a loss, theft, or damage of an insured asset. FNOL is normally the first step in the formal claims process lifecycle and is aimed at reducing the turnaround time and expenses.
2.2 Supervisory Approval
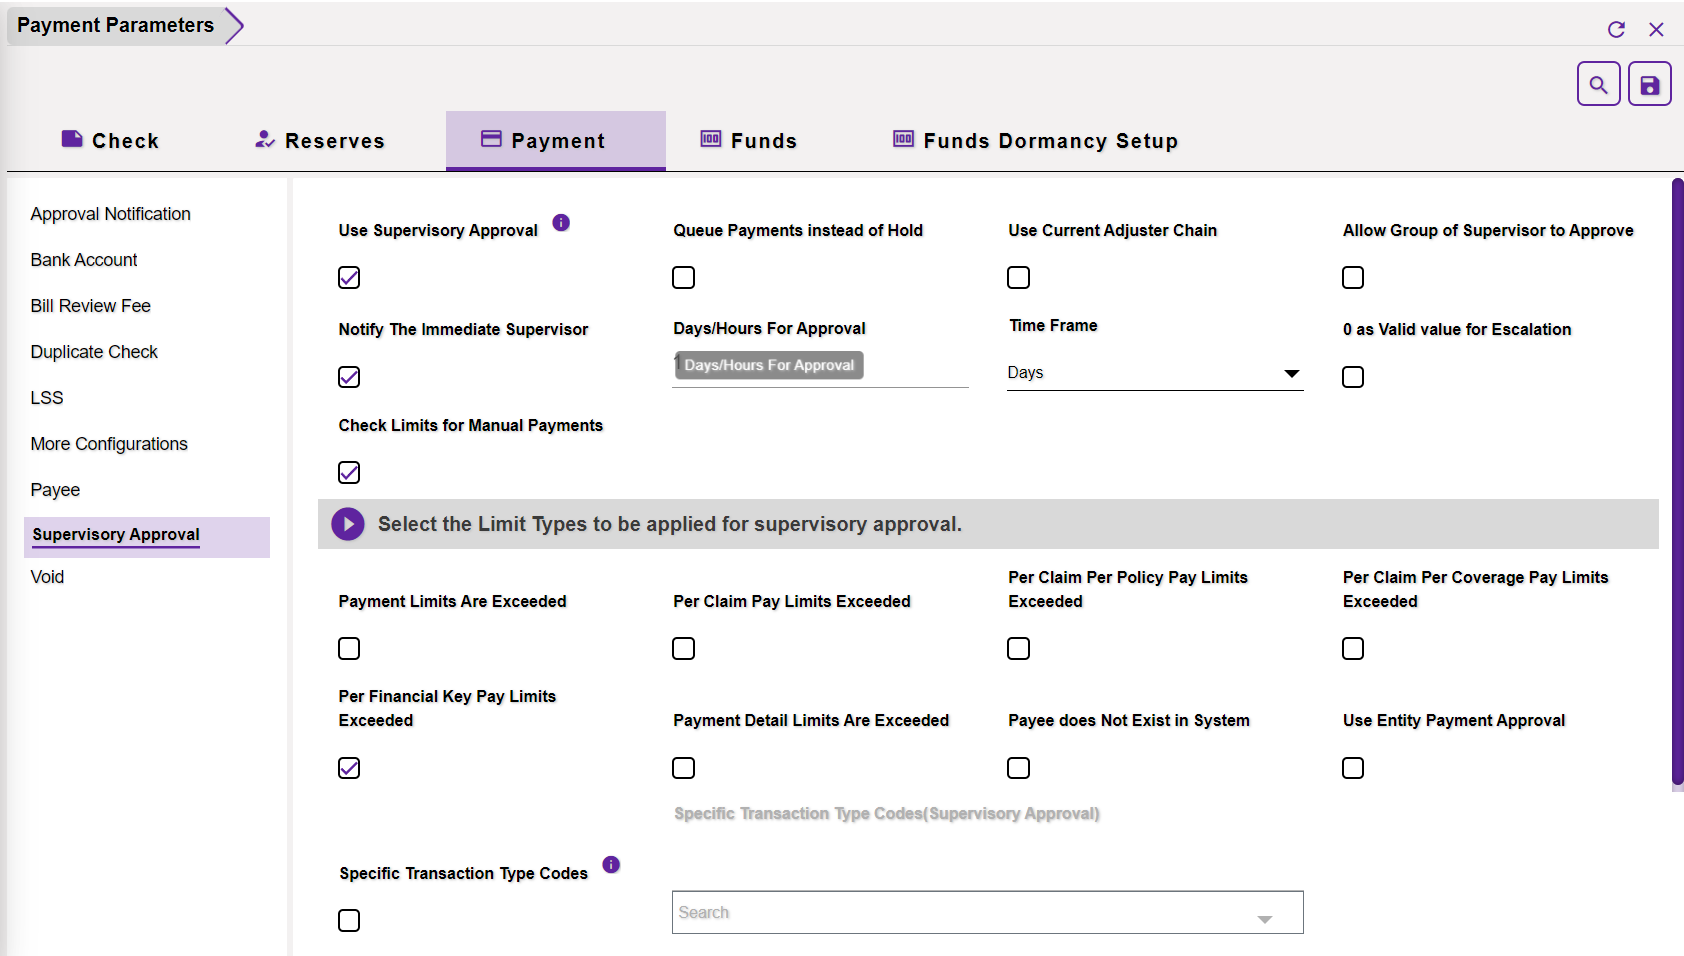
The Supervisory Approval section of the screen enables Reserve & Payment approval to be carried out. Moreover, both functionalities can be accessed individually. This section of the Payment Parameter screen offers a number of criteria for the same.
The Fund will go on Hold as per the criteria selected. Select the criteria by checking the checkbox to determine if a hold should be placed on a funds transaction.
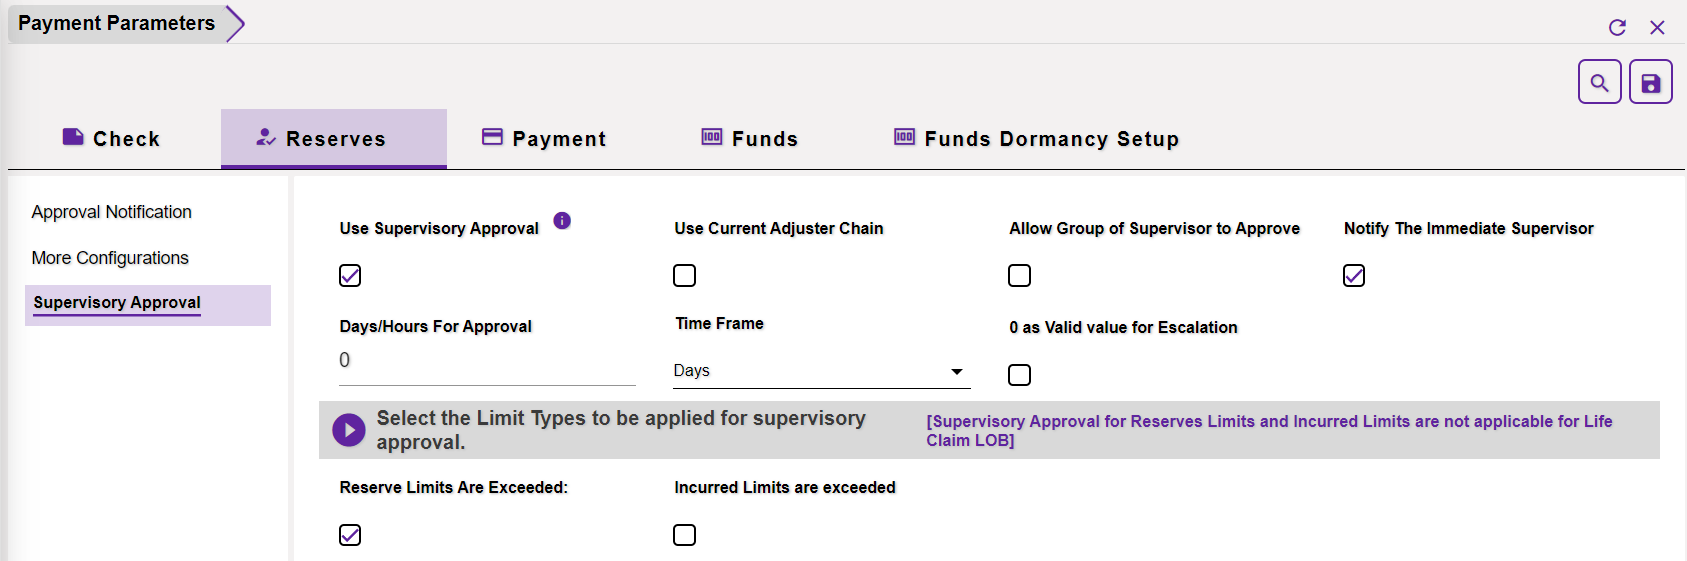
Use Supervisory Approval: When this setting is selected along with the Reserve setting, the Reserve which exceeds the limit will go on hold and will be escalated to the Supervisor for approval. Once this field is enabled, the field Allow the group of supervisor to approve will be enabled.
Use Current Adjuster Chain: If this checkbox is selected, then, the Reserve that goes on Hold will follow the Adjuster’s Supervisory Chain instead of its Manager’s Supervisory Chain.
Allow Group of Supervisor to Approve: Select the field to enable the group of supervisors to approve payment.
Notify The Immediate Supervisor: When this setting is checked, then, only the immediate supervisor is notified regarding a Reserve going on Hold.
Days/Hours For Approval: Enter the time period for approval, with respect to the time frame, that is, No. of Days/Hours, after which the Reserve will be escalated to the Manager.
Time Frame: Select the time frame from the dropdown list that is to be considered before escalating the Reserve to the Manager.
Consider 0 as Valid value for Escalation: When this setting is checked, the Reserves that are on Hold will be visible in the list of the entire supervisory chain. The Reserves will be visible to all the managers at all levels of the user.
2.2.1 Select the Limit types to be applied for supervisory approval.
Reserve Limit Are Exceeded: If this is checked, then, a Fund exceeding the Reserve limit will be put on Hold and will be processed only after the Supervisory Approval.
Incurred Limits are exceeded: When the setting is enabled, the user will not be able to incur on a Claim more than the amount fixed.
2.3 Supervisory Approval Notification
Disable Email To Supervisor: If this setting is enabled, then, no email will be sent to the manager when a Reserve goes on Hold.
Disable Diary To Supervisor: If this setting is enabled, then, no diary will be sent to the manager when a Reserve goes on Hold.
3.0 Payment
3.1 Approval Notification
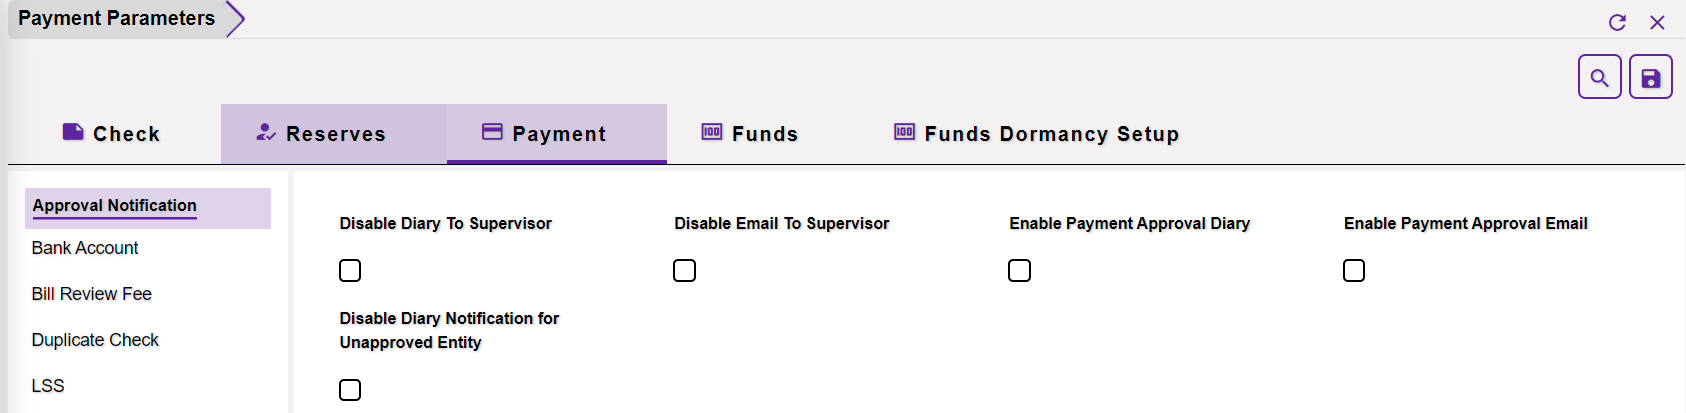
Disable Diary To Supervisor: If this setting is enabled, then, no diary will be sent to the manager when a Reserve goes on Hold.
Disable Email To Supervisor: If this setting is enabled, then, no email will be sent to the manager when a Reserve goes on Hold.
Enable Payment Approval Diary: If enabled, a Diary notification for Payment Approval will be sent to the Supervisor.
Enable Payment Approval Email: If enabled, the Supervisor will receive an Email notification for Payment Approval.
Disable Diary Notification for Unapproved Entity: If this setting is enabled, then, the Diary notification will be disabled for Unapproved Entities. That is, the Supervisors will not receive any Diary notification for the entities that were disapproved.
3.2 Bank Account
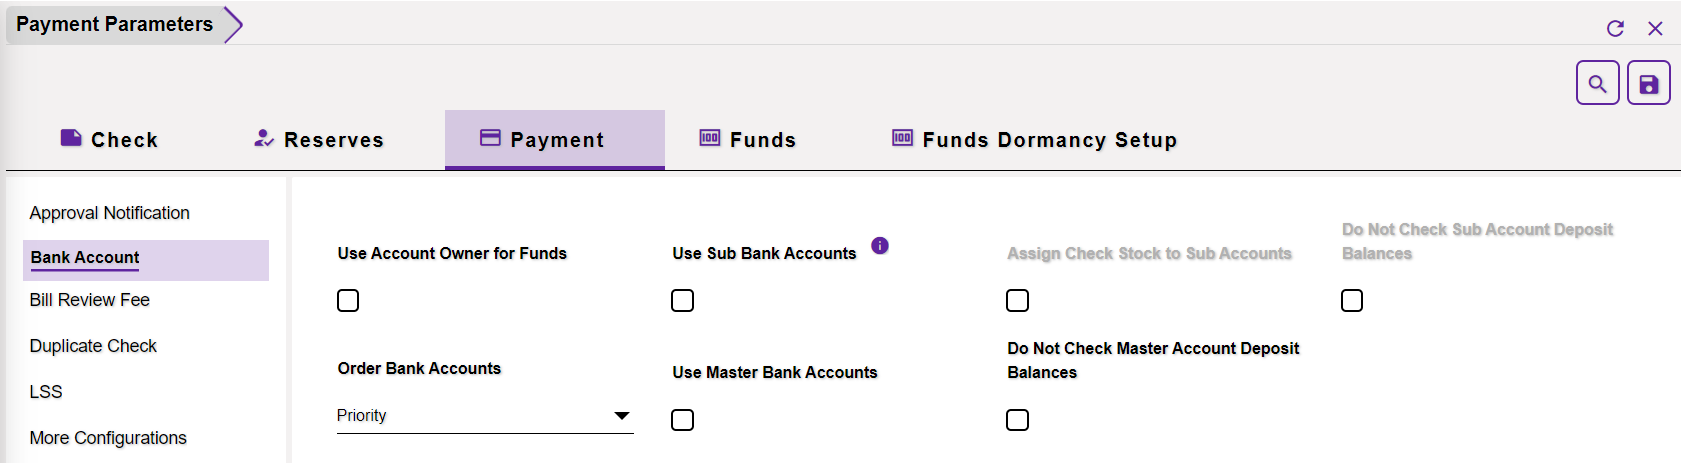
Use Account Owner for Funds: If this checkbox is selected, then, the created Bank Account will be available while creating a Transaction in the Claims zone.
Use Sub Bank Accounts: If this option is selected, then, the Sub Bank Account child node will be available on the right pane, on the Checks window of the Claims zone, after a Bank Account is created and saved.
Assign Check Stock to Sub Accounts: If this option is selected, then, the Check Stocks dropdown will be displayed on the Sub Bank Account screen.
Do Not Check Sub Account Deposit Balances: If a new Transaction is created with an existing sub-bank and this setting is enabled, then, the created transaction will get printed without getting any error message.
Order Bank Accounts: Select a relevant Order Bank Account from the dropdown list. The various options available are discussed below.
- None (No Order): Select this option if you want bank account lists to be displayed in the order in which they were extracted from the database.
- Priority: Select this option if you want bank account lists to be displayed in order of their assigned priority.
- Account Name (Default): Select this option if you want bank account lists to be displayed in alphabetical order based on the account name.
- Account Number: Select this option if you want bank account lists to be displayed in order of account numbers.
Use Master Bank Accounts: If selected, the Master Bank Account dropdown field will be displayed on the Bank Account screen.
Do Not Check Master Account Deposit Balances: If enabled, the user will be allowed to print Insufficient Funds Check if the Payment made is higher than the Deposit Balance. On the contrary, if the setting is OFF, then, the user will not be allowed to print Insufficient Funds Check and an Insufficient Check details will be displayed in a PDF format when the Payment Amount is higher than the Deposit Balance. For instance, if the Deposit Balance for a Bank is $10 and the Payment created is $20, then, on printing the check, a PDF file with the insufficient fund information will be generated.
Note:
- The Do Not Check Master Account Deposit Balances setting checkbox will be checked, by default, in a fresh database.
- If the Use Sub Bank Account setting is enabled, on the Utilities/Configuration Manager screen, then, this Do Not Check Master Account Deposit Balances setting will automatically get unchecked as well as disabled.
3.3 Bill Review Fee
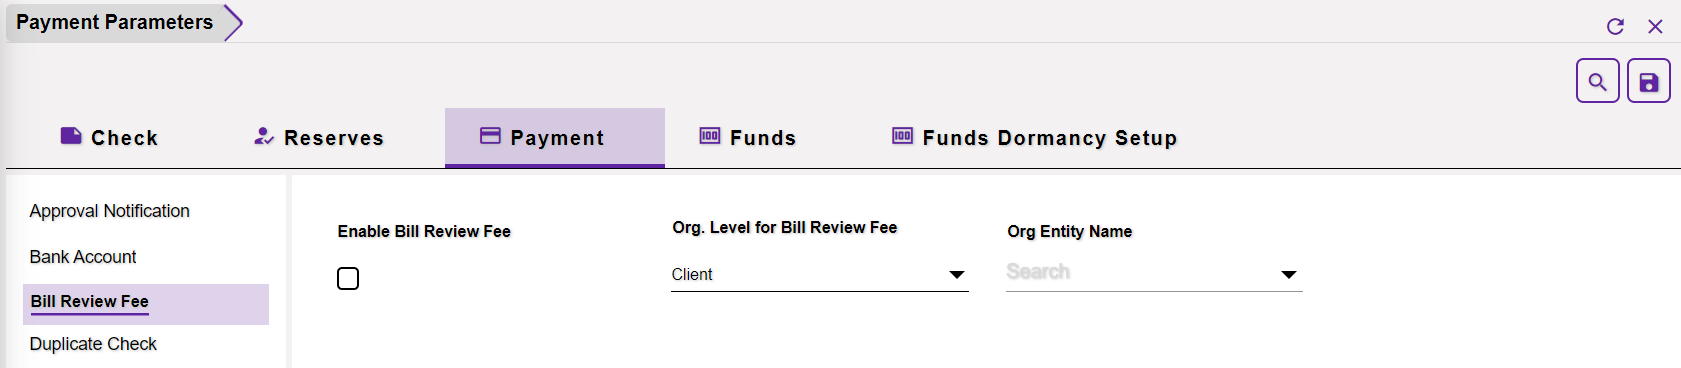
Enable Bill Review Fee: Select the check box to activate the bill review fee feature and create queued medical/hospital payments.
Org. Level for Bill Review Fee: Select the required level for which you want to use the bill review fee and set up the medical/hospital fee amount for creating queued payments.
Note: The Bill Review fields: Hospital Bill Review Amount per line item, Min # of lines, Medical Bill Review Amount per line item, Min # of lines display on the Org. Hierarchy level window, for the org level selected in this field.
Example: If you select XYZ entity, then the claim for which queued payment is to be created should have a department belonging to client XYZ. The payment will only be created for the selected Bill Review fee when the selected Org Level and Org Entity Name are associated with the transaction.
Org Entity Name: Enter the name of the entity or select the Ellipses button to select the entity for which you want to use the bill review fee feature.
3.4 Duplicate Check
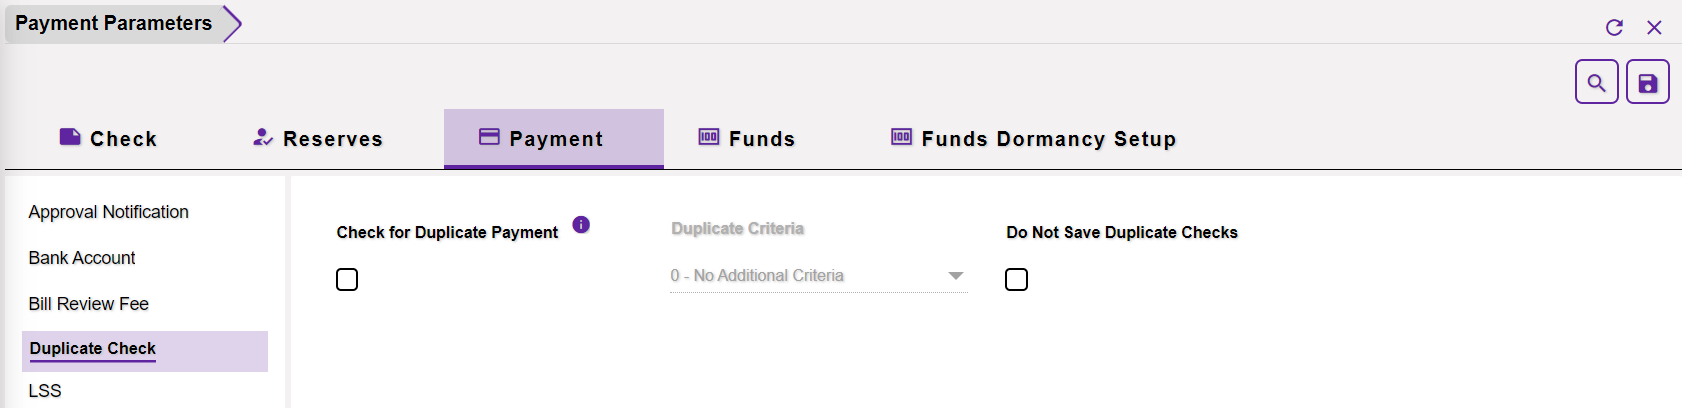
Check for Duplicate Payment: If this setting is enabled, then, the users will be able to create checks for duplicate payments, on the Checks window of the Claims zone. The next field, labeled, Duplicate Criteria, will become editable as soon as this checkbox is selected. The duplicate payments can be checked based on the criteria selected in the following field.
Duplicate Criteria: This field is read-only, by default. It becomes editable when Check for Duplicate Payment is enabled. Select the duplicate criteria from the dropdown list that is to be considered before checking a duplicate payment.
Do Not Save Duplicate Checks: If selected, the user will not be able to save duplicate checks.
3.5 LSS
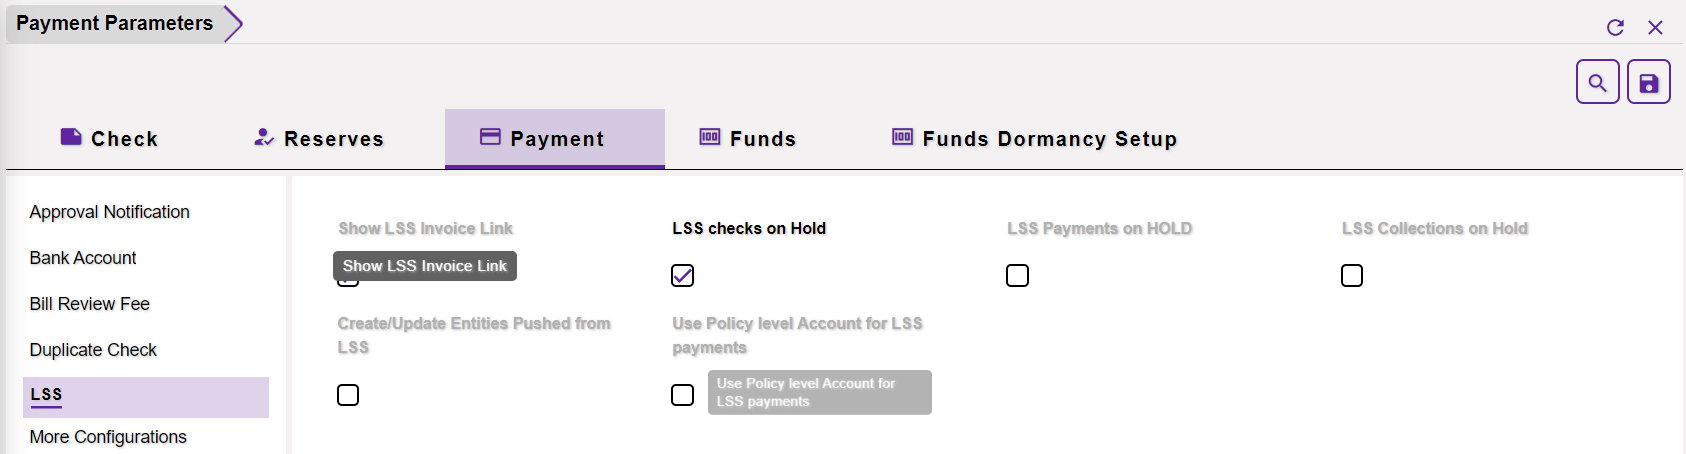
Show LSS Invoice Link: If the checkbox is selected, then, the LSS Invoice will be displayed as a clickable hyperlink on the Funds window > Transaction tab and on the Approve Transactions window.
LSS checks on Hold: If this setting is enabled, then, the LSS checks will be successfully pushed to Assure Claims and the same payments will be displayed on the Transaction History window of the Claim screen with their status marked as On Hold.
LSS Payments on HOLD: If this setting is enabled, then, the LSS payments will be successfully pushed to Assure Claims and the same payments will be displayed on the Transaction History window of the Claim screen with their status marked as On Hold.
LSS Collections on Hold: If enabled, a collection will not be accepted from LSS if Collection Amount is greater than the Total Amount Paid for the Claim.
Create/Update Entities Pushed from LSS: If this setting is enabled, the Entities pushed from LSS can be created or updated.
Use Policy level Account for LSS Payment: If enabled, the user will be allowed to use Policy Level Accounts for LSS Payments.
3.6 More Configurations
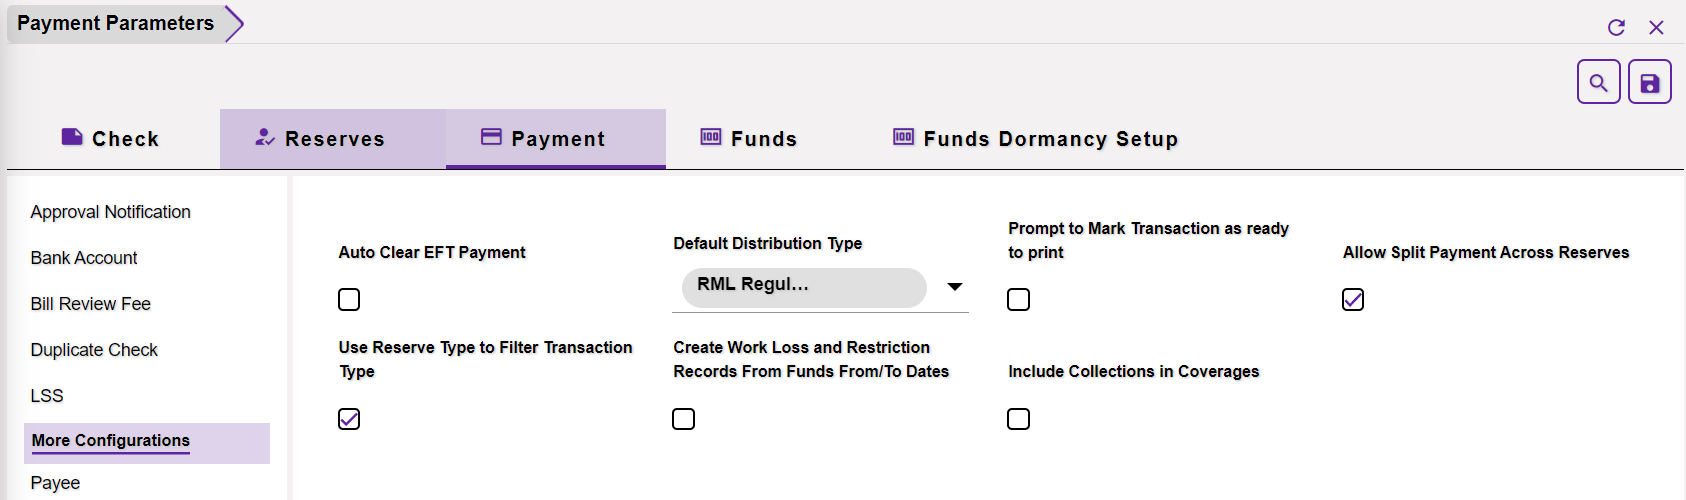
Auto Clear EFT Payment: If this setting is enabled, then, EFT payments will get auto-cleared when they are printed.
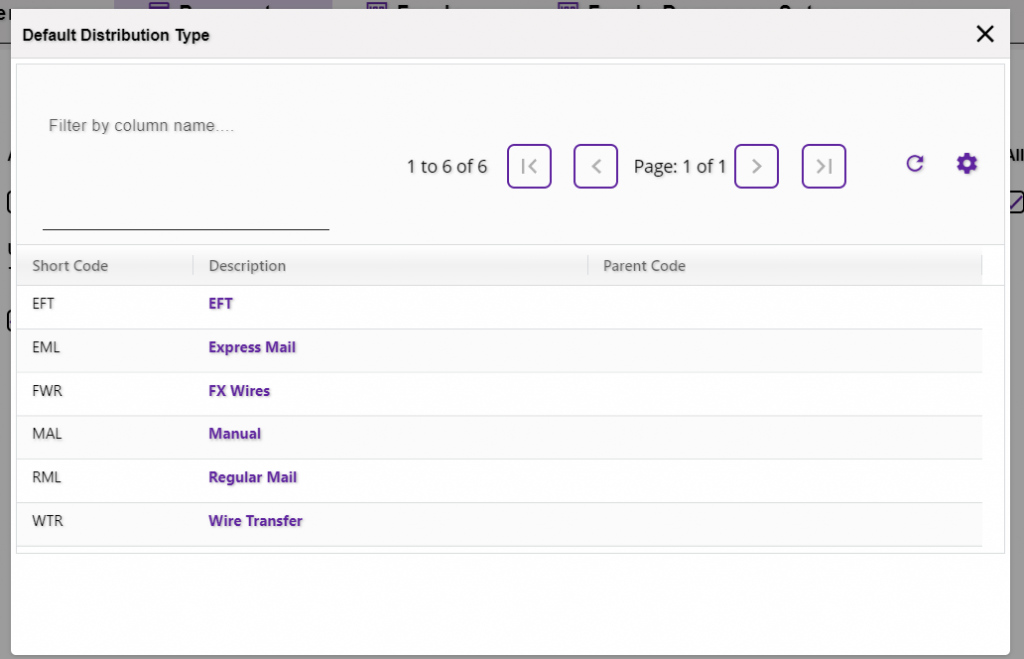
Default Distribution Type: The field includes the various available Distribution Types. To view the same, select the dropdown icon to pop open the lookup table. The selected distribution type will become the default value of the Distribution Type on the Automatic Checks window of the Funds screen.
Prompt to Mark Transaction as ready to print: When this setting is enabled followed by the Allow Ready to Print setting from the SMS screen, then, a Ready to Print popup message will be displayed every time a Transaction is saved.
Allow Split Payment Across Reserves: If this option is enabled, then, creating Split Payment will be allowed across Reserves.
Use Reserve Type to Filter Transaction Type: Select the check box and the Transaction Type codes will be auto-filtered based on the selected Reserve Type code. When you enter a transaction detail on the Funds Split detail window, the Reserve Type field becomes editable when you select this check box and you can look up the Reserve Type.
Create Work Loss and Restriction Records From Funds From/To Dates: If this option is selected, then, the Work Loss and Restrictions will be generated automatically on Workers’ Compensation Claims whenever any Transaction with the same From and To Dates are created. That is, this setting enables auto-creation of Work Loss and Restriction Records.
Include Collections in Coverage: If enabled, the user will be able to set the limits in Policy for Coverages.
3.7 Payee
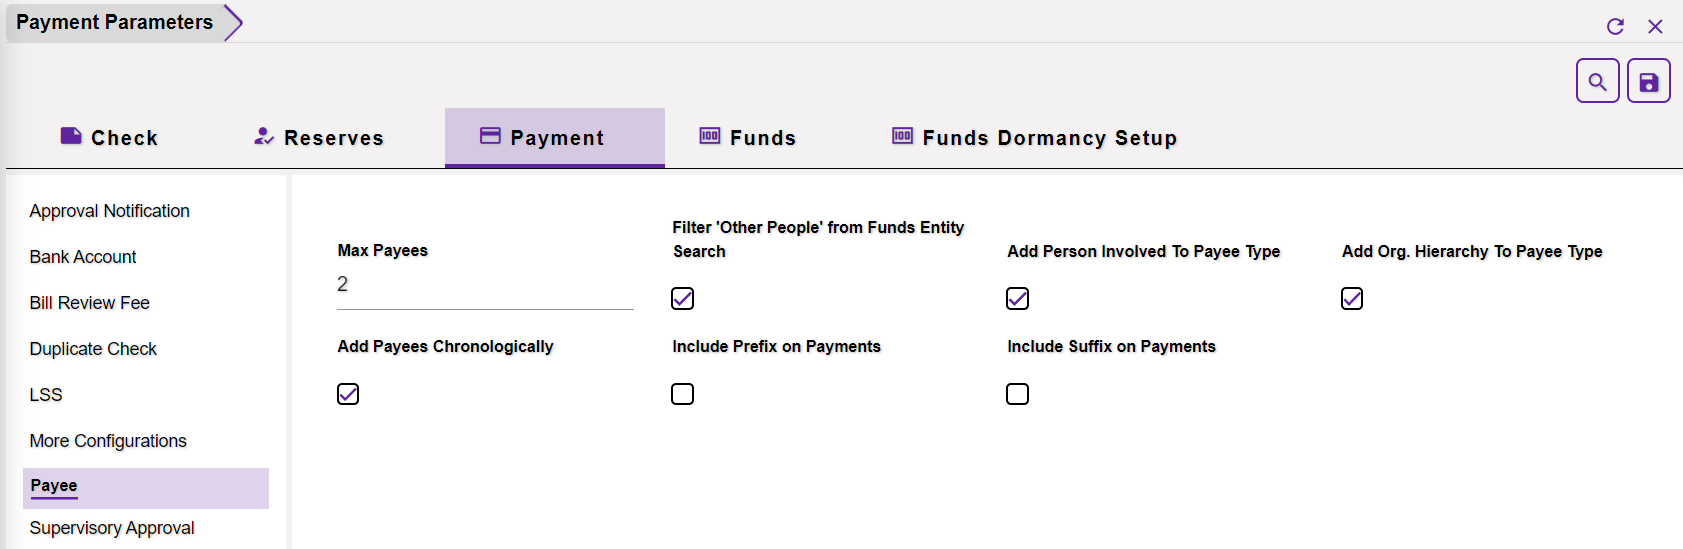
Max Payees: Enter the maximum number of Payees that can be entered in the Payee field of the Fund Management screen.
Filter ‘Other People’ from Funds Entity Search: If this checkbox is selected, then, Assure Claims will not include entities of the type “Other People” when an entity in Funds Management is searched.
Add Person Involved To Payee: The Payee Information section of the Transaction window of the Financials/Reserves screen features a Payee Type dropdown list. The list features the various Payee Types for the users to choose from. If this checkbox is selected, then, the Person Involved option will be listed in the Payee Type field. Thus, the Person Involved can be selected as the Payee Type.
Add Org. Hierarchy To Payee Type: If this option is selected, then, the org. Hierarchy will be included in the Payee Type.
Add Payees Chronologically: If this setting is selected, then, the Payees will be added in chronological order.
Include Prefix on Payments: If this option is selected, then, the prefix will be included on the payments.
Include Suffix on Payments: If this option is selected, then, the suffix will be included on the payments.
3.8 Supervisory Approval
Use Supervisory Approval: When this setting is selected along with the Payment setting, the Reserve which exceeds the limit will go on hold and will be escalated to the Supervisor for approval. Once this field is enabled, the field Allow the group of supervisor to approve will be enabled.
Queue Payments Instead Of Placing On Hold: If this is enabled, then, the payments will be queued instead of going on hold.
Use Current Adjuster Chain: If this checkbox is selected, then, the Payment that goes on Hold will follow the Adjuster’s Supervisory Chain instead of its Manager’s Supervisory Chain.
Allow Group of Supervisor to Approve: Select the field to enable the group of supervisors for payment approval.
Notify The Immediate Supervisor: When this setting is checked, then, only the immediate supervisor is notified regarding a Payment going on Hold.
Days/Hours For Approval: Enter the time period for approval, with respect to the time frame, that is, No. of Days/Hours, after which the Reserve will be escalated to the Manager.
Time Frame: Select the time frame from the dropdown list that is to be considered before escalating the Payment to the Manager.
Consider 0 as Valid value for Escalation: When this setting is checked, the Payments that are on Hold will be visible in the list of the entire supervisory chain. The Payments will be visible to all the managers at all the levels of the user.
3.8.1 Select the Limit types to be applied for supervisory approval.
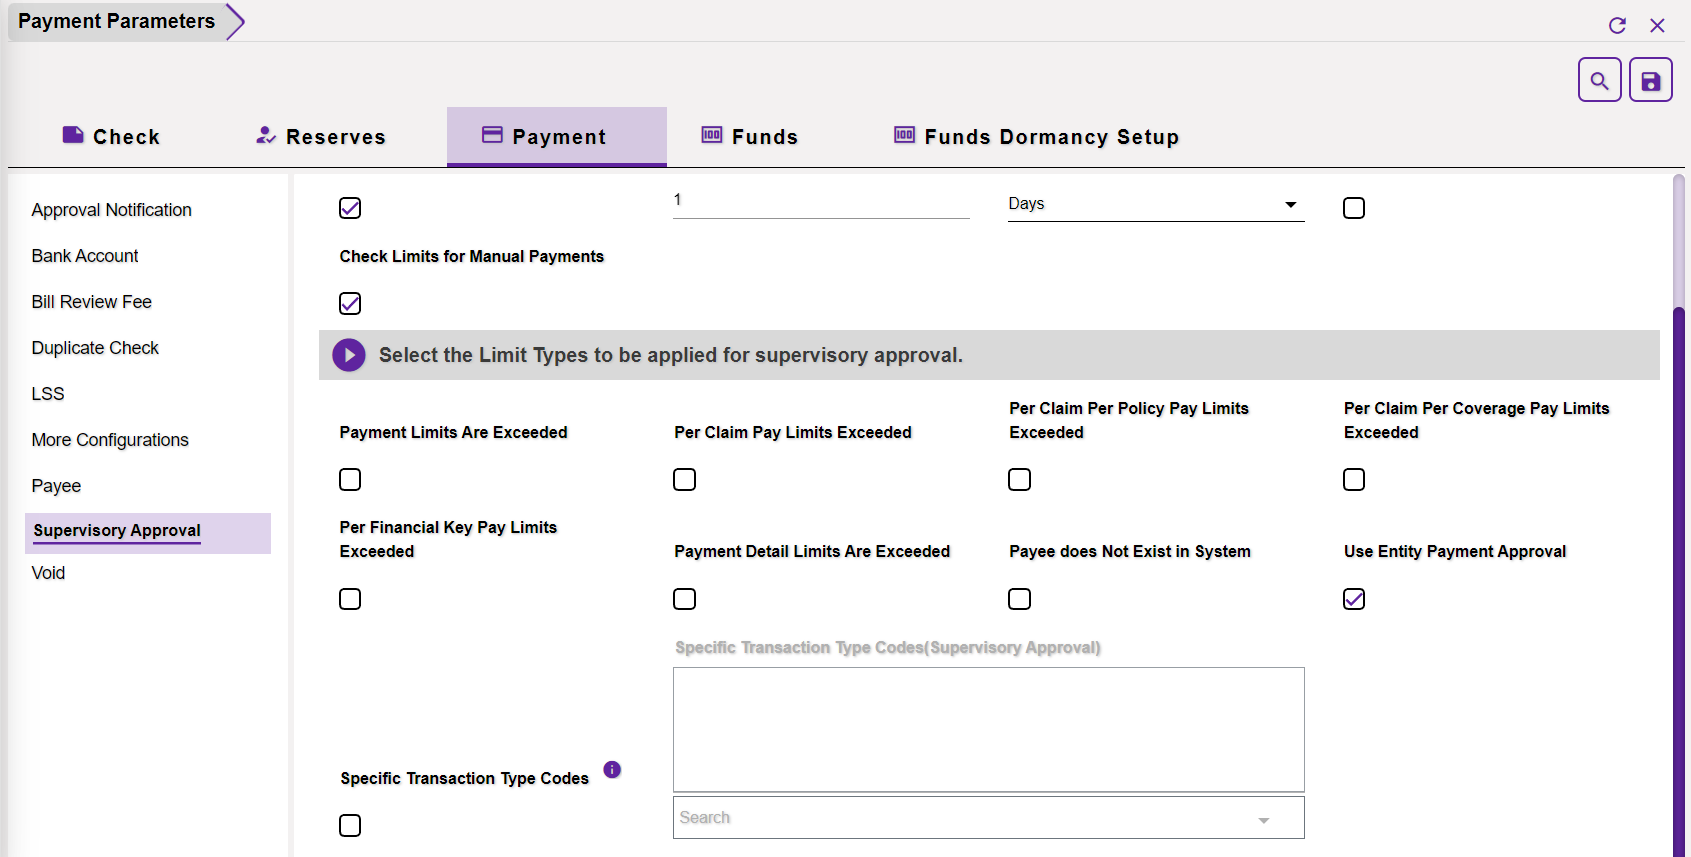
Payment Limits Are Exceeded: If this is checked, then, a Fund exceeding the payment limit will be put on Hold and will be processed only after the supervisory approval.
Per Claim Pay Limits Exceeded: Select the field and the payment that exceeds the per claim pay limit will go on hold.
Per Claim Per Policy Pay Limits Exceeded: Select the field and the payment that exceeds the per claim policy pay limit will go on hold.
Per Claim Per Coverage Pay Limits Exceeded: Select the field and the payment that exceeds the per claim pay coverage pay limit will go on hold.
Payment Detail Limits Are Exceeded: The payment with the other details exceeding the permissible limit will go on hold if this field is checked.
Payee does Not Exist in System: If this option is enabled, then, the payment will go on hold if the associated payee does not exist in the system.
Use Entity Payment Approval: If Entity Payment Approval check box is enabled, then, the Entity Payment Approval Status field will be displayed on the Organization Hierarchy window of the Maintenance zone.
Specific Transaction Type Codes: Select the checkbox if a specific transaction type is to be put on Hold. Once this field is checked, the following field, Specific Transaction Type Codes (Supervisory Approval), is enabled.
Specific Transaction Type Codes(Supervisory Approval): This field will become editable once the previous field is enabled. Select the Transaction Types from the lookup table that are to be put on Hold.
3.9 Void
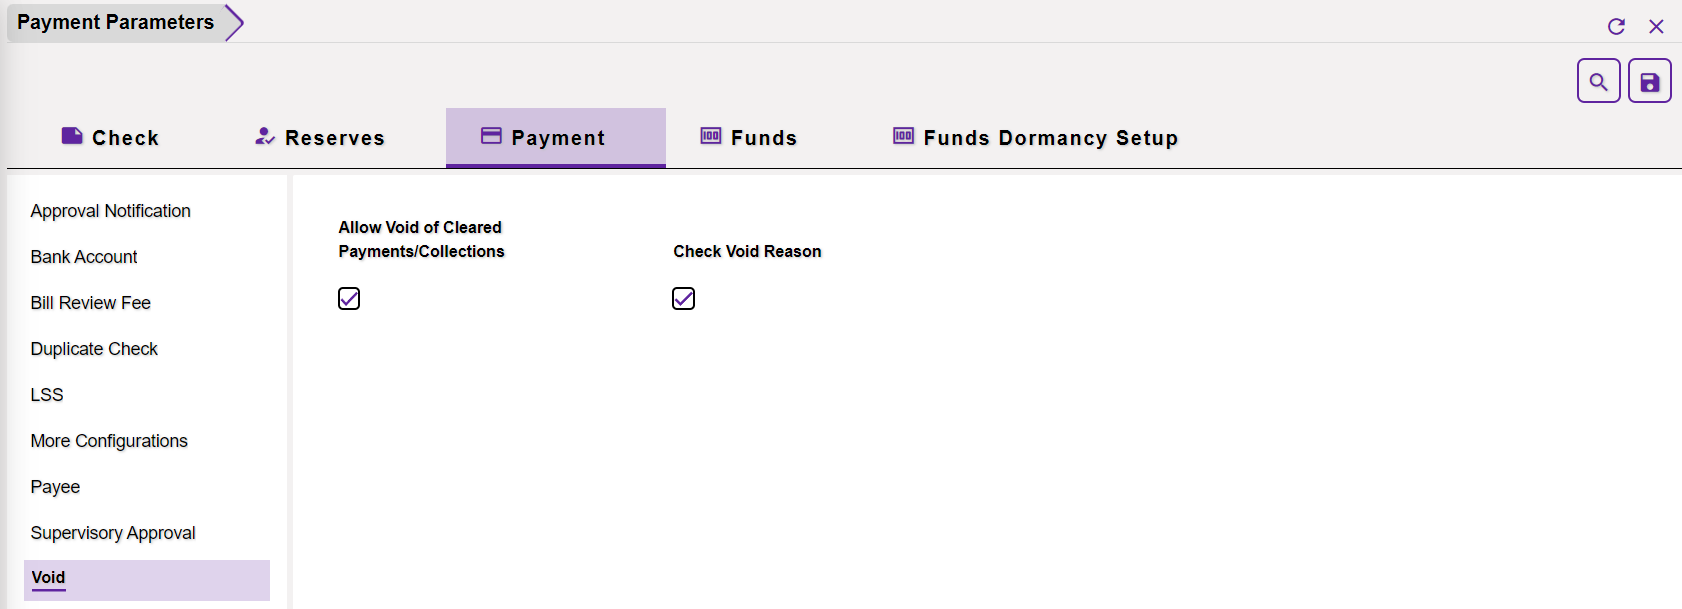
Allow Void of Cleared Payments/Collections: If selected, then, the Cleared Payment or Collection will be allowed to be voided.
Check Void Reason: If this setting is enabled, then, the Check Void Reason field will be displayed on the Transaction/Funds screen of the Claim zone.

Note: When this checkbox is enabled, then, a warning message will be displayed prompting the user to enter a reason for voiding the check. A reason for voiding the check can be entered when the Void checkbox is selected on the Funds window.
4.0 Funds
4.1 Financial Key
The Funds section offers an option to create new Financial keys and view the existing ones. The existing Financial keys can be viewed by selecting the required criterion in the Filter Financial Key with field. The relevant keys will be filtered and displayed.

To create a new Financial Key, select Add button from the toolbar. The new section will expand as shown below. The various fields are discussed below.
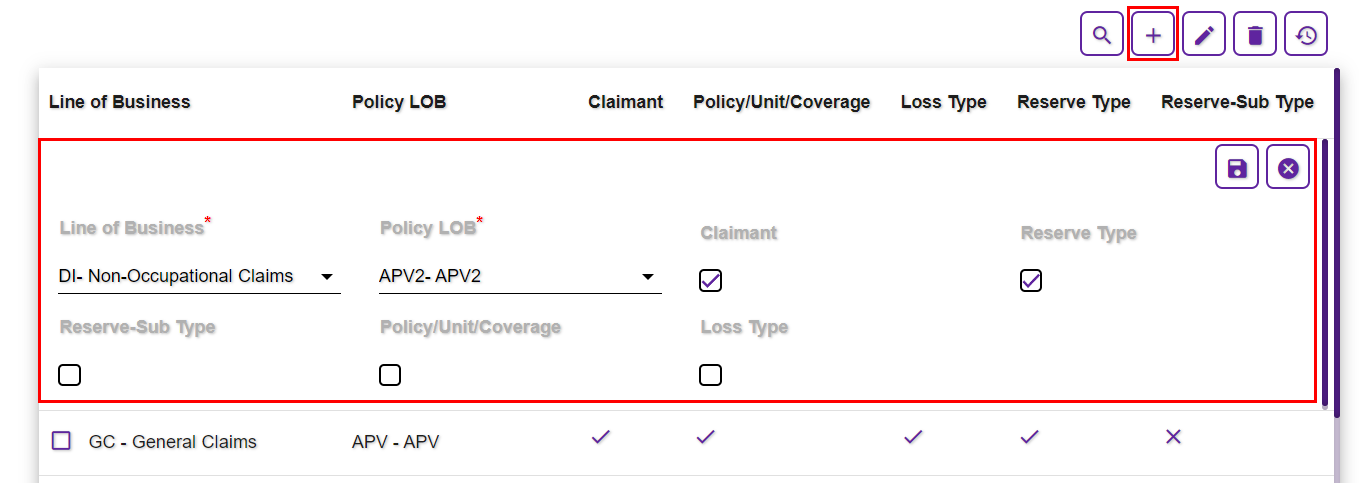
Line of Business: Select the Line of Business from the dropdown list for which the Financial Key is to be selected.
Policy LOB: The Policy Line of Business will be displayed in this dropdown list based on the LOB selected in the previous field. Select the relevant option.
Claimant: This option will be enabled only when Disability Income – Non-occupational and Workers’ Compensation Claim is selected from the Line of Business field earlier. Select the checkbox to include Claimant in the Financial key.
Reserve Type: If selected, the Reserve Type will be considered in the creation of the Financial key.
Reserve-sub Type: If selected, the Reserve-sub Type will be considered in the creation of the Financial key.
Policy/Unit/Coverage: If this checkbox is selected, then the Policy/Unit/Coverage will be included in the creation of the Financial key.
Loss Type: If this checkbox is selected, then the Loss Type will be included in the creation of the Financial key.
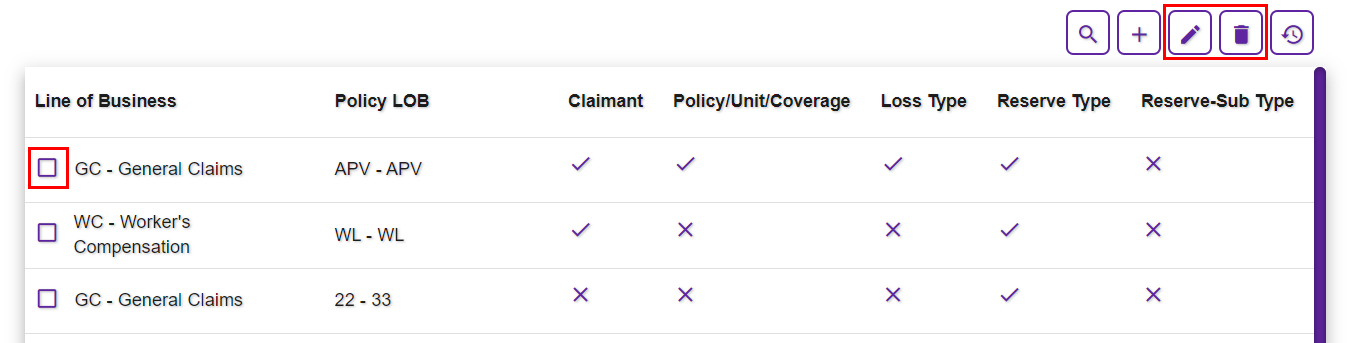
To remove or edit an existing Financial key, select the corresponding checkbox followed by the Delete ![]() and Edit
and Edit ![]() button respectively from the toolbar as shown below.
button respectively from the toolbar as shown below.
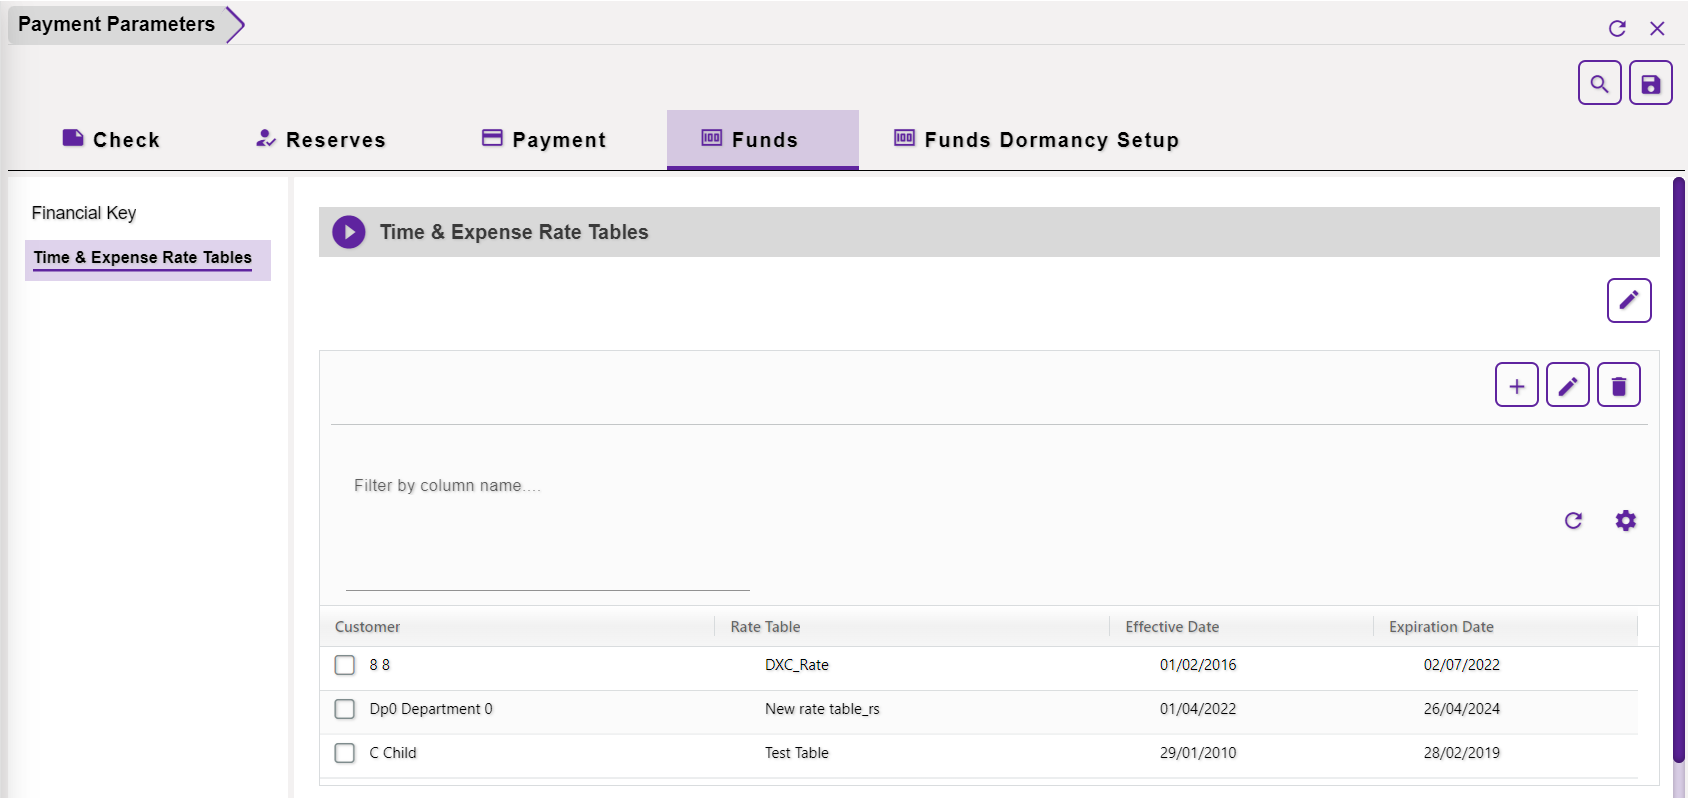
4.2 Time & Expense Rate Tables
4.2.1 Preliminary Settings:
The following 2 prerequisite settings must be turned on for accessing the Time & Expense Rate Tables module:
- The checkboxes View and Update on the Payment Parameters node must be selected on the SMS screen of the Security zone
- The checkbox Use Time & Expense available under Configuration Manager > General System Parameter > Claims Module (tab) > Time and Expense (subtab) must be selected.
-
- An activation key must be entered to activate this feature.
(Please contact DXC Assure Claims Support Helpdesk or your Sales Representative for assistance) - Upon entering an activation key, the dropdown menus – Bank Account and Rate Org Level, and the checkbox – Show All Transaction Types for Invoice Detail become enabled for selection as necessary.
- An activation key must be entered to activate this feature.
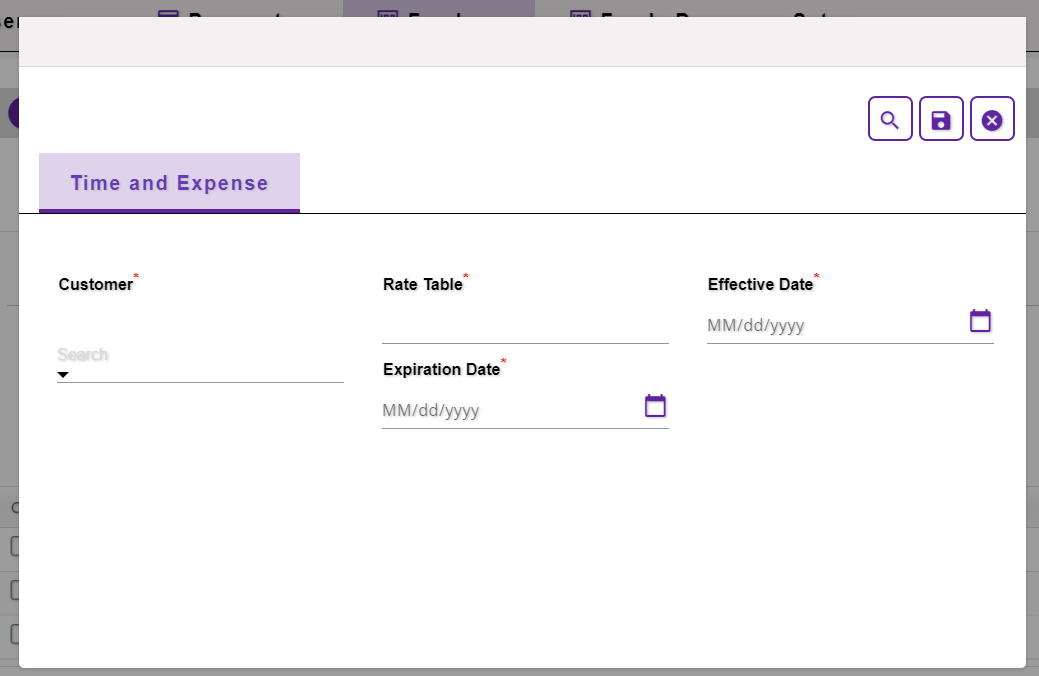
4.2.2 Add a new Time and Expense entry
A new Grid Row can be added by selecting the Add ![]() button which opens the Time and Expense popup window.
button which opens the Time and Expense popup window.
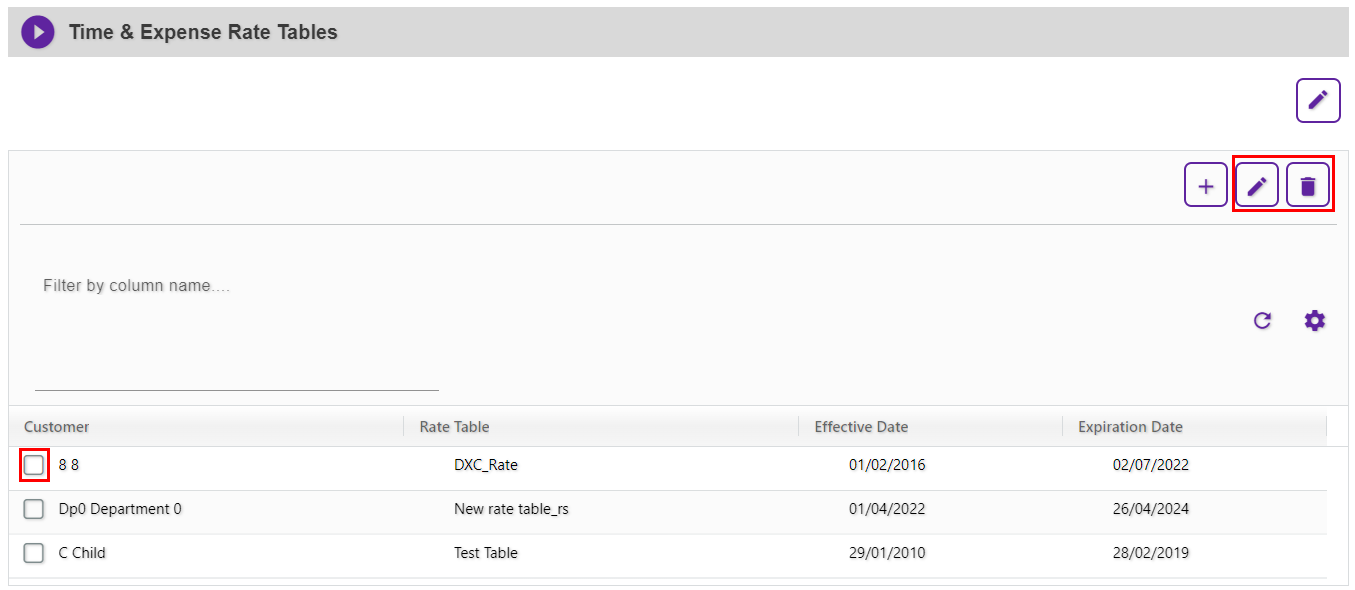
4.2.3 Edit or Delete an existing Time and Expense entry
To remove or edit an existing Time and Expense entry, select the corresponding checkbox followed by the Delete ![]() and Edit
and Edit ![]() button respectively from the toolbar as shown below.
button respectively from the toolbar as shown below.
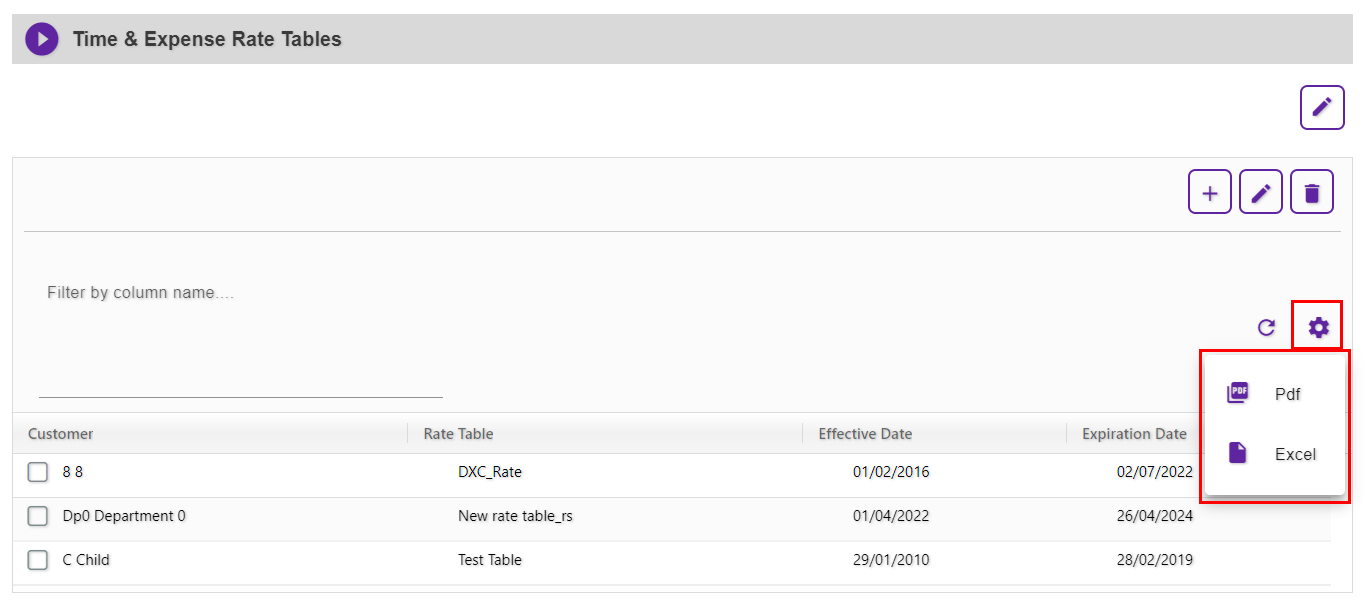
4.4.4 Exporting Grid Data
Grid data can be exported in the form of a PDF or an Excel file by clicking on the Grid Configuration button followed by an appropriate option.
Note:
- Availability of the Time & Expense Rate Tables feature is subject to the SMS permissions allowed to a user along with General System Parameter settings
- While the look and feel has been enhanced, there is no change in the basic functionality of the Time & Expense Rate Tables feature
- An activation key will be needed for using the Time & Expense Rate Tables feature
Options to Search and Filter records is available on all grids - Screens of Time & Expense Rate Tables are Multilingual compliant
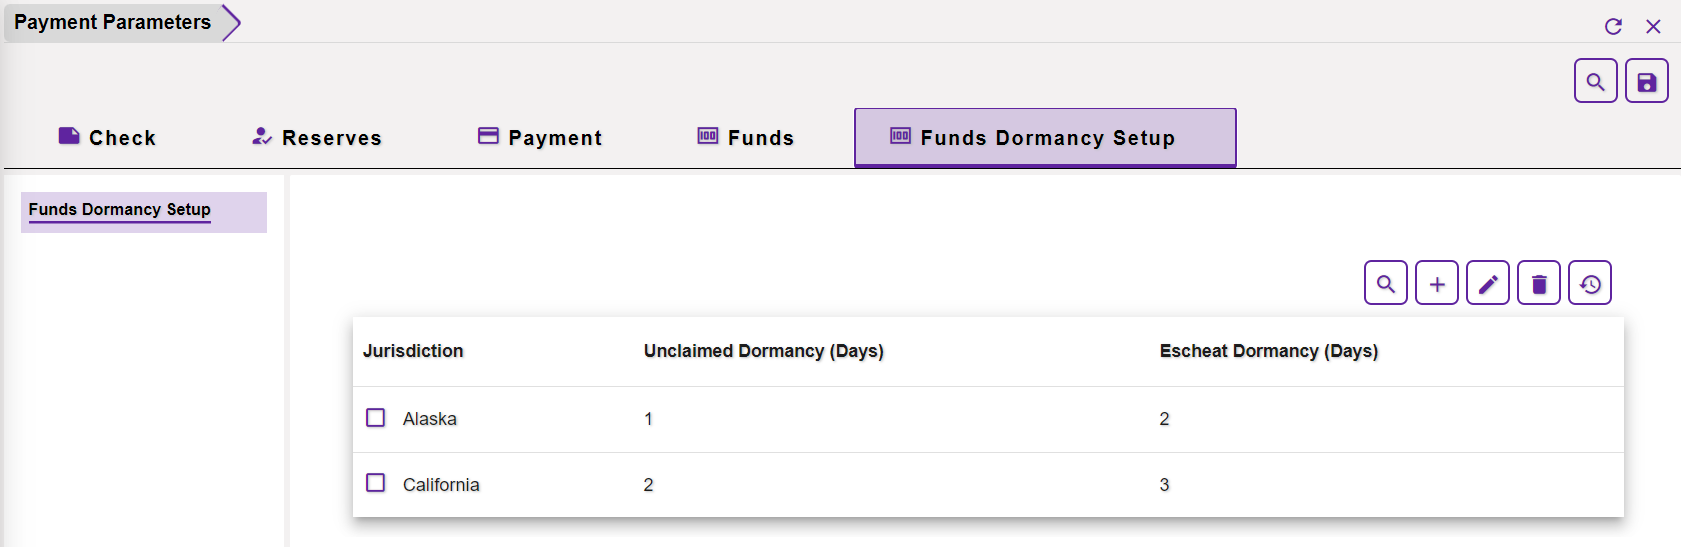
5.0 Funds Dormancy Setup
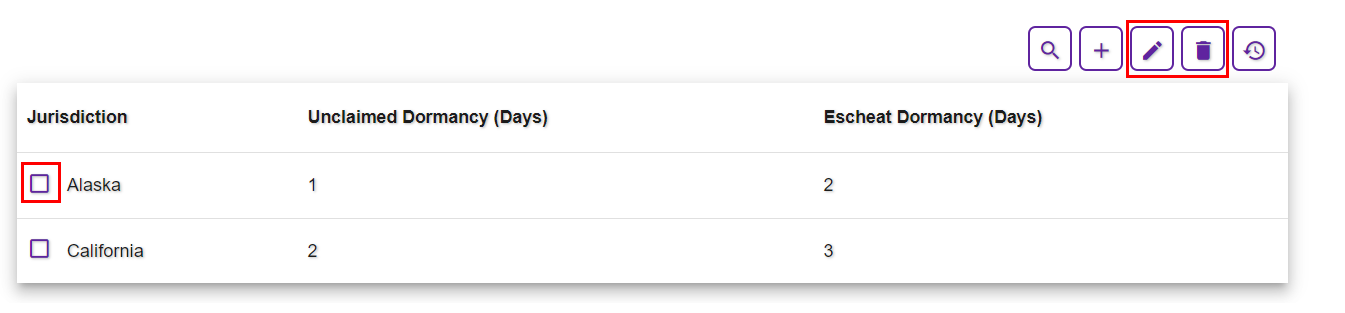
The Funds Dormancy setup section features the Dormant funds along with their respective unclaimed and escheated dormancy days.
To add new dormancy information, select the Add icon on the top right corner to open the corresponding section. Enter relevant data and select the Save button. The saved information will be displayed in the section below.
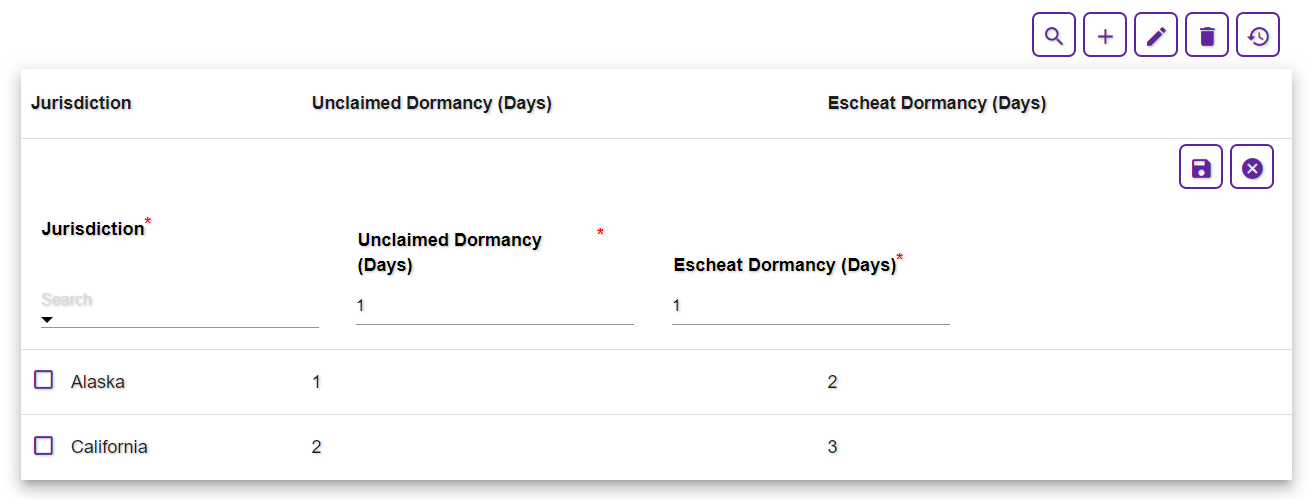
Similarly, to Edit or Delete an existing record, select the corresponding checkbox, followed by the Delete ![]() and Edit
and Edit ![]() button respectively.
button respectively.