How Can We Help?
Non-Occupational Claim
Introduction
Use the Non Occupational Claims window to enter detailed information about the claims related to injuries or illnesses resulting in disability.
Non-occupational Claim Screen: Claim Info Accordion
Use the Claim Info accordion to enter general information about the Non-Occupational Claim.
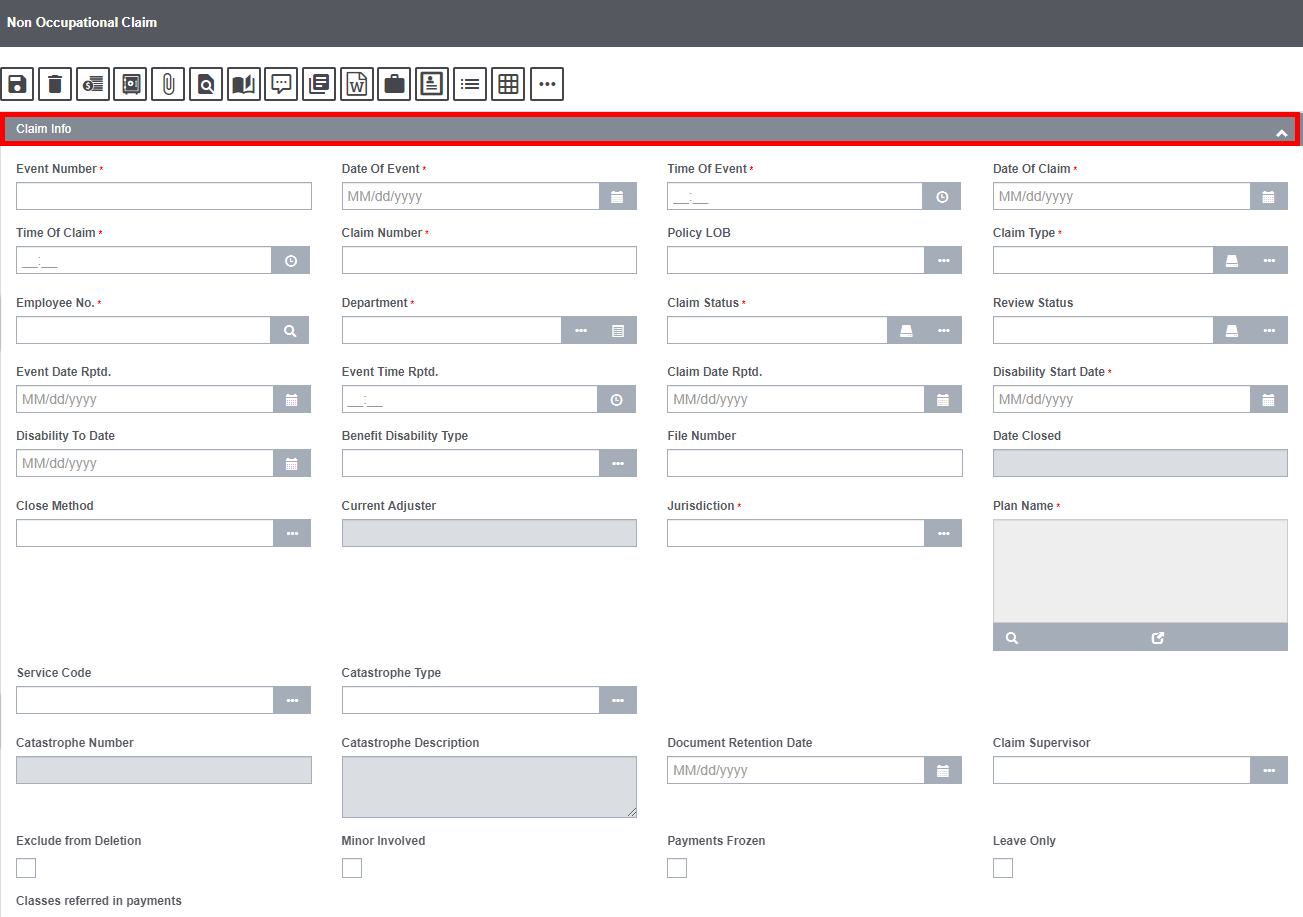
Field definitions:
Event Number: The Event Number will be displayed if you open the Non-Occupational Claims window from the Event window.
If you open the Claims window directly, DXC Assure Claims will create a new event and add the Event Number to this field when you save the Claim.
Date of Event: Enter the date on which the Event occurred or select ![]() button to choose from a calendar.
button to choose from a calendar.
Time of Event: Enter the time when the Event occurred.
Date of Claim: Enter the date on which your organization learned of the Claim or select the ![]() button to choose from a calendar.
button to choose from a calendar.
Time of Claim: Enter the time when your organization was informed of the claim or click on the icon ![]() to select the relevant time.
to select the relevant time.
Claim Number: Enter a unique identifying number for the Claim or leave blank and DXC Assure Claims will generate a Claim Number when you save.
Policy LOB: Enter the code that best describes the insurance line of the Policy against which the Claim is made or select the ![]() button to select from the code lookup window.
button to select from the code lookup window.
Claim Type: Enter the code that best describes the Claim. The Claim Type field has two icons ![]() , Status Details and Claim Type. Select the Status Detail button
, Status Details and Claim Type. Select the Status Detail button ![]() to conveniently change the Claim Type and view all previous changes made to it.
to conveniently change the Claim Type and view all previous changes made to it.
Employee Number: Employee Number is entered in this field. Select the Search icon ![]() to get redirected to the Search Criteria window.
to get redirected to the Search Criteria window.
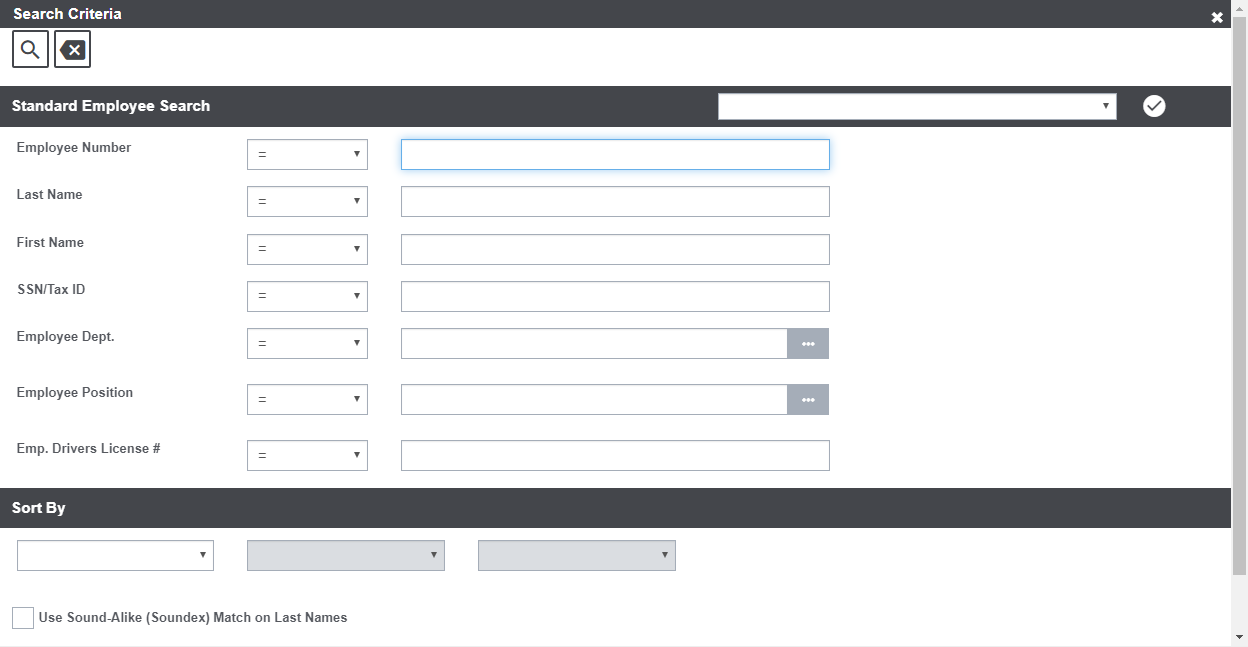
Enter the search criteria and select the relevant Employee Number.
Department: Enter the Department, the individual or equipment involved in the Event. Select the ![]() button to get redirected to the Department Hierarchy window.
button to get redirected to the Department Hierarchy window.
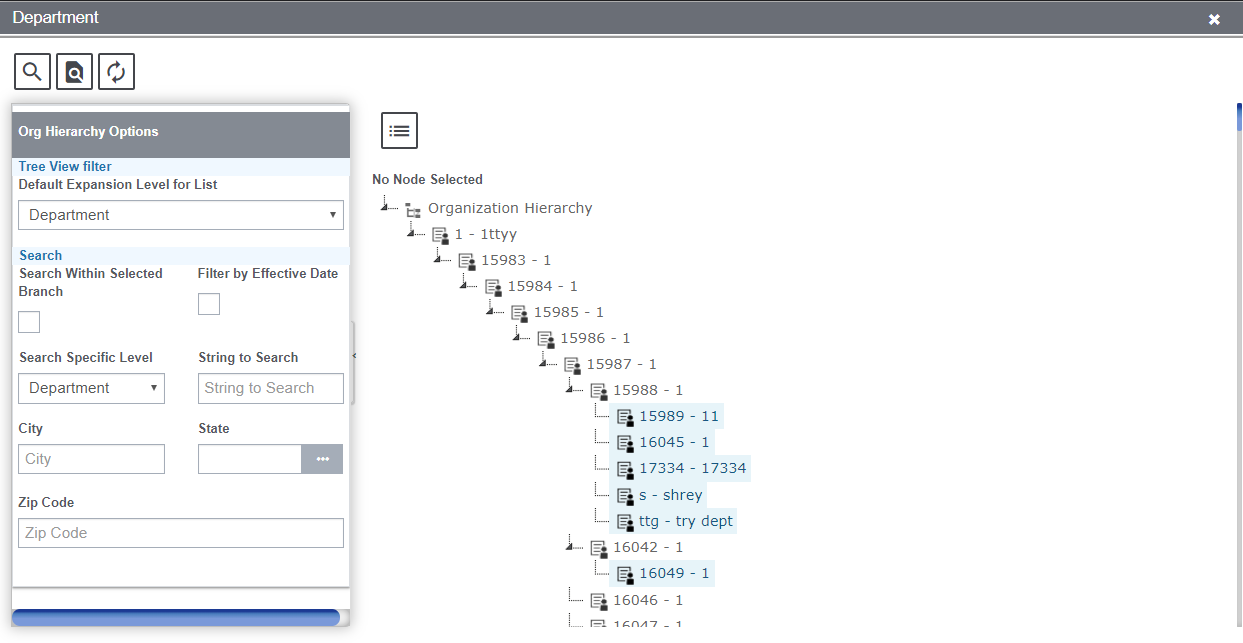
Select from the Org Hierarchy window. Click on the icon ![]() to view the instruction corresponding to the organization hierarchy.
to view the instruction corresponding to the organization hierarchy.
Claim Status: Enter the code that best describes the Claim Status. Select the ![]() button to select from the Claim Status Code selection window. Additionally, the
button to select from the Claim Status Code selection window. Additionally, the ![]() Claim Status Detail button allows you to change the Claim Status and view all previous changes made to it.
Claim Status Detail button allows you to change the Claim Status and view all previous changes made to it.
Review Status: Review Status allows any changes made to the Review Status field. Selecting the Review Status History ![]() will display a
will display a
popup showing the Review Status History. The Claim Review Status ![]() popup window displays the Review Statuses created in the Maintenance Table.
popup window displays the Review Statuses created in the Maintenance Table.
Event Date Rptd: Enter the date on which the Event was reported or select the ![]() button to choose from a calendar.
button to choose from a calendar.
Event Time Rptd: Enter the time when the Event was reported. Click on the icon ![]() to select the relevant Event time reported.
to select the relevant Event time reported.
Claim Date Rptd: Enter the date when Claim was reported or select the button to select from a calendar.
Disability Start Date: Select the start date of the disability as a result of the Event.
Disability To Date: Select the end date of the disability.
Benefit Disability Type: Select the type of benefit available for the mentioned disability from the lookup table.
File Number: Enter any special identification number that your organization uses such as the box number or the insurance company’s case number.
Date Closed: For a closed Claim, displays when the Claim was closed.
Close Method: When you close a Claim, enter the code that best describes how the Claim was closed or select ![]() the button to select from the Code Selection window.
the button to select from the Code Selection window.
Current Adjuster: The current adjuster of the Claim is entered here.
Jurisdiction: Enter the state in which you must file OSHA reports for the Claim or select the ![]() button to choose from the States window.
button to choose from the States window.
Plan Name: Enter a Non-Occupational Disability Plan applicable to the Claim or select the ![]() button to choose from the Plans window.
button to choose from the Plans window.
Note: DXC Assure Claims displays all plans that meet the criteria based on the Claims’ Department, Claim Type, Effective Dates, Plan Status, and Trigger Method.
Service Code: Enter the code that best describes who is responsible for processing the Claim or select the search button to select from the Code Selection window.
Catastrophe Number: Displays the number of the catastrophe record attached to the Claim.
Note: The number is displayed based on selection made in Catastrophe Type field.
Catastrophe Description: Displays the description of the catastrophe record.
Document Retention Date: Click on the calendar icon to select the retention date of the document.
Claim Supervisor: Select the Claim Supervisor from the lookup table. Select the icon ![]() to open the lookup table.
to open the lookup table.
Exclude from Deletion: Select this checkbox to exclude the Claim from deletion. If checked, the user will not be allowed to delete the Claim.
Minor Involved: Select the checkbox if any minor is involved in the claim.
Payments Frozen: Select the checkbox to stop all payments on this claim.
Note: The Claim remains open but no payments are made until you clear this checkbox. You can only use this checkbox if you have the appropriate permissions.
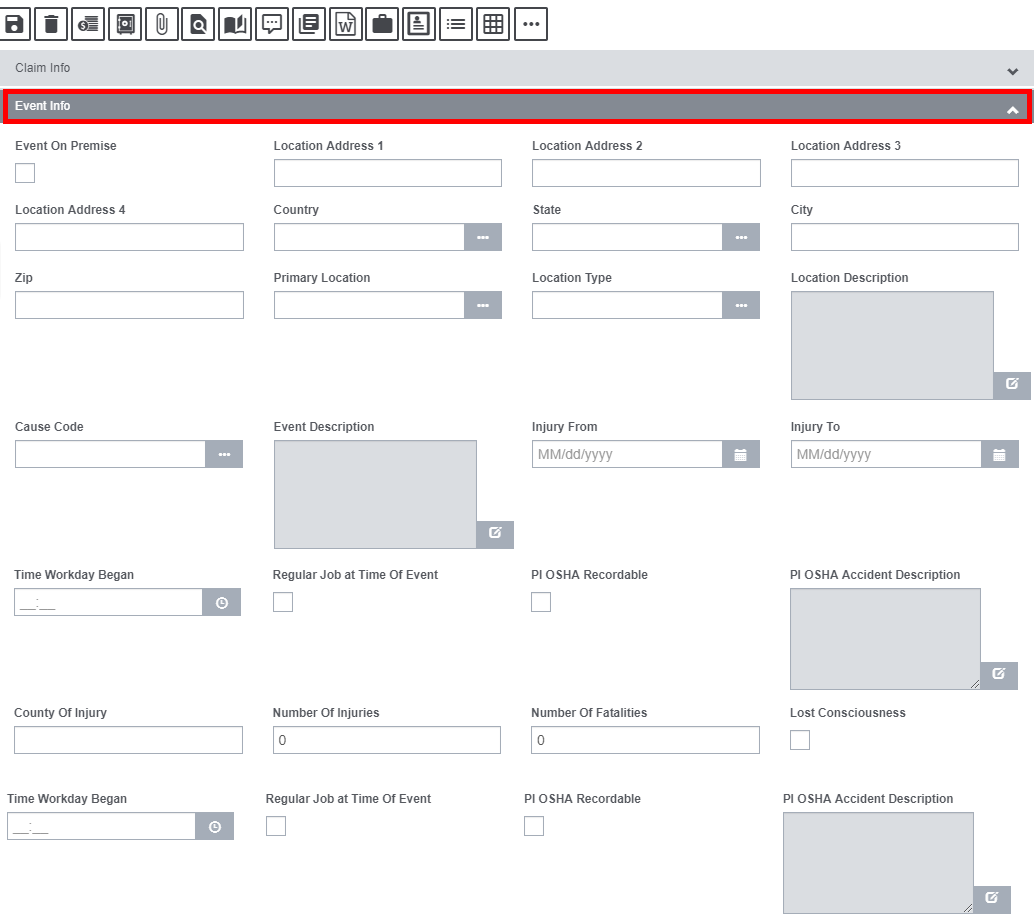
Non-occupational Claim Screen: Event Info Accordion
The Event Info accordion enables you to enter general information about the Event related to the particular Claim. DXC Assure Claims automatically updates this accordion, if you open the Claim screen via Event.
If the Claim is entered before an Event, DXC Assure Claims uses the information on this accordion to create a new Event for this Claim.
Injury To: Click on the ![]() button to pick the date from the calendar when the injury was caused.
button to pick the date from the calendar when the injury was caused.
Event Description: Enter a description for the Event or select the button to open the DXC Assure Claims Editor. In the DXC Assure Claims Editor, enter the description and then select OK.
Event On Premise: Select the checkbox if the Event occurred,
- on your organization’s property (if you are self-insured).
- on the insured organization’s property (if you are a TPA ).
Location Address: Enter the address where the Event occurred. Enter the City, State, Zip, and Country in the appropriate fields.
Primary Location: Enter the code that best describes the exact location where the Event occurred or select the button to select from the Code Selection window.
Cause Code: Enter the code that best describes the Event cause or select the button to choose from the Code Selection window.
Injury From: Enter the date when the injury was caused or select the ![]() button to pick the date from the calendar.
button to pick the date from the calendar.
Time Workday Began: Click on the icon ![]() to select the time when the workday began.
to select the time when the workday began.
Regular Job at Time of Event: Select this checkbox if the person was undergoing regular job when the event occurred.
OSHA Recordable: Select this checkbox if the event details is to be made OSHA Recordable.
Location Description: Enter a description for the location where the event occurred or select the button to open the DXC Assure Claims Editor. In the DXC Assure Claims Editor ![]() , enter the description and then select OK
, enter the description and then select OK ![]() .
.
County of Injury: Enter the county where the Event occurred.
Location Type: Enter the code that best describes the location type where the Event occurred or select the button to select from the Code Selection window.
Number of Fatalities: Enter the number of deaths that resulted from the Event.
Number of Injuries: Enter the number of persons injured as a result of the Event.
Lost Consciousness: Check the field if the consciousness was lost as a result of the Event.
OSHA Accident Description: Enter the description of the OSHA Accident.
Non-occupational Claim Screen: Employee Info Accordion
Enter the personal information of the employee in the Employee Info accordion:

Field Description:
First, Middle and Last Name: Enter the first, middle and last name of the employee in the respective fields.
Initials: Enter the initial of the employee if any.
Date of Birth: Select the date of birth of the employee from the calendar ![]() .
.
Age: The age will be calculated and entered as per the date selected in the date of birth field.
Office & Home Phone: Enter the office and home phone number of the employee in the respective fields.
Address: Enter the address of the employee. Enter the City, State, Zip, and Country in the appropriate fields.
Fax: Enter the employee’s fax number.
Sex: Enter the code for the employee’s gender or select the ![]() button to select from the Code Selection window.
button to select from the Code Selection window.
Title: Enter the title if the employee has one.
Attorney: Enter the employee’s attorney. Select the ![]() button to search the attorney.
button to search the attorney.
Cost Center: Enter the employee’s assigned accounting cost center. Select the ![]() button to select from a Codes Selection window.
button to select from a Codes Selection window.
Status: Select the status of the claimant by clicking on the ![]() icon.
icon.
Federal: Enter the Federal tax you want to deduct from the gross calculated payment.
Medicare: Enter the Medicare tax you want to deduct from the gross calculated payment.
SS: Enter the Social Security tax you want to deduct from the gross calculated payment.
State: Enter the State tax you want to deduct from the gross calculated payment.
ID Type: Select the ID type from the dropdown list.
Email Address : Select the email type from the lookup table by selecting the ![]() icon and enter the email address in the respective fields.
icon and enter the email address in the respective fields.
In addition to the above mentioned fields, the Employee Info tab has two more buttons. They are discussed below:

Employee Claim History: Select Employee Claim History ![]() button to view the claim history of that particular employee. Clicking on the button will pop open the window displaying the Claim History of the employee.
button to view the claim history of that particular employee. Clicking on the button will pop open the window displaying the Claim History of the employee.

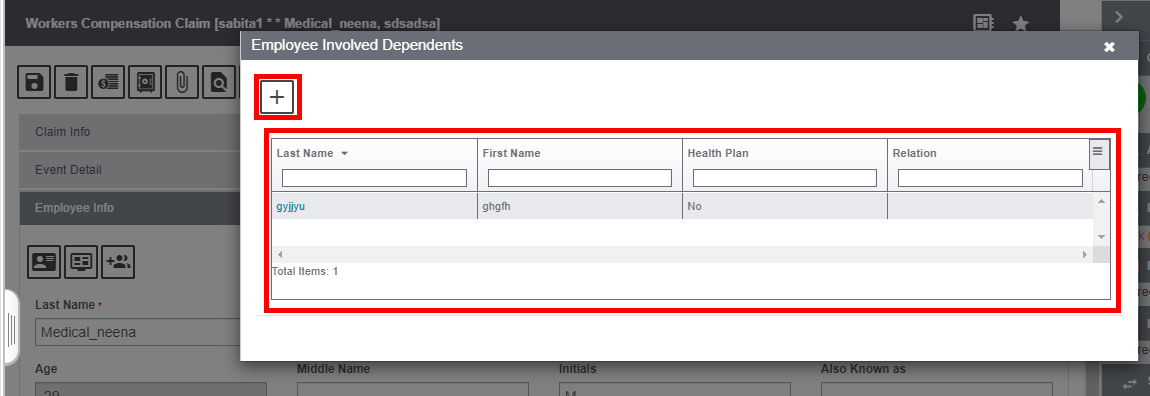
Dependents: Select the Dependents ![]() button to open the Employee Involved Dependents Window. The information if the dependents can be viewed in this window. To add new dependent click on the + sign on the top left corner of the window. Additionally, the number of dependents can be viewed on mouse-hover on the Dependents button.
button to open the Employee Involved Dependents Window. The information if the dependents can be viewed in this window. To add new dependent click on the + sign on the top left corner of the window. Additionally, the number of dependents can be viewed on mouse-hover on the Dependents button.
Non-occupational Claim Window: Employment Info Accordion
Enter the employment information in the Employment Info accordion.
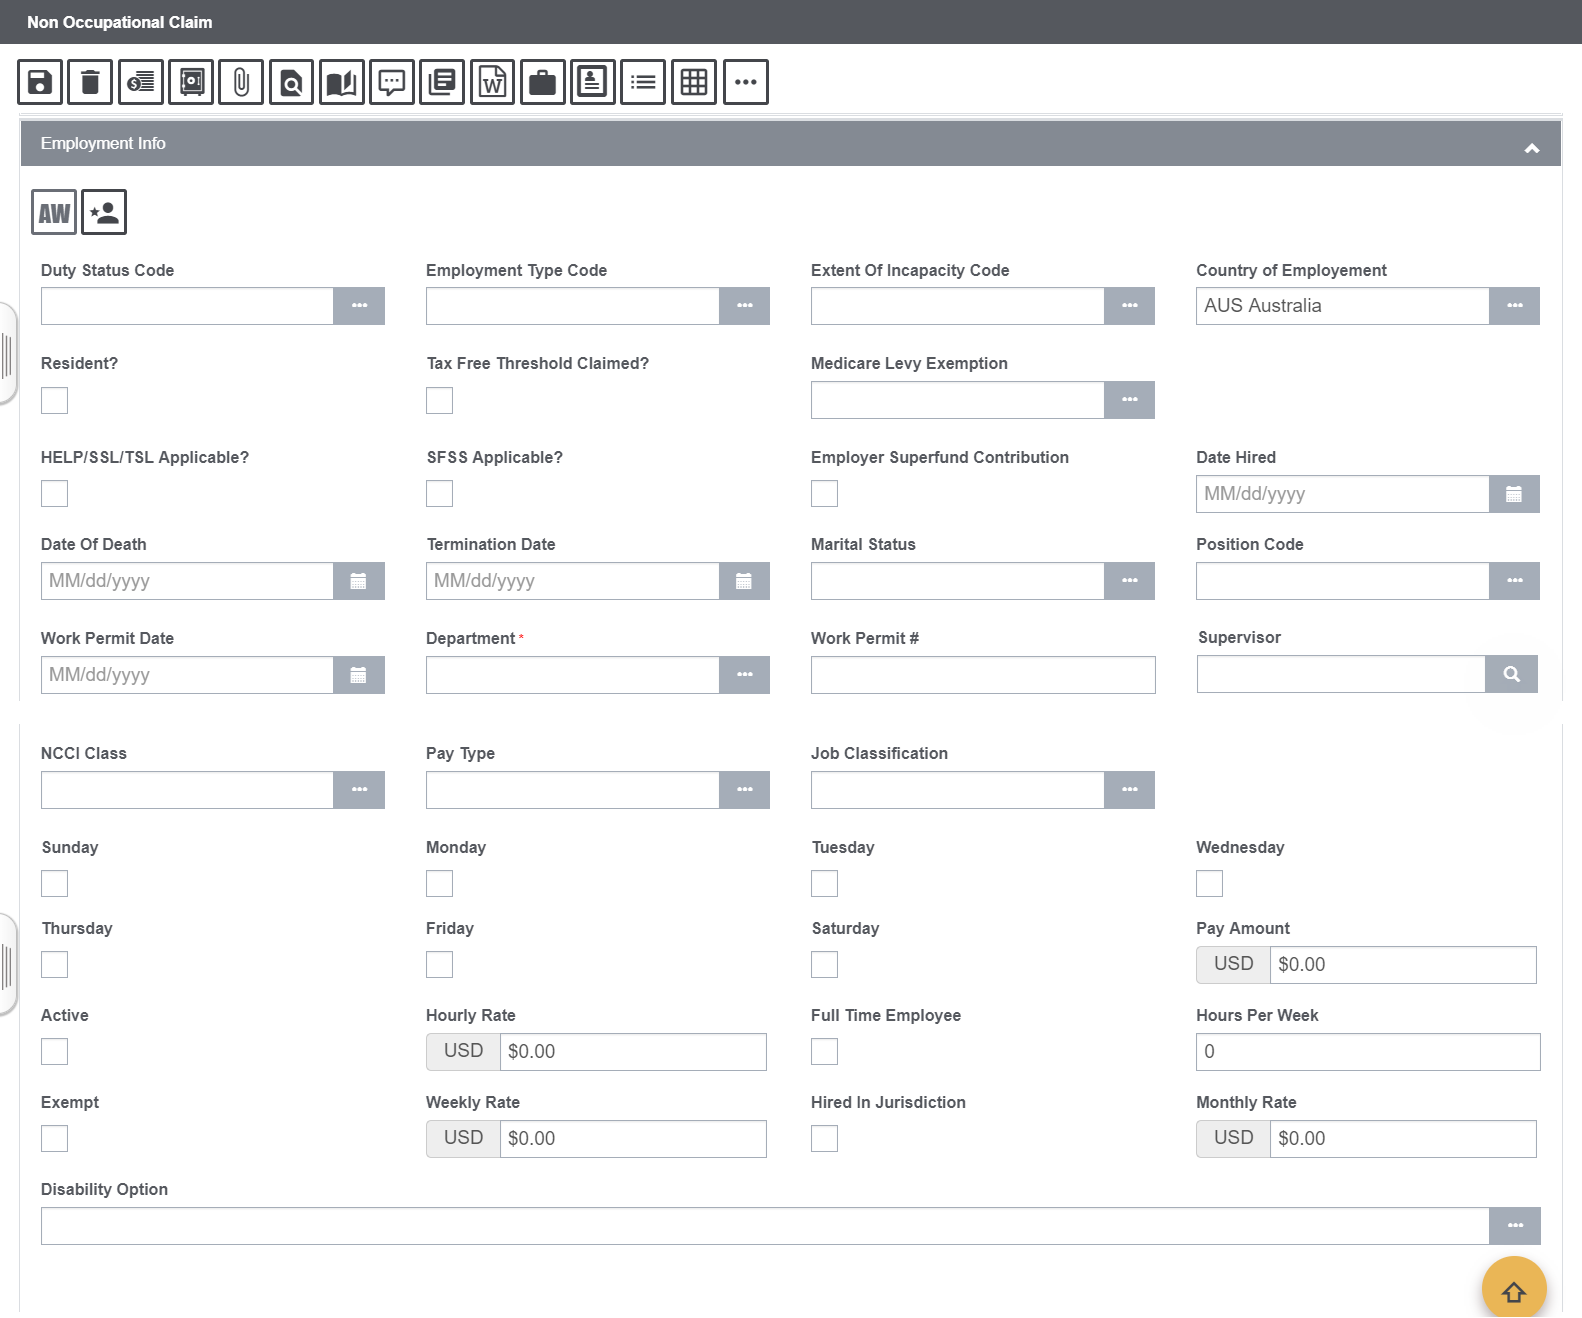
Field Description:
Duty Status Code: Select the Duty Status at the time when the Event occurred from the Duty Status lookup table by selecting on the icon ![]() .
.
Employment Type Code: Select the Employment Type from the lookup table by selecting the icon ![]() .
.
Extent of Incapability Code: Select the extent of incapability as a result of the event by from the lookup table by clicking on the icon ![]() .
.
Country of Employment: Select the country from employment.
Date Hired: Select the date when the employee was hired from the calendar ![]() .
.
Date of Death: Select the date of death by clicking on the calendar.
Termination Date: If the employee no longer works for your organization, enter the last day that the employee worked or select the ![]() button to select from the calendar.
button to select from the calendar.
Marital Status: Select the marital status of the employee by clicking on the ![]() icon.
icon.
Position Code: Enter the code that best describes the position of the employee from the lookup table ![]() .
.
Work Permit Date: Enter the date of the work permit.
Department: Select the department of the employee from the lookup table by selecting the ![]() icon.
icon.
Work Permit: Enter the employee’s work permit number.
Supervisor: Enter the supervisor. To select the supervisor, click on the Search icon ![]() and enter the search criteria.
and enter the search criteria.
NCCI Class: Enter the code for the job class as determined by the National Council of Compensation Insurers or select the ![]() button to select from the Code Selection window.
button to select from the Code Selection window.
Pay Type: Enter the code that indicates whether an employee is salaried or is paid hourly or select the ![]() button to select from the Code Selection window.
button to select from the Code Selection window.
Work Week: Select the check boxes for all the days of the week that the employee works.
Pay Amount: If the employee is salaried, enter the employee’s salary.
Monthly Rate:The employee’s monthly rate is calculated based on the weekly rate and the hours per week.
Active: Check the field if the employee is currently employed by the organization.
Hourly Rate: If the employee is paid hourly, enter the employee’s hourly pay.
Full-time Employee: Check the field if the employee is a full-time employee.
Hours per Week: Enter the employee’s regularly scheduled number of work hours per week.
Exempt: Check the field if the employee is a salaried employee.
Weekly Rate: The employee’s weekly rate is calculated based on the hourly rate and the hours per week. You can enter a different hourly rate.
Hire in Jurisdiction: Select the check box if the employee was hired in the same OSHA jurisdiction as the one you selected on the Claim Info tab.
Along with the fields mentioned above, the Employment Info accordion offers an AWW Rate Calculation (AW) button and Super Funds Provider button.
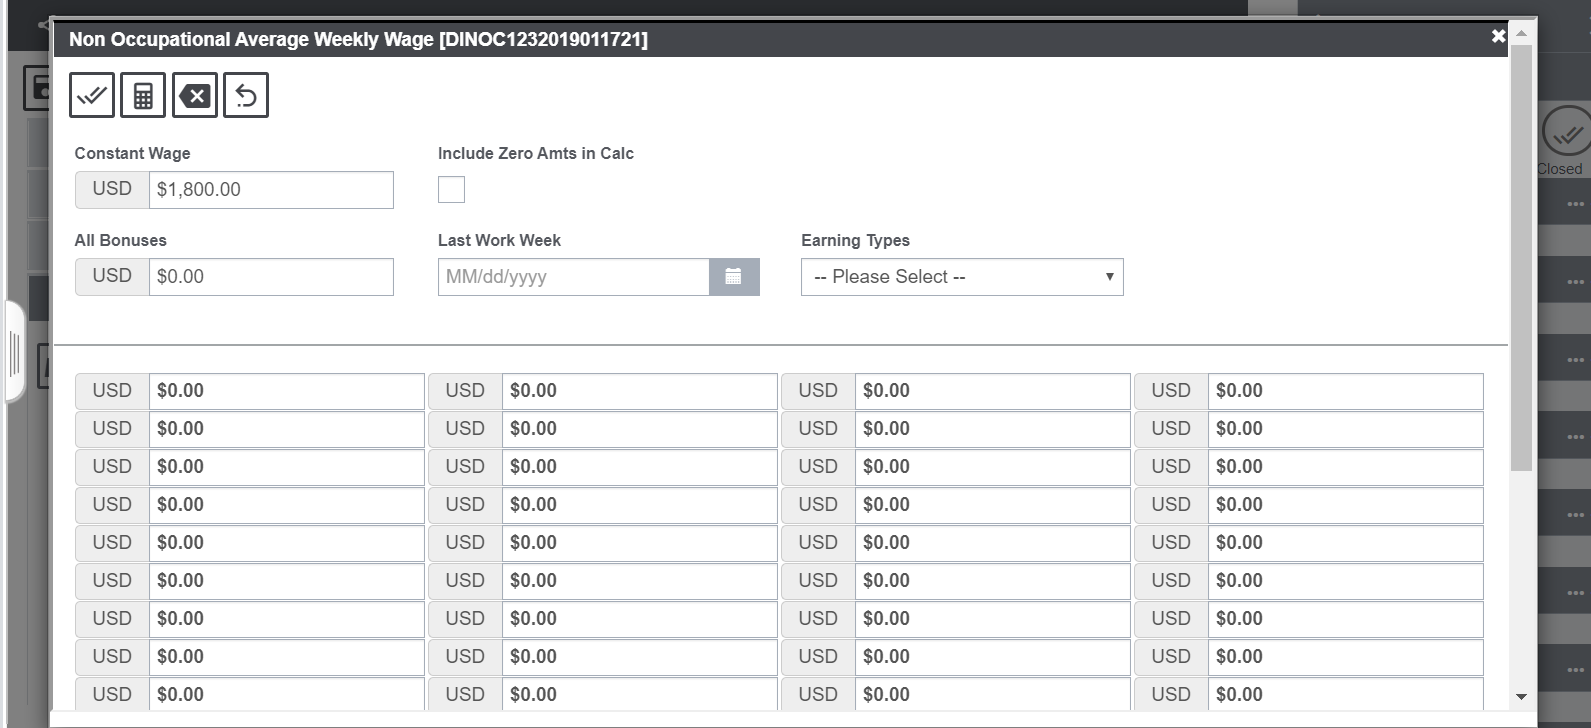
Select the AW ![]() button to open the Non Occupational Average Weekly Wage window. Enter the relevant information in the required field to calculate the Average Weekly Wage of the employee.
button to open the Non Occupational Average Weekly Wage window. Enter the relevant information in the required field to calculate the Average Weekly Wage of the employee.
Select the Super Fund Provider ![]() button to open the Super Fund Provider pop-up window. Enter the relevant information in the required fields followed by the save button to save the Super Fund Provider information.
button to open the Super Fund Provider pop-up window. Enter the relevant information in the required fields followed by the save button to save the Super Fund Provider information.

Non-occupational Claim Window: Medical Info Accordion
Select and complete the fields on the Medical Info tab, as shown below.
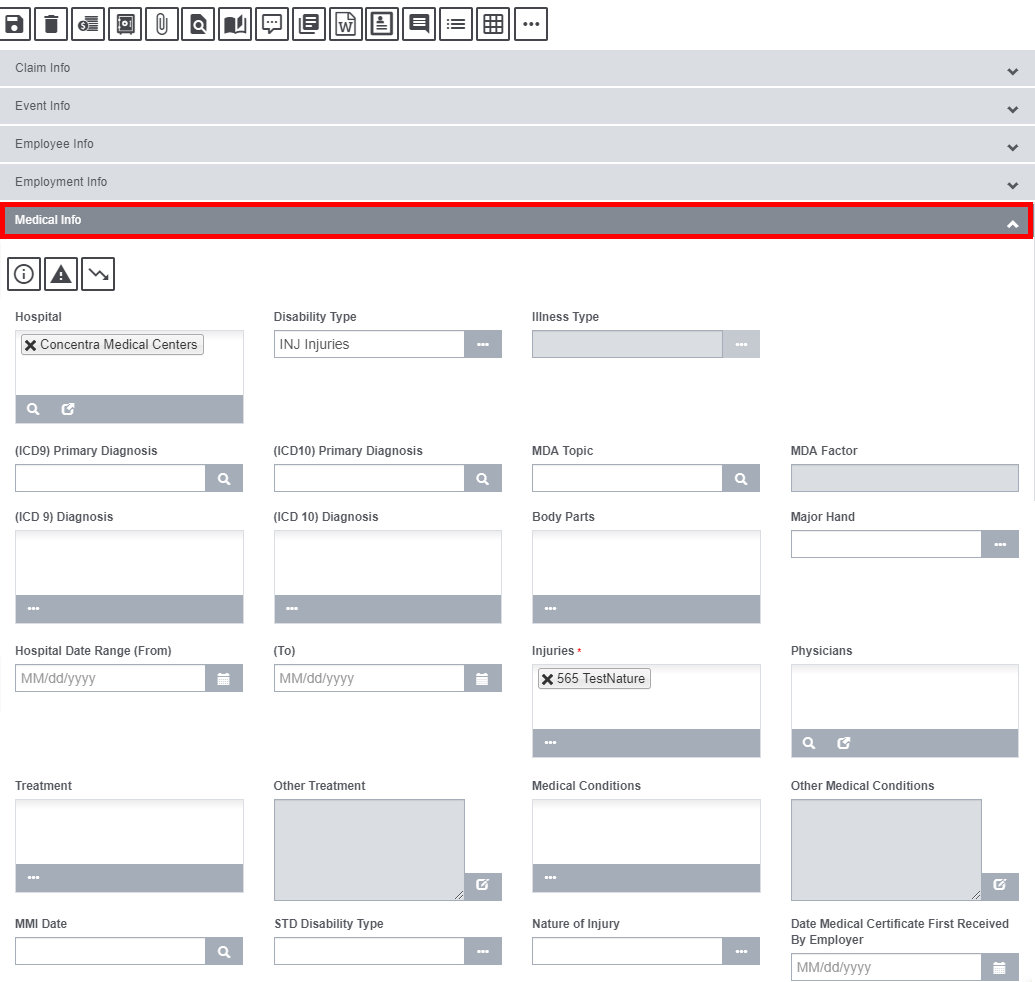
Hospital: Select the button ![]() to open the Standard Entity Search window to search for and select the hospital where the employee was treated.
to open the Standard Entity Search window to search for and select the hospital where the employee was treated.
Disability Type: Enter the code for the employee’s disability type or select the ![]() button to select from the Code Selection window.
button to select from the Code Selection window.
Illness Type: Enter the code for the employee’s illness type or select the ![]() button to select from the Code Selection window.
button to select from the Code Selection window.
(ICD9) Primary Diagnosis: Select the ![]() button to open the Primary Diagnosis window.
button to open the Primary Diagnosis window.
MDA Topic: Select the ![]() button to open the Assure Claims Editor and enter the Medical Disability Advisor topic.
button to open the Assure Claims Editor and enter the Medical Disability Advisor topic.
MDA Factor: Displays the Medical Disability Advisor factor based on the MDA topic you select.
Body Parts: Enter the code that best describes the limbs, bones, or organs involved in the injury or select the ![]() button to select from the Code Selection window.
button to select from the Code Selection window.
Major Hand: Enter whether the Right or the Left hand is the major hand or select the ![]() button to select from the Code Selection window.
button to select from the Code Selection window.
Hospital Date Range: Enter the date range for which the employee was hospitalized or select the ![]() button to select from the calendar.
button to select from the calendar.
Injuries: Enter the code that best describes the injuries the employee sustained or select the ![]() button to select from the Code Selection window.
button to select from the Code Selection window.
Note: The field is active only when you select the Disability Type as Injury.
Physicians: Select the ![]() button to open the Standard Entity Search window and select the physician who made the primary diagnosis.
button to open the Standard Entity Search window and select the physician who made the primary diagnosis.
Treatment: Enter the code that best describes the treatment for the injury or illness or select the ![]() button to select from the Code Selection window.
button to select from the Code Selection window.
Other Treatment: Select the button to open the Insurance RISKMASTER Editor and enter any other treatment.
Medical Conditions: Enter the code that best describes any existing medical conditions or select the ![]() button to select from the Code Selection window.
button to select from the Code Selection window.
Other Medical Conditions: Select the button to open the Insurance RISKMASTER Editor and enter any other medical conditions.
MMI Date: Enter the date on which the injured/ ill employee reached Maximum Medical Improvement (MMI).
STD Disability Type: Enter the code that best describes the STD disability type or select the ![]() button to select from the Code Selection window.
button to select from the Code Selection window.
Date Medical Certificate First Received By Employer: Select the date when the medical certificate of the employee was first received by the employer.
Additionally, there are three other buttons offered in the Medical accordion. These buttons are discussed below:

Disability Guidelines: Selecting the Disability Guidelines ![]() button will open a window that displays the Medical Disability Advisor.
button will open a window that displays the Medical Disability Advisor.
Restrictions: Select the Restrictions button ![]() to open the window displaying the restricted days. The total number of restricted days is based on the First Day Restricted and the Last Day Restricted you entered on the Restricted Days window. If there is no Last Day Restricted, then the total number of restricted days is based on today’s date. The previous duration on the Restricted Days window are also considered in this calculation.
to open the window displaying the restricted days. The total number of restricted days is based on the First Day Restricted and the Last Day Restricted you entered on the Restricted Days window. If there is no Last Day Restricted, then the total number of restricted days is based on today’s date. The previous duration on the Restricted Days window are also considered in this calculation.
Click on the + sign on the top left corner to add new first and last restricted day.

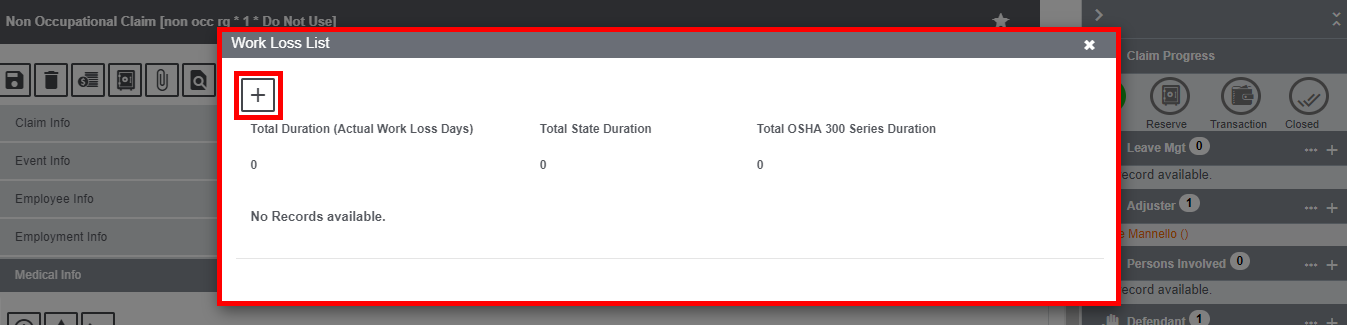
Work Loss: Select the Work Loss ![]() button to open the Lost Days window. The total number of lost days based on the Last Work Day and the Return to Work date you entered on the Lost Days window. If there is no Return to Work date, then the total number of lost days is based on today’s date. The previous duration on the Lost Days window are also considered in this calculation.
button to open the Lost Days window. The total number of lost days based on the Last Work Day and the Return to Work date you entered on the Lost Days window. If there is no Return to Work date, then the total number of lost days is based on today’s date. The previous duration on the Lost Days window are also considered in this calculation.