How Can We Help?
DXC Assure Claims FAQs
FAQ (Frequently Asked Question)
You need to run the ‘Reserve Balance’ Task via the Claim Scheduler screen in the Configuration Manager zone followed by the ‘Financial History Processing’ Task. If an issue persists, please contact the Assure Claims Support Helpdesk.
Navigate to the Query Designer screen (Configuration Manager > Tools & Designers) and modify your search view.
Navigate to the Supplemental Field Data (Configuration Manager > UI Admins) and select the desired Table name and edit it. Add new Supplemental Field(s) as desired. Then, navigate to Powerview Editor screen (under the UI Admins menu) and select the view to add the Supplemental Field(s) to its respective form.
Yes. However, it’s not required to run only when you are making any changes to the BES Admin group.
Yes, this needs to be done only in the UI version of Assure Claims. In the UX version, you just need to refresh the form.
It is possible that RMXOutlook may not be installed correctly. The following points must be considered while installing RMXOutlook:
- RMXOutlook must be installed using the login credentials of the User using this plugin
- UAC (User Account Control) must be ‘turned off’ during installation
- The User must have Local Admin rights while installing RMXOutlook (Admin rights could be revoked once installed)
- The installation file must be available on the local drive rather than on a shared network location
- MS Outlook must be closed during installation/uninstallation
- Execute the installation by selecting the "Run as Administrator" option
Delete sub folders or files from C drive > Users > 'username' > AppData > Local > Apps > 2.0
Yes. The Connection String must be updated before running DB upgrade.
If the Active Directory is enabled, please make sure that the username matches with the Windows login name.
If you are a BES user, then the username must be added to the BES group and the BES Scheduler task must be run.
Please refer to the attached document for details of the Move Transaction Across Claims feature.
Database and Server
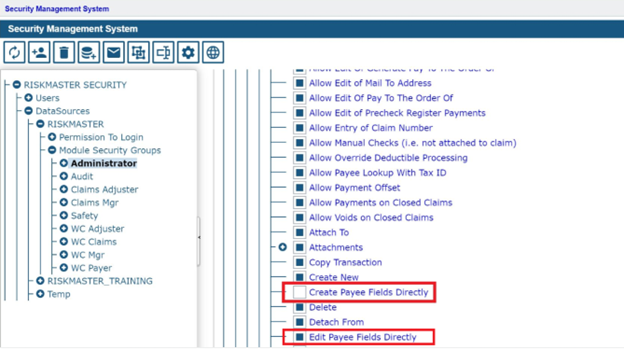
Requisite SMS permissions must be granted to the user to be able to add a Payee at the time of making a Payment. The checkbox labeled “Create Payee Fields Directly” should be checked under SMS for the selected Module Security Group for a given user.
This option is available under RISKMASTER > Funds Management > Transactions > Create Payee Fields Directly.
No, that’s not required as all the data will be in the Riskmaster/Assure Claims databases (Security, Main, View, Task Manager).
No. The Dbo permission must be set as always on for all Assure Claims databases.
Yes, but make sure you don’t change the password, if changed you need to change the user in the App pool and put in the new password
Yes, please reach out to the Assure Claims Support Helpdesk for assistance.
No, it is not advisable.
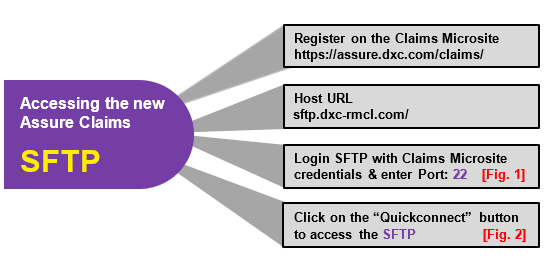
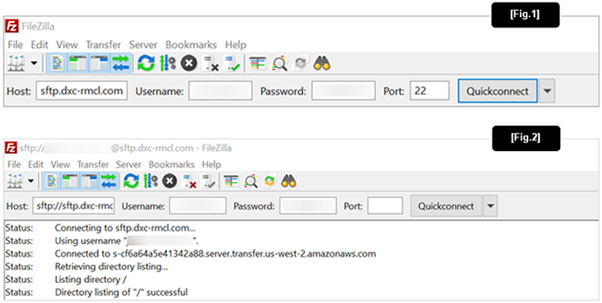
The Claims Microsite provides you access to Secure FTP facility backed by AWS cloud. You can use your Claims Microsite login credentials to log into the new SFTP to upload any file securely.
Yes! DXC Assure Claims offers a more secure working experience with the introduction of Single sign-on (SSO) authentication. SSO is an authentication scheme that allows you to log in with a single User ID and password (your own corporate login credentials) to any of several related, yet independent, software systems. (SSO is available for Assure Claims, Assure Claims Analytics, etc., and your own SAML 2.0 compliant applications.)
With this feature, it is possible to enable SAML 2.0 based Single Sign-On in DXC Assure Claims. Any identity providers supporting SAML 2.0 standard SSO can be configured in Assure Claims to enable Single Sign-On.
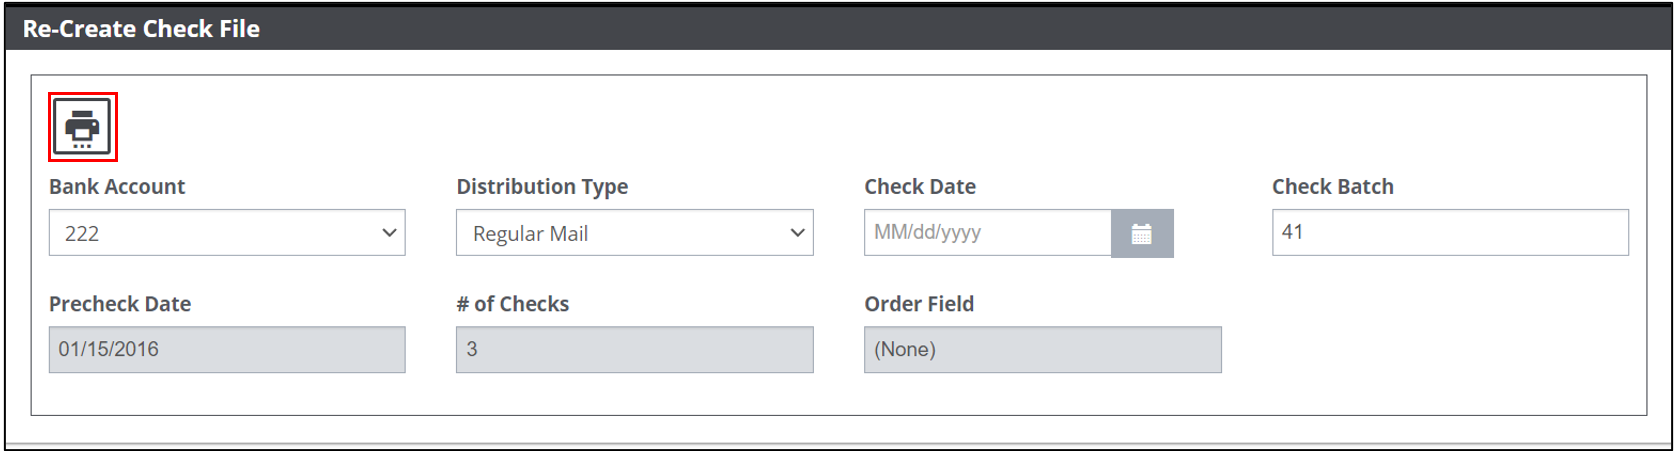
Yes. Re-Create Check File window in the Claims zone lets you do so.
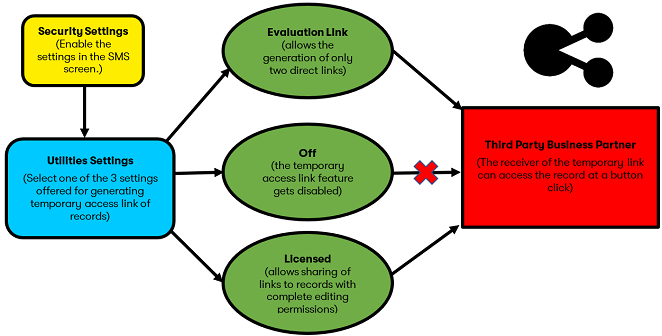
Yes. Yes! It is possible to share a record with your third-party associates/ agents/ vendors etc. as DXC Assure Claims allows the sharing of specific records temporarily without the need of giving out your login credentials.
For e.g., a Claims record can be shared with an Adjuster with a restricted view – if so needed.
“Temporary Access to Any Record” was one of the long-standing needs which DXC addressed in one of the previous releases of Assure Claims.
Temporary Access to Records Process
BI (Business Intelligence)
Report Mapping is required to switch all reports on a compatible universe with an Assure Claims/ Riskmaster version which is pointing to old/current universe while migration.
The following steps can be applied to change the universe.
- Locate the report you want to change the universe on, right click on report and select Modify
- When the report opens in Modify mode, go to the following tabs Data Access > Tools
- Click Change Source button
- Select the query you would like to update the universe for
- Select “Specify a new data source” drop down and click Universe
- Highlight the appropriate universe, click Select button
- Click Next and Finish button
- Make sure to save the report after applying the universe changes.
If any new Supplemental field is added in the Riskmaster and we are not seeing the same field in the BI universe then we need to run Sync Utility. This tool will add all the Supplemental fields in the universe.
If a user is unable to add existing or new entities then we need to change the settings under Code Relationships.
If we are adding an Auto Diary setup for the new user then we need to enable the settings for that user under General system Parameters >> Diaries/Text Fields.
FTP (File Transfer Protocol)
ICD 10 Codes
You may download latest ICD 10 codes from below link (The file can be placed on sftp or AWS S3 location to download).
a. Go to Maintenance > Table Maintenance > Select Letter ‘D’ in user code tables à Click on Diagnosis Code (ICD-10)
b. Click on Import Codes > Select a code file to import the codes.
ICD-10 codes are very different from ICD-9 codes and have a completely different structure. Currently, ICD-9-CM codes are mostly numeric and have 3 to 5 digits. ICD-10 code sets are alphanumeric and contain 3 to 7 characters. ICD-10 code sets are more robust and descriptive with “one-to-many” matches in numerous instances. There are nearly 5 times as many diagnosis codes in ICD-10-CM than in ICD-9-CM.
Yes, both can exist. But ICD-9 codes are not being used anymore since 2018. We are keeping ICD-9 for only existing records where they have been used.
Starting 17.x onwards, all the ICD-10 codes are going to be in one code table (Diagnosis Codes (ICD-10)) only with marking as Yes in Parent table for MMSEA screen. Rest of the codes will go to Medical Info or Employee Event Details tab.
This could be due to code description length more than the length of column CODE_DESC within CODES_TEXT table. Increase the column size accordingly.
From version 17.x onwards.
Navigate to Maintenance > Table Maintenance > Select Letter ‘D’ in user code tables > Click on Diagnosis Code (ICD-10). Select the code and delete it.
If you are on version 17.x or above, there is no need to upgrade. We just need to make sure; you do not have separate codes in table maintenance (CDC ICD-10 Diagnosis Codes and Diagnosis Codes (ICD-10)) because all the codes should go in one table, i.e. Diagnosis Codes (ICD-10).
Codes marked as 'Yes' for parent table, will be available in MMSEA screen while others with 'No', will be available for other screens (Medical Info or Employee Event Details)
A code clean-up may be needed if your version has codes in two tables. This will ensure all the used and unused codes are in sync and properly placed inside main code table.
Event Codes are not mandatory for reporting to Medicare. These are only needed if you use them in reporting else ICD-10 are enough for Medicare.
Environmental Issues
Clear browsers cache and then try to login.
Session could be expired. Try to re-login.
Perform IIS reset and clear browsers cache.