How Can We Help?
Event
Introduction
In Insurance RISKMASTER , every claim is associated with an event . When an incident is reported, you first enter event information. You subsequently add claims to the event when claimants file claims related to the event. You can also directly enter claims. When you directly enter a claim, Insurance RISKMASTER creates an event for the claim, using the information you enter into the claim.
DXC recommends that you enter event information before entering claim information.
You can add multiple claims to a single event. When you add a claim to an event, information you entered in the event is automatically entered into the claim. This saves you time when you add multiple claims to a single event.
To create a new Event, go to the Document in the Claim zone and select Event to get redirected to the Event screen. For detailed information about Event creation, watch the video below:
Event Window: Event Info Tab
Use the Event Info tab to enter general information about an event.
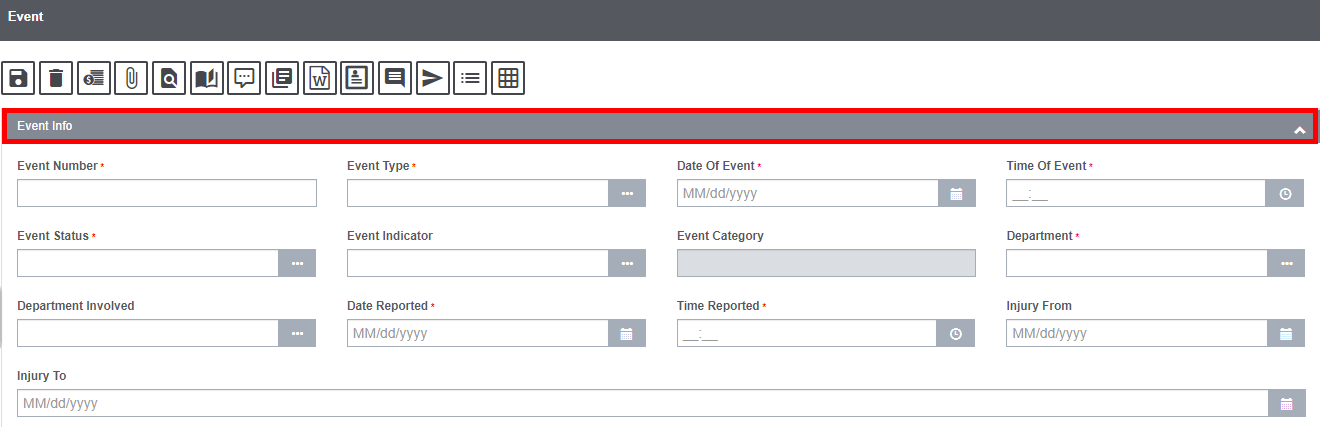
Field description:
Event Number: Leave this field blank, so that RISKMASTER can generate a system-configured event number when you save the event. However, if your organization set it up, you can enter an event number manually.
Event Type: Enter the code that best describes the event or select the button to select from the Code Selection window.
Date of Event: Enter the date on which the event occurred or select the ![]() button to select from a calendar.
button to select from a calendar.
Time of Event: Enter the time when the event occurred.
Event Status: Enter the code that best describes the event status, select the ![]() button to select from the Code Selection window.
button to select from the Code Selection window.
Event Indicator: Enter the code that best describes the event indicator or select the ![]() button to select from the Code Selection window.
button to select from the Code Selection window.
Event Category: When you enter the Event Indicator, the Event Category field automatically updates after you save.
Department: Enter the department, the individual or equipment involved in the event or select the ![]() button to select from the Org Hierarchy window.
button to select from the Org Hierarchy window.
Department Involved: Enter the department against which the claim is filed or select the ![]() button to select from the Org Hierarchy window.
button to select from the Org Hierarchy window.
Date Reported: Enter date on which the claim was reported or select the ![]() button to select from a calendar.
button to select from a calendar.
Time Reported: Enter the time the claim was reported.
Note: You must enter time in the format xx:xx, with a colon (:) between the hours and minutes. The time you enter defaults to AM unless you specify PM.
Injury From: Enter the beginning date on which the injury occurred or select the button to select from a calendar.
Injury To: Enter the date after which the injury stopped being an issue or select the button to select from a calendar.
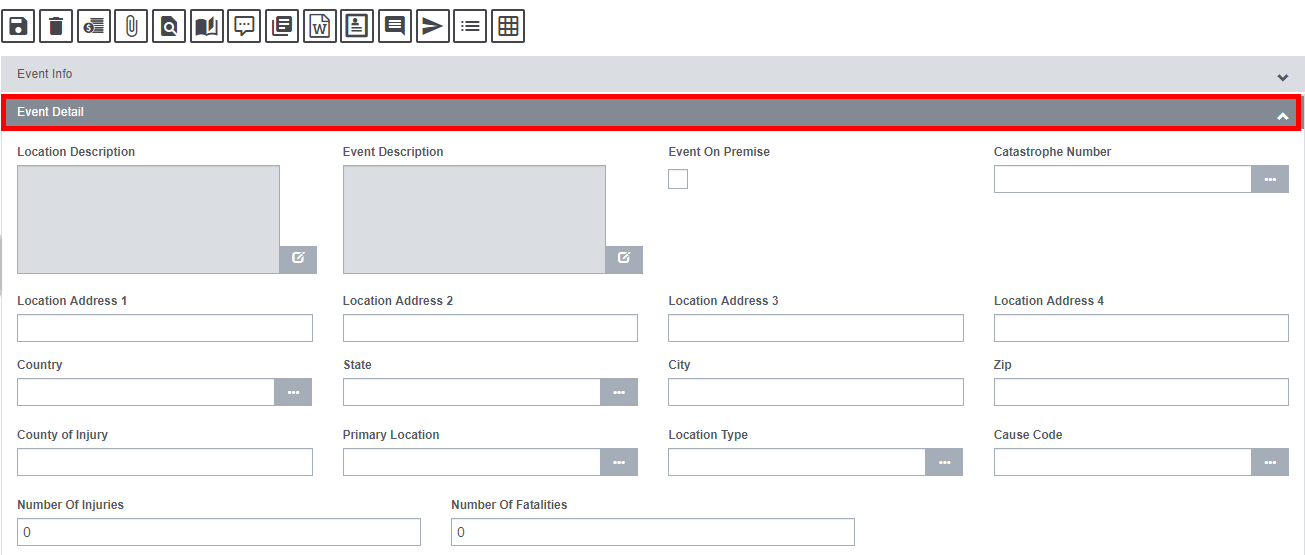
Event Window: Event Detail Tab
Use the Event Detail tab to enter details about an event such as, location of incident, cause of injury, number of injuries, and so on.
Field Description:
Location Description: Enter a description for the location where the event occurred or select the button to open the Insurance RISKMASTER Editor. In the RISKMASTER Editor, enter the description and then select the button.
Event Description: Enter a description for the event or select the button to open the RISKMASTER Editor. In the RISKMASTER Editor, enter the description and then select the button.
Event On Premise: Select the check box if the event occurred,
- on your organization’s property (if you are self-insured).
- on the insured organization’s property (if you are a TPA).
Location Address: Enter the address where the event occurred. Enter the City, State, Zip, and Country in the appropriate fields.
County of Injury: Enter the county where the event occurred.
Primary Location: Enter the code that best describes the exact location where the event occurred or select the ![]() button to select from the Code Selection window.
button to select from the Code Selection window.
Location Type: Enter the code that best describes the location type where the event occurred or select the ![]() button to select from the Code Selection window.
button to select from the Code Selection window.
Cause Code: Enter the code that best describes the event cause or select the ![]() button to select from the Code Selection window.
button to select from the Code Selection window.
Number of Injuries: Enter the number of persons injured as a result of the event.
Number of Fatalities: Enter the number of deaths that resulted from the event.
Confidential Record: Select the check box to mark the record as confidential. When you mark a record as confidential, only a specific set of selected users can then view it.
Note: When you select the check box, a window opens. You can select users you want to grant access for the selected event. The user and his supervisor
would be able to access the record.
Event Window: Reported Info Tab
Use the Reported Info tab to enter contact information for a person who reports an event.

Field Definitions:
Reporter’s Last Name: Enter the reporter’s last name or select the button to open the Standard Entity Search window and search for a reporter.
First Name: Enter the reporter’s first name.
Address: Enter the reporter’s address. Enter the City, State, Zip, and Country in the appropriate fields.
Soc. Sec. No.: Enter the reporter’s social security number (SSN).
Office Phone: Enter the reporter’s work telephone number.
Home Phone: Enter the reporter’s home telephone number.
Fax: Enter the reporter’s fax number.
Email: Enter the reporter’s email.
Event Window: Follow Up Tab
Use the Follow Up tab to record medical treatments relating to an event . You add this information to an existing event when it becomes available.
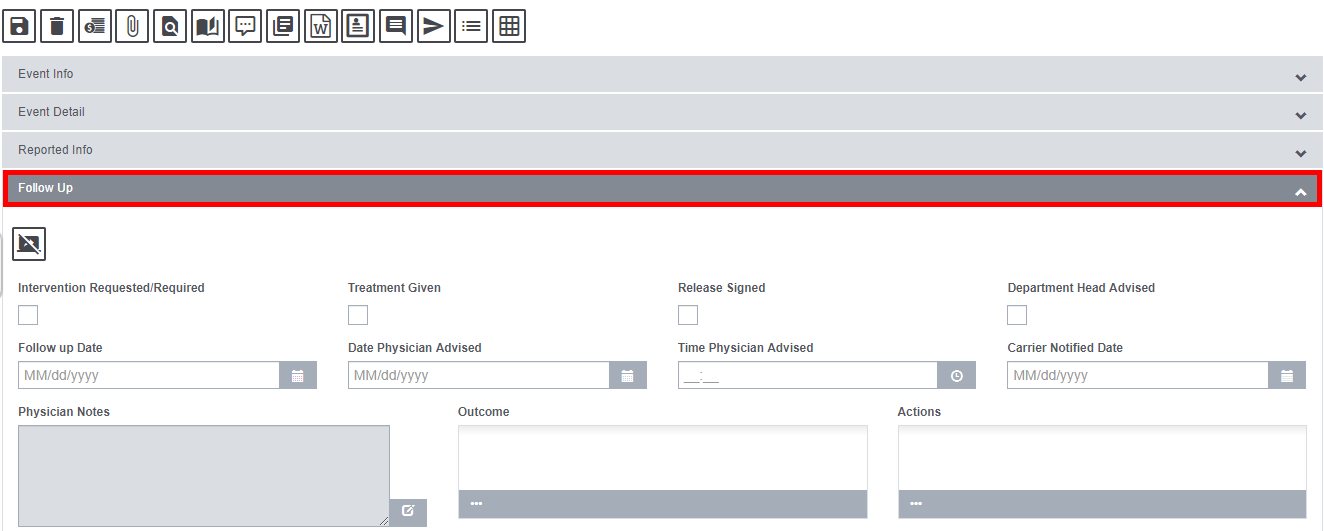
Field Description:
Release Signed: Select the check box if the patient signed a release.
Department Head Advised: Select the check box if the department head was notified.
Follow Up Date: Enter the date on which other activities occurred in response to the event or select the ![]() button to select from a calendar.
button to select from a calendar.
Date Physician Advised: Enter the date on which the physician was advised of the event or select the ![]() button to select from a calendar.
button to select from a calendar.
Time Physician Advised: Enter the time when the physician was advised of the event.
Note: You must enter time in the format xx:xx, with a colon : between the hours and minutes. The time you enter defaults to AM unless you specify PM.
Carrier Notified Date: Enter the date on which your organization’s insurance carrier was notified or select the ![]() button to select from a calendar.
button to select from a calendar.
Physician Notes: Select the button to open the RISKMASTER Editor. In the RISKMASTER Editor enter any comments the physician made and then select OK.
Treatment Given: Select the check box if a patient received medical treatment.
Additionally, Interventions ![]() button offered in the Follow Up tab. Select the button to open the Evaluation/Intervention window.
button offered in the Follow Up tab. Select the button to open the Evaluation/Intervention window.

Use the Intervention/Evaluation window to add ergonomic intervention information to events. Ergonomic intervention involves the application of ergonomics to select or design tools, machines, systems, tasks, jobs and work environments, for maximizing human performance without causing injuries or detrimentally affecting performance. Ergonomic interventions are primarily implemented to offset the cost of occupational injuries by reducing the risk of injuries occurring in the first place. The other major benefits of economic intervention are:
- Reduction in work related injuries and illnesses
- Reduction in absenteeism
- Reduction in errors
- Increased productivity and quality
- Maintaining high employee retention and morale
Event Window: Quality Management Tab

Field Description:
Case Number: Enter the medical case number.
Med. File Category: Enter the code that best describes the medical category for the case or select the ![]() to choose from the Code Selection window.
to choose from the Code Selection window.
Med. Indicator: Enter the code that best describes the medical indicator for the case or select the ![]() to choose from the Code Selection window.
to choose from the Code Selection window.
There are four other buttons offered in this tab as shown.

There functionalities are discussed below:
Initial Review Window
Select the Initial Review button ![]() to get redirected to the initial review window and enter the details about the quality management initial review.
to get redirected to the initial review window and enter the details about the quality management initial review.
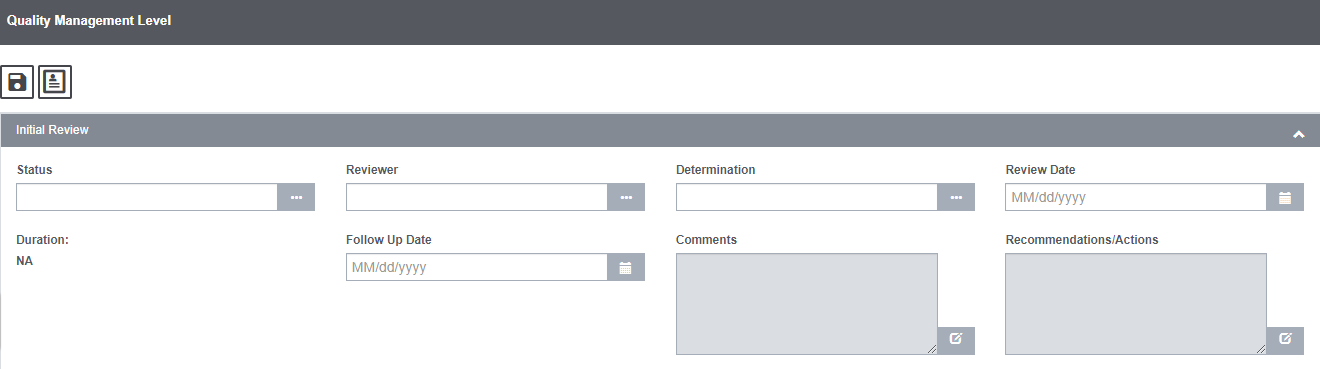
Field Description:
Status: Enter the code that best describes the status of the case or select the ![]() to choose from the Code Selection window.
to choose from the Code Selection window.
Reviewer: Select the ![]() button to open the Code Selection window and select the system user whom you want to assign as reviewer.
button to open the Code Selection window and select the system user whom you want to assign as reviewer.
Determination: Enter the code that best describes the review decision on the case or select ![]() the to choose from the Codes Selection window.
the to choose from the Codes Selection window.
Review Date: Enter date on which the reviewer conducted the initial review.
Follow Up Date: Enter date on which the follow up is scheduled.
Comments: Select the ![]() button to open the Insurance RISKMASTER Editor and enter any additional comments on the initial review of the case.
button to open the Insurance RISKMASTER Editor and enter any additional comments on the initial review of the case.
Recommendations/Actions: Select the ![]() button to open the Insurance RISKMASTER Editor and enter any recommendations for the case.
button to open the Insurance RISKMASTER Editor and enter any recommendations for the case.
Select the Save ![]() button once the details are filled. Select the Record Summary
button once the details are filled. Select the Record Summary ![]() option to view the summary of the initial review details.
option to view the summary of the initial review details.
Physician Advisor/Committee/Department/Quality Manager Review
Select Level Physical Advisor Review button ![]() to enter the details about the physical advisor review.
to enter the details about the physical advisor review.
Field Description:
Status: Enter the code that best describes the status of the case or select the to select from the Code Selection window.
Physician: Select the button to open the Standard Entity Search window and select the physician whom you want to assign as reviewer.
Determination: Enter the code that best describes the review decision on the case or select the to select from the Codes Selection window.
Review Date: Enter date on which the physician conducted the review.
Follow Up Date: Enter date on which the follow up is scheduled.
Comments: Select the button to open the Insurance RISKMASTER Editor and enter any additional comments on the initial review of the case.
Recommendations/Actions: Select the button to open the Insurance RISKMASTER Editor and enter any recommendations for the case.