How Can We Help?
Enhanced Notes
Enhanced Notes Overview
Use the Enhanced Notes feature to add notes to claims and events. Enhanced notes enable you to govern data handling and manage tasks related to claims and events. You can sort enhanced notes by adjuster, date, user type and note type and can maintain the sorted order of enhanced notes for that particular user when ever user opens the Advanced Search window.
While viewing existing enhanced notes, you can re-order column headers, print notes by note type, and create enhanced notes templates. You can also restrict editing rights to the user who creates a note and you can specify a time frame within which a note can be edited.
You must enter a Note Type code to create and complete an enhanced note. To create a new note or view notes related to an event or claim, search for the event or the claim you want to associate the note with and then open the Enhanced Notes window.
Enhanced Notes Window
Use the Enhanced Notes window to see notes attached to an event or a claim . You can view the enhanced notes in the upper frame of the window with the most recent note being the first. You can re-order the columns on the Enhanced Notes window by simply dragging and dropping a column header to change the position of the column.
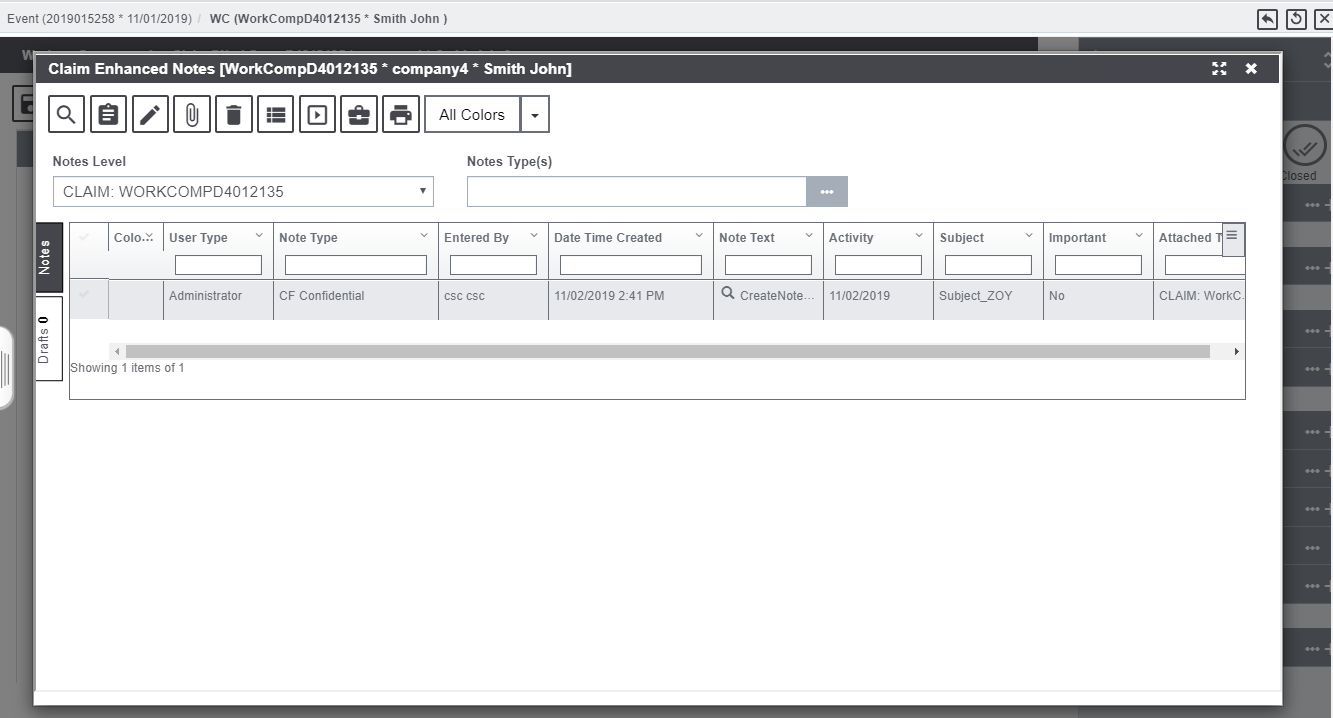
You can select the Create New button to enter new claim notes. You can also modify the list of notes available by selecting the advanced search button. Select a note from the upper frame to display more details about the note in the two fields below. The functionality of the various buttons in the toolbar are discussed below:

Advanced Search: Select the ![]() button to open the Advanced Search window.
button to open the Advanced Search window.
Create Note: Select the ![]() button to create a new enhanced note for a claim or an event.
button to create a new enhanced note for a claim or an event.
Edit Note: Select the ![]() button to edit an existing enhanced note.
button to edit an existing enhanced note.
Note Attachment: This button ![]() displays the note text entered while creating the enhanced note.
displays the note text entered while creating the enhanced note.
Delete Note: Select a note and then select this ![]() button to delete the selected enhanced note.
button to delete the selected enhanced note.
View All Notes: Select the ![]() button to display all the enhanced notes in ascending order.
button to display all the enhanced notes in ascending order.
Templates: Select the ![]() button to open the Enhanced Notes Templates window and select a template to use for enhanced notes.
button to open the Enhanced Notes Templates window and select a template to use for enhanced notes.
Print Notes: Select the ![]() button to display the notes in a Print Preview window. You can select any one of the following:
button to display the notes in a Print Preview window. You can select any one of the following:
- Print Selected Note: Select a note and then select this option to display the selected note in a Print Preview window.
- Print All Notes: Select the option to display all the notes in a Print Preview window.
- Print Notes by Note Type: Select the option to display the notes by selected note type in the Print Preview window.
Note: You need to select a Note Type before selecting the Print Notes button.
Advanced Search Window
Use the Enhanced Notes Search window to modify the list of notes available for viewing. The list is limited to the notes attached to the Event associated with the current claim , and whether or not the note type is a confidential note type.

To open from the Enhanced Notes window, select the Advanced Search button.
Field definitions:
Event Number: Displays the number of the event to which the list of notes is attached.
Claim(s): Select Claim option to open the Claim Selection window, and select the claim for which you want to view the enhanced note.
Claimant: Select Claimant option to open the Claim Selection window, and select the claimant for whom you want to view the enhanced note.
User Group: Select the button to open the Code Selection window and select the user type who has access to the enhanced notes.
Entered By: Select the button to open the Code Selection window and select the system user who entered the enhanced notes.
Activity From Date: Select button to select the start date from which you want to view the enhanced notes.
Activity To Date: Select button to select the end date till which you want to view the enhanced notes.
Note Type: Enter the code that best describes the note type or select the button to select from the Code Selection window.
Subject: Enter the text you want to search for in the Subject field in the notes list.
Notes Text Contains: Enter the text you want to search for in the Note Text field in the notes list.
Important: Displays whether the Enhanced Notes is important or not.
Sort By: From the drop down list, select the criteria you want to use to sort the notes list in order of importance. Begin with the most important criteria on the left, followed by the second most important and so on. You can sort the list by:
- Entered By: Name of the user who entered the note.
- Note Type: The type of note (Supervisor, System and so on.)
Note: If the note type is of type confidential, then only the entering user and the entering user’s supervisor can view the note.
- Activity Date: A date range for the creation of the note.
- User Type: A code defined for each security group and inherited by a user added to that group.
Note: The sorted order of notes list is maintained for that particular user when ever user opens the window.
Create an Enhanced Note
To create an enhanced note, first, search for the claim or event you want to attach enhanced notes to. The event opens in the event window or the claim opens in a Claim window. Now, from the toolbar, select the Enhanced Notes ![]() button. The Enhanced Notes window opens.
button. The Enhanced Notes window opens.
You can even navigate to the Enhanced Note window from the right-hand pane of the Claim screen. On ![]() the Enhanced Note window, select Create Note button to get redirected to the note creation screen as shown below:
the Enhanced Note window, select Create Note button to get redirected to the note creation screen as shown below:
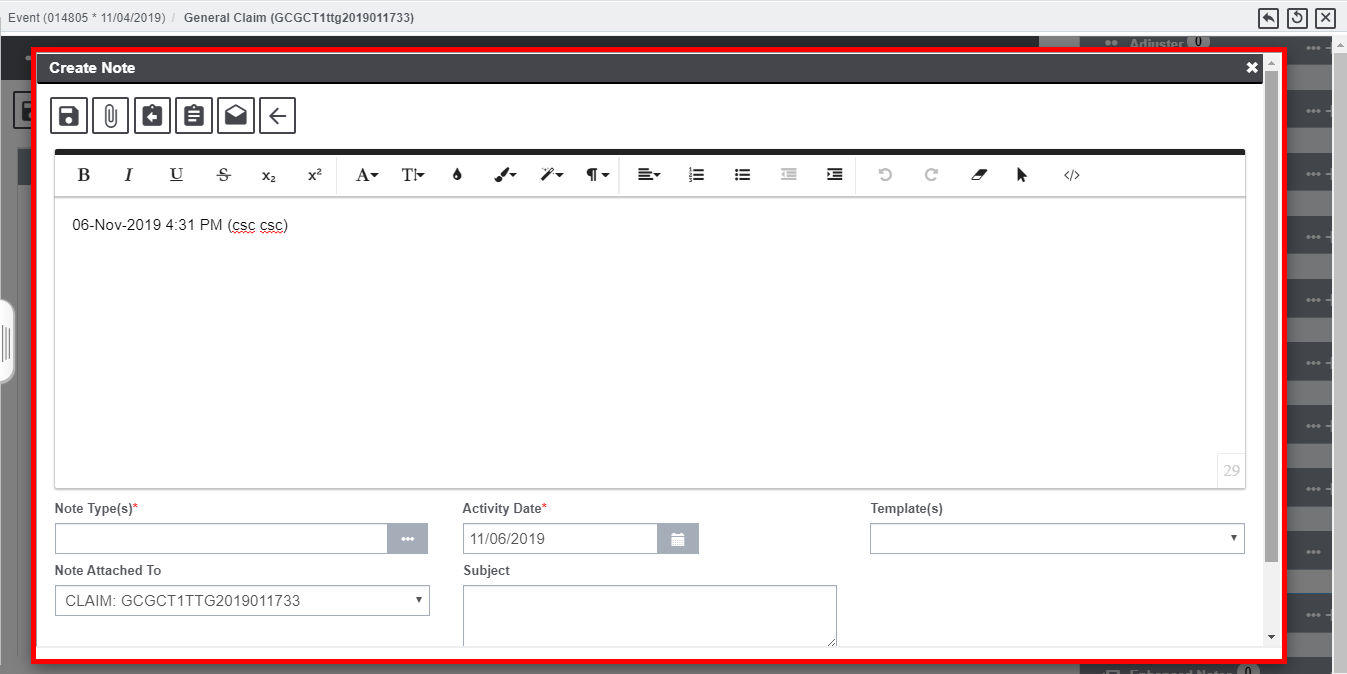
Fill the fields on the Create Notes window, as discussed below:
Note Type: Enter the code that best describes the note type or select the button to select from the Code Selection window.
If you select a confidential note type, only the current adjuster and the current adjuster’s supervisor can view the note. You have to select a note type to complete a enhanced note.
You can change the Note Type for an enhanced note. If the note type is that of a system generated note, you cannot change the note type.
Activity Date: Enter a date for creation of the enhanced note. By default, the Activity Date is the current system date.
Template: Select the ellipses button to open the Enhanced Notes Templates window and select a template for enhanced notes.
Note Attached: To Select a claim or the event to which you want to attach the note to. If a note applies to all claims related to an event, do not associate it with an individual claim.
Subject: Enter the Subject line for the notes.
Toolbar Buttons in the Create Note Window
The buttons offered in the toolbar menu of the Create Note window are discussed below:
Note Attach: This button ![]() enables you to attach document to the note text entered while creating the enhanced note.
enables you to attach document to the note text entered while creating the enhanced note.
Create Another Note: Select the ![]() button to create a new note for the claim without closing the window and navigating back to the Enhanced Notes window.
button to create a new note for the claim without closing the window and navigating back to the Enhanced Notes window.
Save as Draft: Select the ![]() button to save the entered note as draft.
button to save the entered note as draft.
View All Notes
Select the View All Notes button to see all the saved notes. The notes will be displayed in the format shown below:
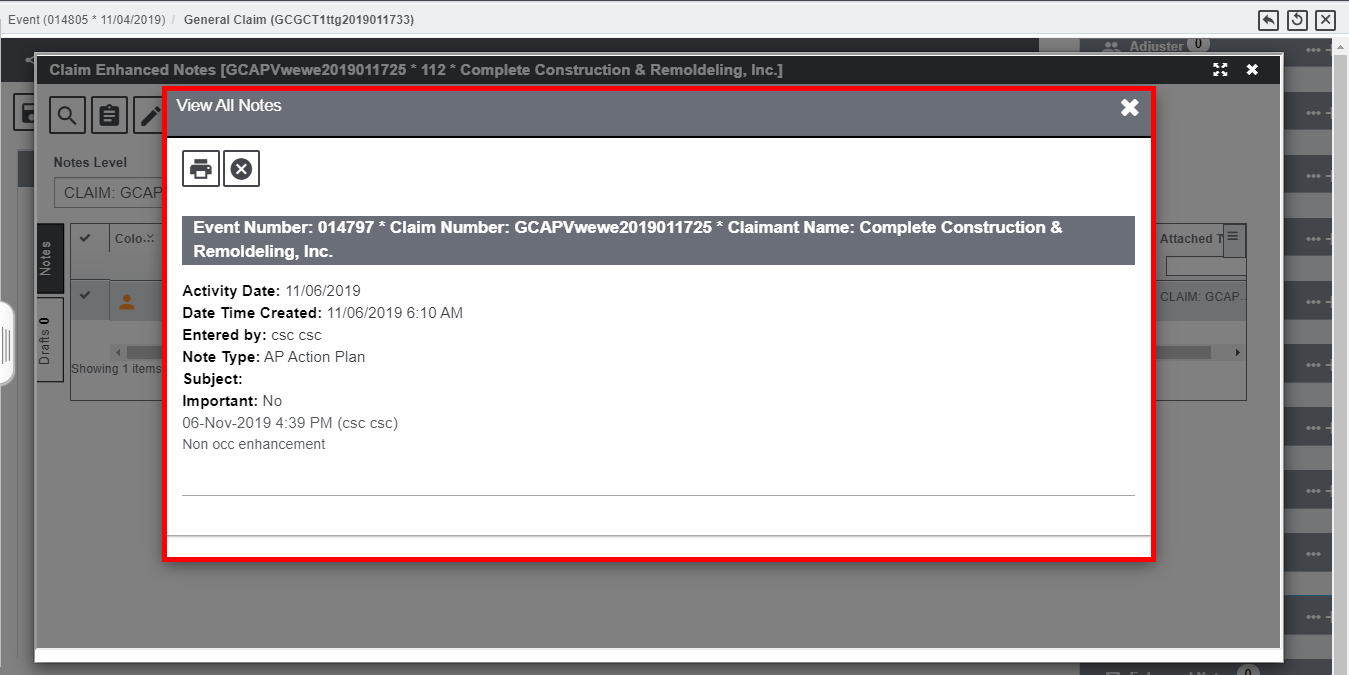
Field Definitions:
Activity Date: Displays the date of creation of the Enhanced note.
Date/Time Created: Displays the date/Time of creation of the enhanced note.
Entered By: Displays the name of the user who entered the enhanced note.
Notes Type: Displays the note type code and description selected from the Note Type Codes List. If you select a confidential note type, only the current adjuster and the current adjuster’s supervisor can view the note.
Note: You can change the Note Type for a enhanced note. If the note type is that of a system generated note, you cannot change the note type.
Subject: Displays the information describing the content of the note. It is an optional field and is used only for display.
Important: Displays whether the Enhanced Notes is important or not.
Notes Detailed View
Navigating through Progress Notes has been rendered easier with a much-improved Enhanced Notes popup window. The Next & Previous command buttons or the Left/Right arrow keyboard keys can be used to toggled various Notes.
View the detailed video demonstration of this enhancement below:
Templates Window
To select the template for the notes, on the Enhanced Notes window, select the Templates button from the toolbar. This will get you redirected to the View All Templates window.
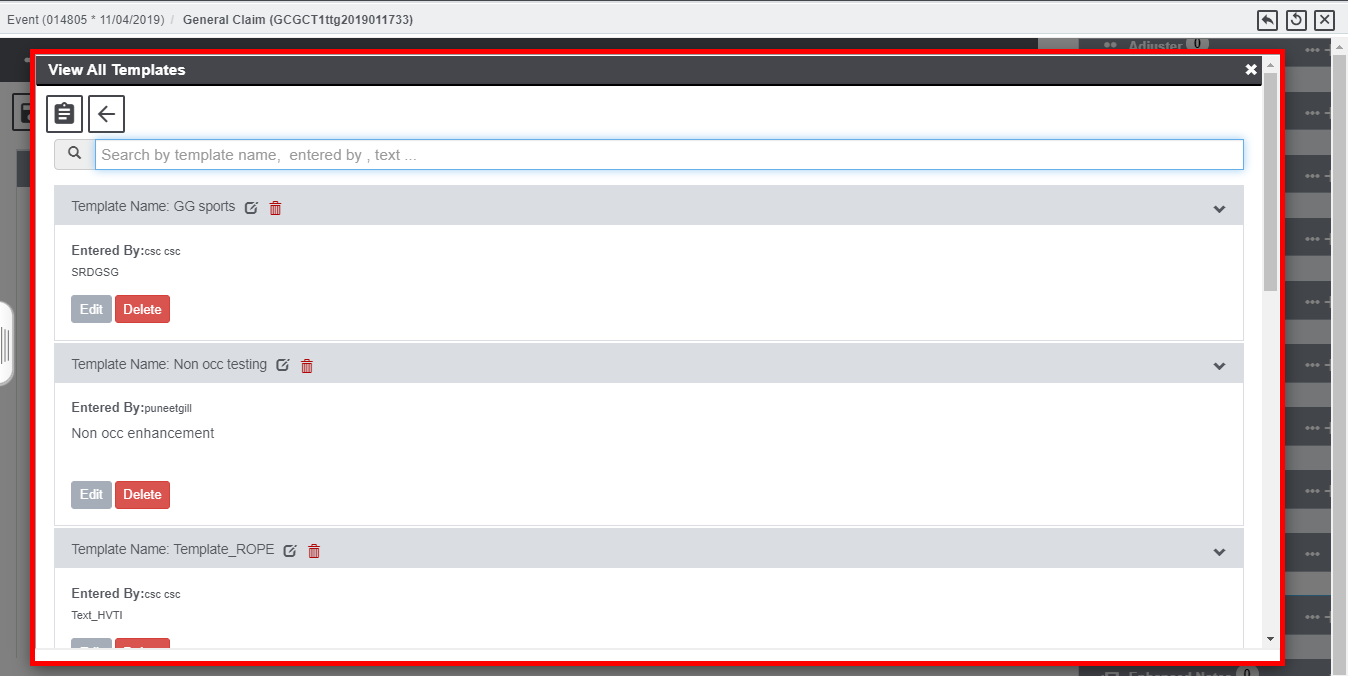
Field definitions:
Template Name: Displays the name of the template.
Entered By: Displays the name of the user who created the template.
Create Template: Select the button to open a window that lets you create a new enhanced notes template.
Edit Template: Select an existing template and then select the button to open a window that lets you edit the template.
Delete Template: Select an existing template and then select the button to delete the template.
Print Notes
To print all notes, follow the steps mentioned below:
1. Search for the claim or event you want to attach an enhanced note to.
2. The event opens in the event window or the claim opens in a Claim window.
3. From the toolbar, select the Enhanced Notes button . The Enhanced Notes window opens.
4. Select the Print All Notes option.
5. Select the Print Notes button to display the notes in a print preview window.
6. On the Print Preview window, select the print button to get a printed copy of all the notes.
To print selected note
1. On the Enhanced Notes window, select the option against the note that you want to print.
2. Select the Print Selected Note option.
3. Select the Print Notes button to display the selected note in a Print Preview window.
4. On the Print preview window, select the print button to get a printed copy of the note.
To print notes by Note Type.
1. On the Enhanced Notes window, select the Print Notes by Note Type option.
2. In the Note Types field, select the ![]() button to open Code Selection window to select the required note type.
button to open Code Selection window to select the required note type.
3. Select the Print Notes button to display the notes in a print preview window.
4. On the print preview window, select the print button to get a printed copy of the notes.