How Can We Help?
Diaries
Diaries Overview
Work Process Administration (WPA) in DXC Assure Claims refers to the Diary system. The Diary system of the application offers strong work management capabilities. The Diary System Messaging function enhances communication between system users by enabling sending of messages and Diaries to other users. You can use Diaries to create Reminders, and to assign, track, and prioritize Tasks.
Purpose of Diaries
You can use a Diary in three typical work scenarios:
- Bookmarking records or windows for later reviews or work tasks.
- Routing work in a group, based on predetermined timelines or any other criteria.
- Automatic, Best Practice Business Rule checking and Diary creation. Best Practices provide the Business Rules and templates with benefits and proactive triggers.
Type of Diaries
The various types of Diaries offered are discussed below:
1. Referenced Diary/ To Do List: A readily accessible, organized list of Diary tasks and the due dates for these tasks.
2. Quick diary/ Bookmarking: A quick and easy method of bookmarking Claims, by attaching a Claim to the Diary To Do List. The Quick Diary enables the easy retrieval of a Claim record.
3. Auto diary/ Best Business Practices: A tool that enables you to choose a pre-designed task option for frequently used Claim Types, and to automatically assign common tasks.
4. Diary Routing: A quick and easy method of sending or assigning a Diary Task to another user.
5. Referenced Email: A simple messaging system between system users.
Work Process Administration
The main processes in Work Process Administration are discussed below:
Documentation: You can document Events, Claims, Policies and Funds using various software products, such as, Smart System Functions built into Business Rules, Auto Diaries and System Utilities.
Administration: You can process and forward records by Role and Function and use instructions and procedures to further organize work. Use Time and Event triggers to assist in keeping work on schedule.
Billing and Forecast: You can provide billing information and forecast using Time on Task. Time on Task enables you to assign the time you want to spend on a Diary, or to process bills, or forecast reports using SORTMASTER.
Reporting: You can generate reports using SORTMASTER.
Diaries Window
A Diary can be reviewed, created and managed from the Diaries Window.
Note: You can click on a column title to sort the diary list by that column.
To open the Diaries Window, from the main menu, select Diaries. From the Diaries menu, choose Diary List.
Diaries Toolbar
The functionality of the various toolbar buttons on Diaries window are discussed below:
![]()
Create Diary: Select the ![]() button to create a new Diary.
button to create a new Diary.
Edit Diary: Select the ![]() button to edit a new/existing diary. Select the diary that is to be edited and then select this button open the diary window.
button to edit a new/existing diary. Select the diary that is to be edited and then select this button open the diary window.
Complete: Select the ![]() button to complete the diary task. Select a diary and then select this Complete button to mark the selected diary as completed.
button to complete the diary task. Select a diary and then select this Complete button to mark the selected diary as completed.
Route: Select the ![]() button to route the diary to another user.
button to route the diary to another user.
Roll: Select the ![]() button to choose the date to roll the diary.
button to choose the date to roll the diary.
Peek: Peek ![]() button allows the manager to view the diaries of other users
button allows the manager to view the diaries of other users
History: Select the ![]() button to see the diary history.
button to see the diary history.
Void: Choose the ![]() button to void the selected diary.
button to void the selected diary.
Print: Choose the ![]() button to print the selected diary.
button to print the selected diary.
Reload: Select the ![]() button to reload the diary page.
button to reload the diary page.
Create a New Diary
Use the Create Diary window to create a new diary task. To open the Create Diary Window, select the ![]() button from the toolbar.
button from the toolbar.
In order to create a Diary for a particular claims, go to the Claim window and select the Diary ![]() button to pop open the Attach Diary window.
button to pop open the Attach Diary window.
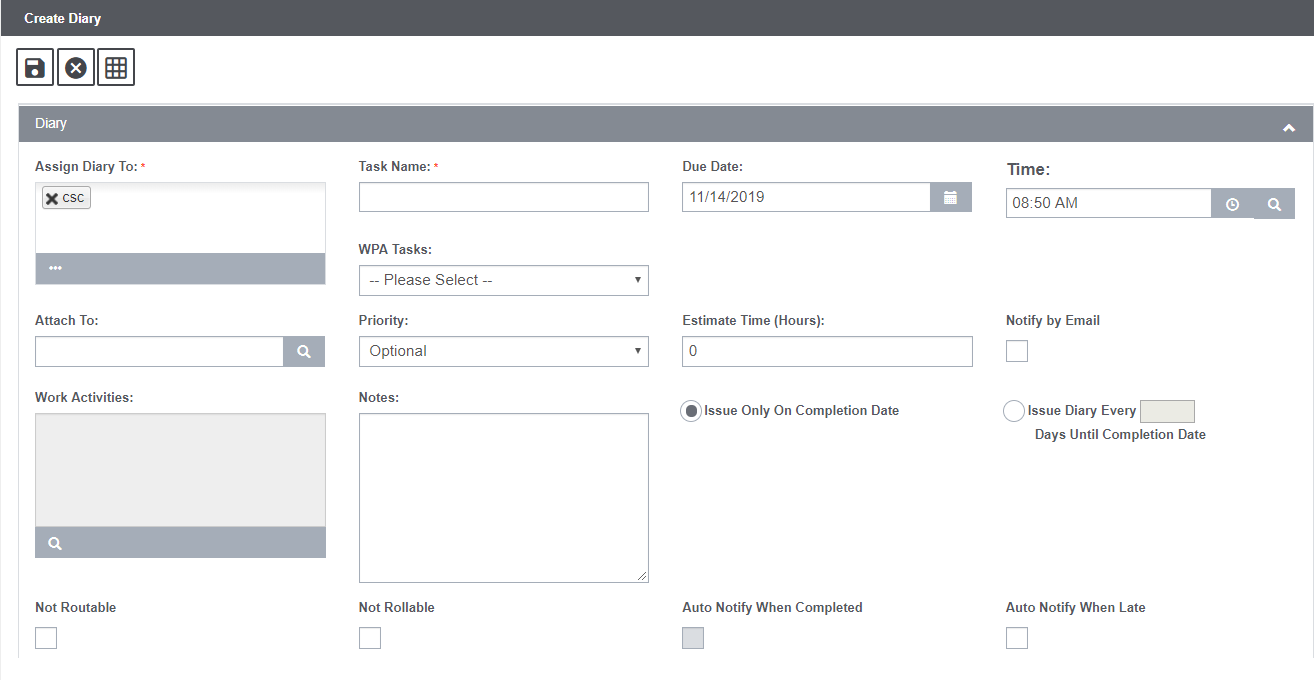
Field definitions:
Assign Diary To: Select the user you want to assign this diary to.
Task Name: Enter a descriptive name for the diary task. If you open the Create Diary window from a claim or event, this field is automatically populated.
Due Date/Time: Enter the date and the time when you want the task to be completed or select the calendar button to enter date from a calendar.
Attach To: Select the search ![]() button to open the Search window and select the claim for which you want to create a diary.
button to open the Search window and select the claim for which you want to create a diary.
WPA Tasks:
Priority: From the drop down list, select the importance you want to assign to the task.
Notes: Enter additional comments for the diary.
Estimate Time (Hours): Enter an approximate time in hours to complete the diary.
Notify by Email: Select the check box to automatically send an email notification to the assigned users as soon as a diary is created or updated.
Note: By default this check box is checked. You can uncheck it. For email notification to be sent,a valid email address must be set up in the Security Management System for assigned users or for the user creating the diary.
Work Activities: Select the search ![]() button to open the Create Diary window and from the drop down list select a work activity description. You can add multiple work activities.
button to open the Create Diary window and from the drop down list select a work activity description. You can add multiple work activities.
Notes: Enter the required text for the diary.
Issue only on Completion Date: Select the option to issue diary reminders on the due date only.
Issue Diary Every ___ Days Until Completion Date: Select the option to issue diary reminders at intervals of the number of days you enter.
Not Routable: Select the checkbox if the Route option is to be disabled for the concerned diary.
Not Rollable: Select the checkbox if the Roll option is to be disabled for the concerned diary.
Automatic Notification When Completed: Select to automatically notify users for this diary, when the diary is marked as completed.
Automatic Notification when Late: Select the check box to automatically notify users associated with this diary when there is delay in completion of the diary.
Route Diary
Route Diary option enables you to change the assignee of a particular diary. To avail the functionality, select the Diary from the Diary List and click the Route button to pop open Route Diary window.
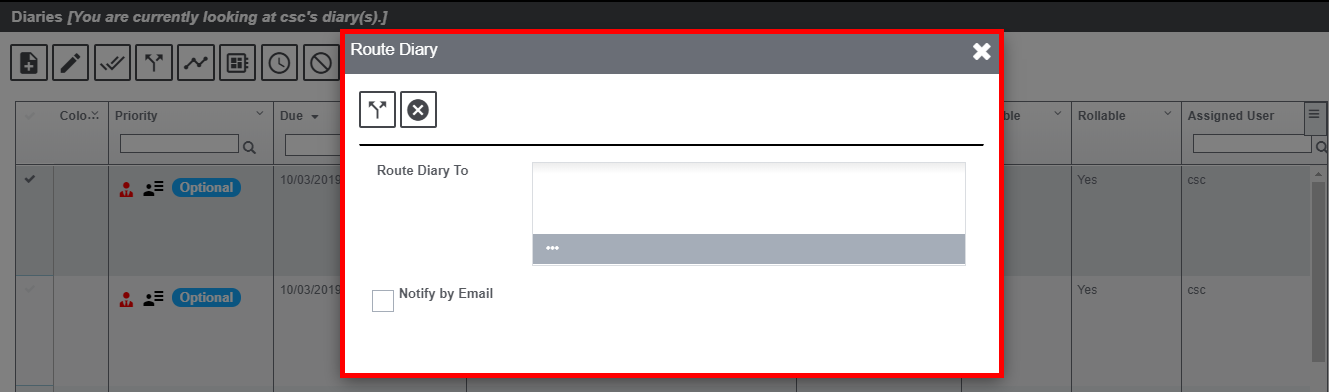
In the Route Diary To field, select a user to assign the selected diary task to, and then select the Route button. DXC Assure Claims will notify the selected user about the diary assignment.
Note: On the Route Diary window, the check box Notify by Email is checked by default, although you can uncheck it. This automatically sends an email notification to the routed user as soon the user is selected to assign the selected diary task to.
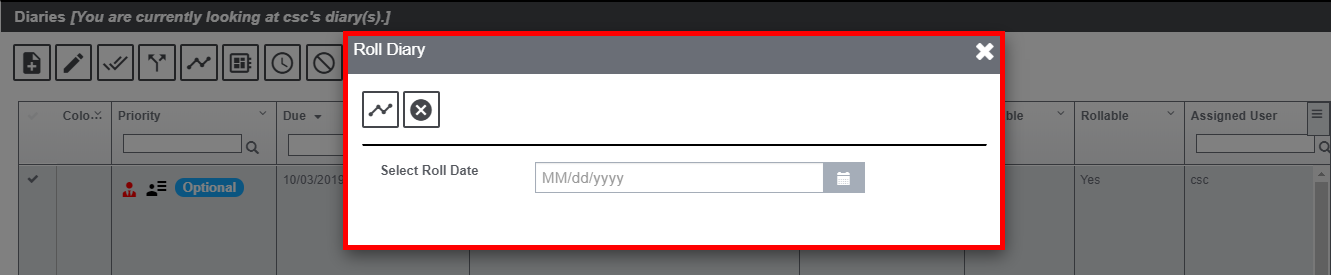
Roll Diary
The Roll Diary option enables you to change the due date of the task of a particular diary.
To leverage the feature, select a diary from the list and then select this button to open the Roll Diary window. On the Roll Diary window, enter a new due date for the task and then select the Roll button.
Peek Diaries
Peeking allows a manager to view the diaries of other users. These diaries may be edited routed and\or completed by the manager.
To avail the feature, first, select the Peek ![]() button to open the Diary Peek window. Second, select a user whose diaries you would like to see from the list of available users then click on the Peek
button to open the Diary Peek window. Second, select a user whose diaries you would like to see from the list of available users then click on the Peek ![]() button.
button.
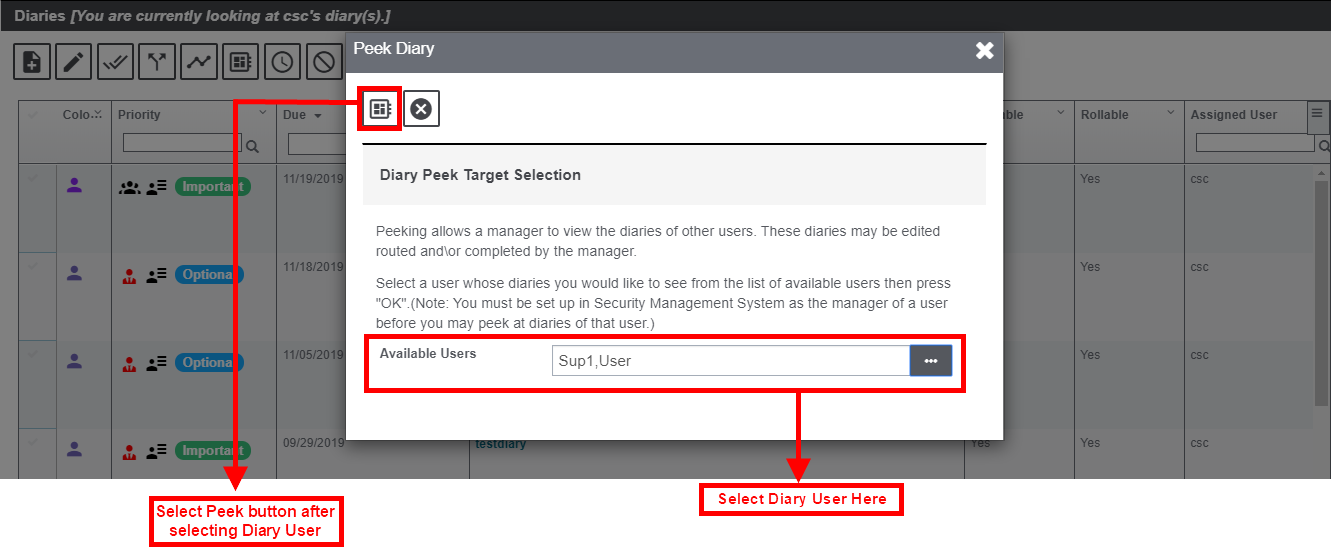
This will get you redirected to the diary list of the selected user. To go back to your own diary list, select the Home button.
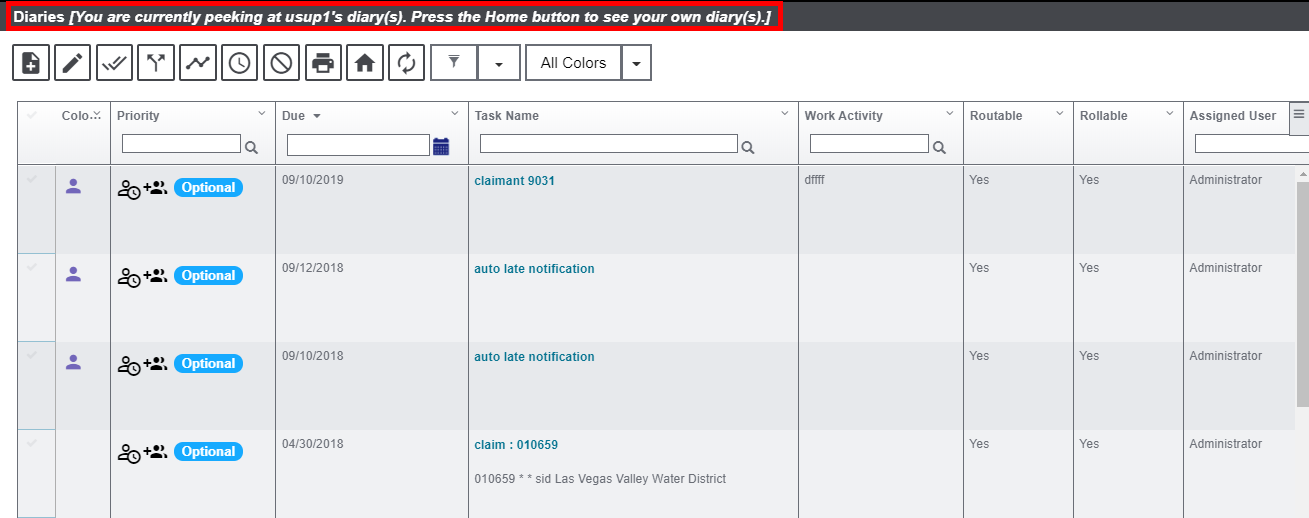
Note: You must be set up in Security Management System as the manager of a user before you may peek at diaries of that user.
Diary History
Select the History ![]() button to open and view the Diary History window. The window displays the completed diary tasks. You can view the diary completion dates, completion responses and expenses your organization spent on the task.
button to open and view the Diary History window. The window displays the completed diary tasks. You can view the diary completion dates, completion responses and expenses your organization spent on the task.
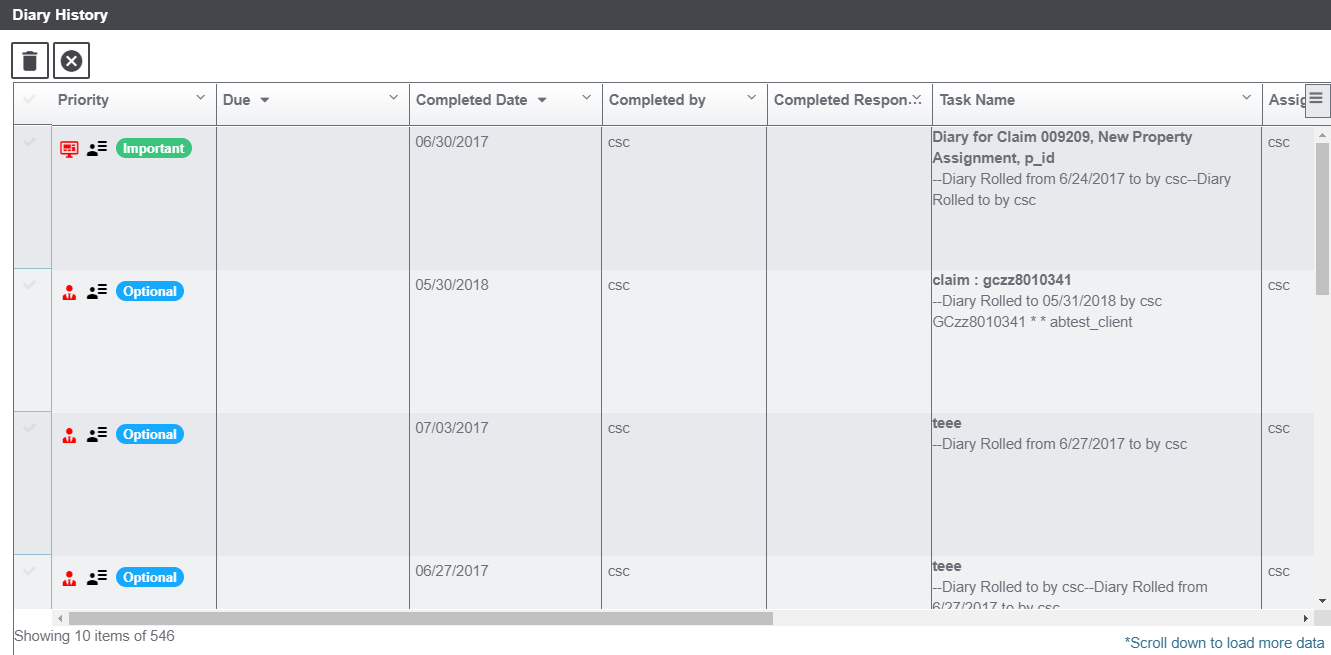
Field Description:
Priority: Displays the level of importance for the task, it’s user and the due date of the same. All these information of the diaries are indicated by various colors and icons, such as:
| This icon.. | Indicates that… |
| The task is Important. | |
| The task is Required. | |
| The task is Optional. | |
| The task was assigned by a different user. The black indicates that it is overdue. | |
| The task was assigned by a different user. The red indicates that it is overdue. | |
| The task was generated using Auto diary. The black indicates that it is overdue. | |
| The task was generated using Auto diary. The red indicates that it is overdue. | |
| User | |
| Group | |
| Other User Diary, Not Overdue | |
| Same User, Diary Not Overdue |
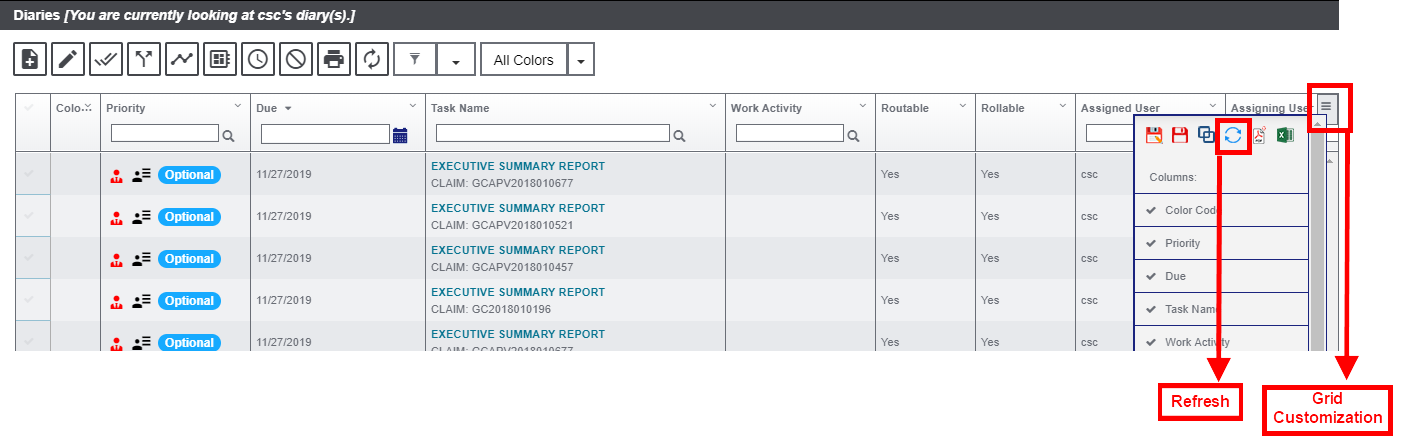
Note: When upgrading from a previous version of DXC Assure Claims to version 19.3, it is recommended to refresh the grid by selecting the Restore State icon accessed via the Grid Customization hamburger icon.
Completed Date: In case, the diary is marked as completed, then, the date of completion will be displayed in this field.
Completed By: In case, the diary is marked as completed, then, the name of the user by whom the diary was completed will be displayed in this field.
Completed Response: The response of the completed diaries will be displayed in this field.
Task Name: Displays the name and basic information of the task. Also displays whether the task is a quick diary.
Assigned User: Displays the name of the user to whom the diary has been assigned.
Assigning User: Displays the name of the user who is assigning the diary.
Claim Status: Displays the status of the claim.
Diary Status: Displays the status of the diary.
Attached Record: Displays the record the diary is attached to.
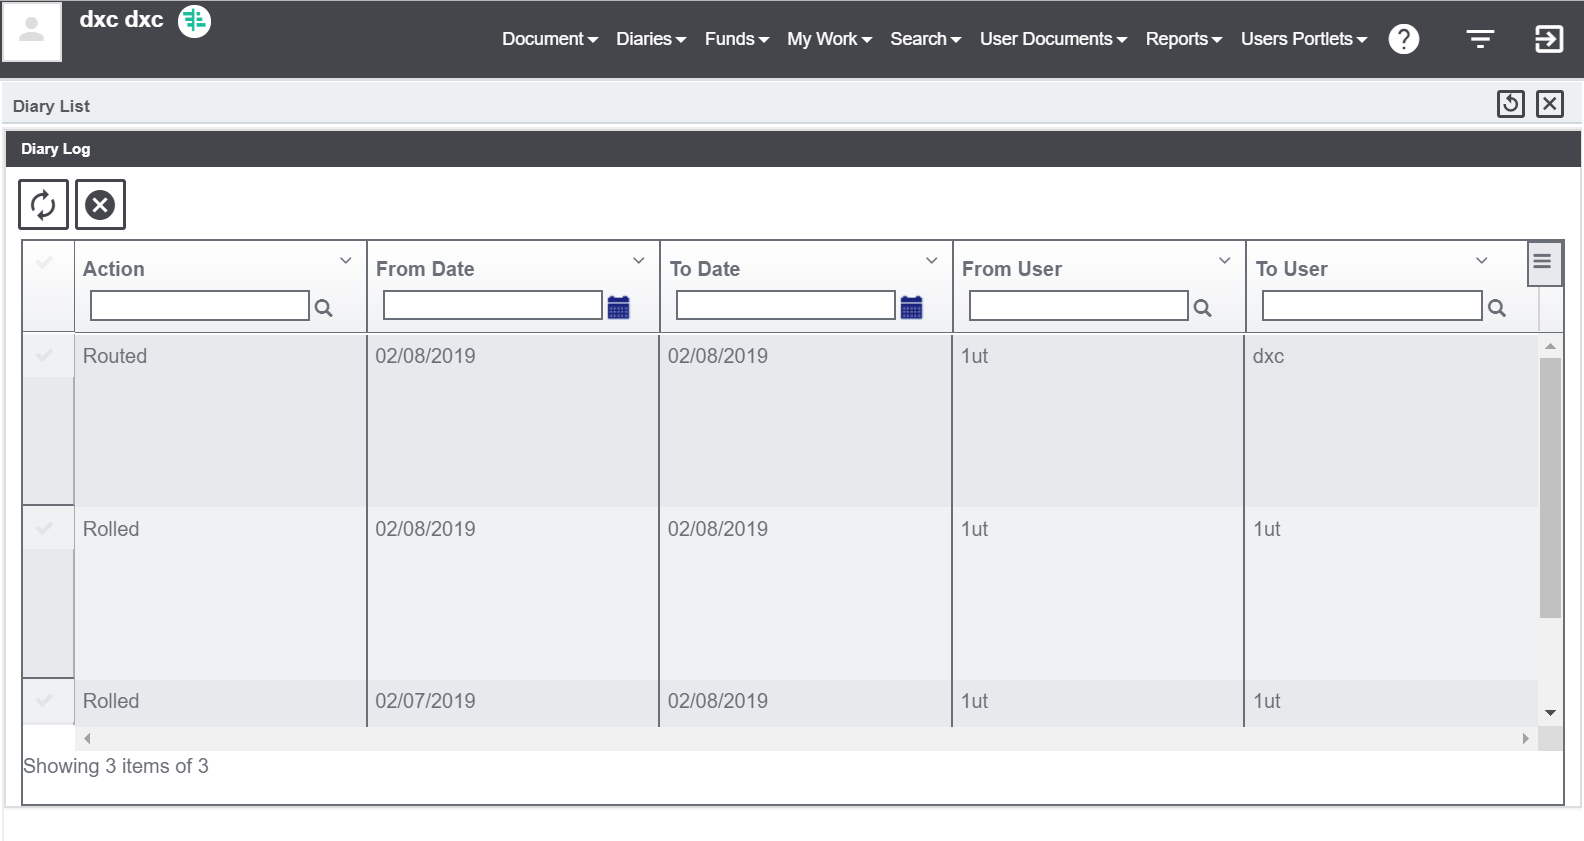
Log Information: To make Diary tracking convenient for the users, DXC Assure Claims has introduced a Log Information column. The Rolled and Routed information are now displayed in this column instead of the Task Name. To view the information, select the Diary and click on the Magnifier in the Log Information.
The information of that Diary will be displayed as shown in the image below. Similar Log Information column has been added in the History section as well. The same information will be displayed here.
Additionally, the Log Information column is multi-lingual complaint as well. A new “Diary Log” option has been added in the Localization Setup of the Utility screen. Thus, the log information can be displayed in multiple languages.
Note: The log information will not be created for the existing diaries if the user is upgrading from the previous version to the latest release version of Insurance RISKMASTER. The log information will only be created for the new diaries after the upgrade is done.
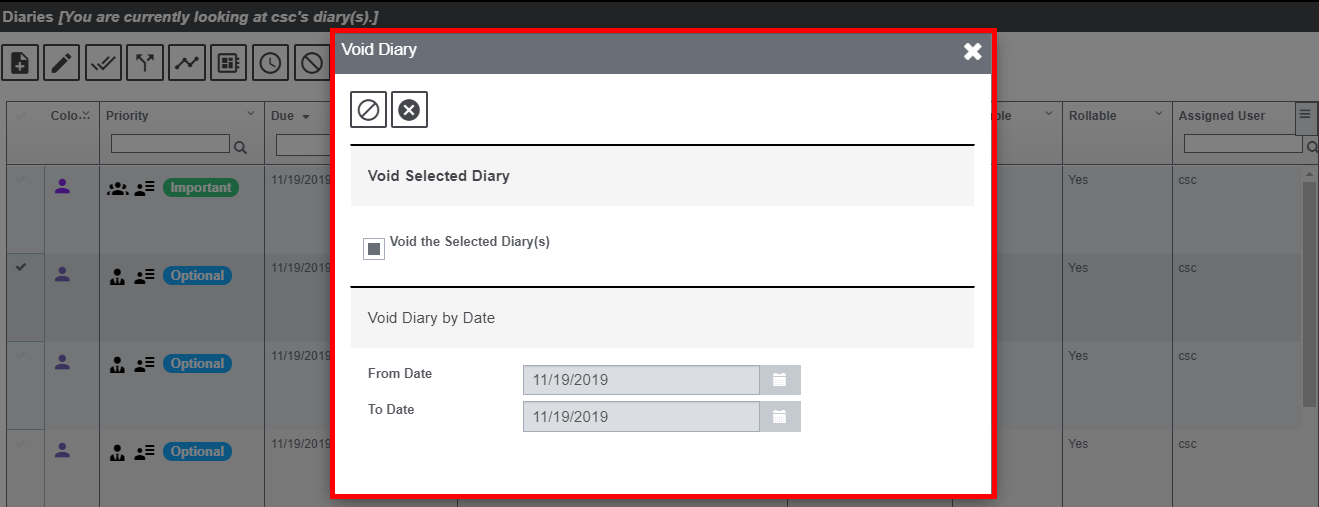
Void Diary
To void a diary, select the diary from the list and then select the ![]() button to open the Void Diary window. On the Void diary window, follow the steps mentioned below:
button to open the Void Diary window. On the Void diary window, follow the steps mentioned below:
- Check the Void the Selected Diary(s) checkbox to void the selected diary only.
- Or else, select From and To dates to delete all diaries with due dates that fall between the dates you entered.
- Select the Void button to delete the selected diaries, or the Cancel button to close the window without deleting diaries.
Diary Calendar Window
The Diary Calendar window displays a calendar with diaries marked on it. You can filter the diaries to include in the calendar.
To open the Diary Calendar, from the main menu, select Diaries followed by Diary Calendar.
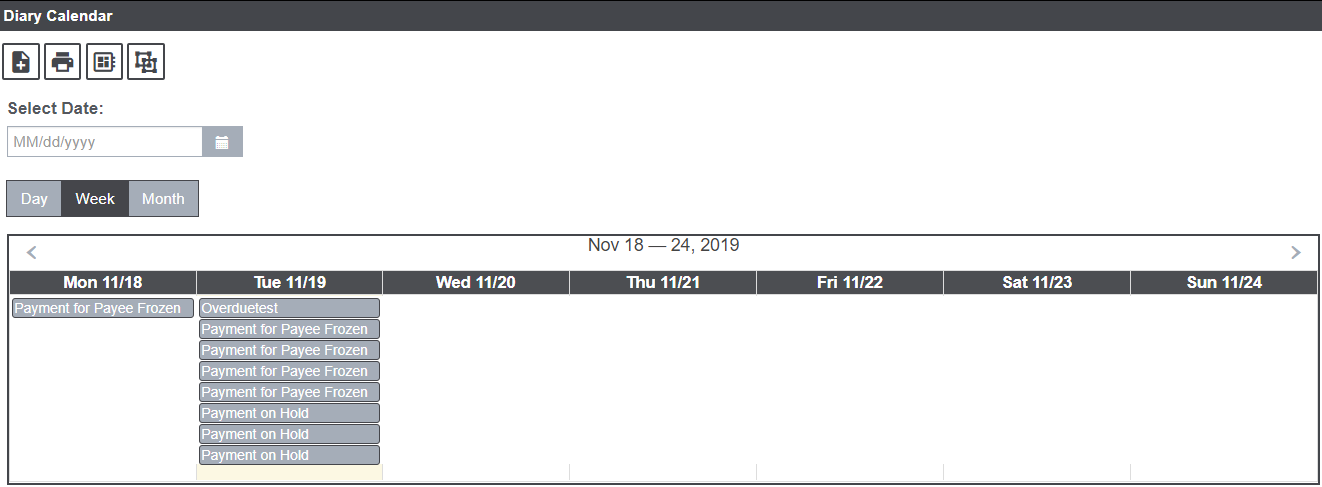
Select Date: Select the date and the diaries due on the particular date will be displayed.
Diary List Style:
- Select Daily to print a calendar with only one day per window.
- Select Weekly to print a calendar with one week per window.
- Select Monthly to print a calendar with only one month per window.
Print: Select to open the Print Preview window. View your calendar and then choose Print to print the calendar to your default printer.