How Can We Help?
Bank Account
1.0 Bank Account Overview
The Bank Account module offered by Assure Claims empowers you can to keep track of funds associated with a Claim. It even enables you to create Bank and Sub-bank accounts, as per the requirement. Not just this, even the checks can be scheduled automatically, as and when required.
After you set up your bank account information, you can configure the display of information on the checks. You must set up the check stock for each bank account against which you will enter the checks. For example, you can have several checking accounts or escrow accounts that you use to issue payments. Each payment requires a separate account record and check.
To navigate to the Bank Account window, go to Claims > Funds > Bank Account.
2.0 Bank Account – Field Descriptions
The Bank Account window enables you to create a new Bank account. It features three accordions. The various fields in these accordions are discussed in detail below.
2.1 General Information Accordion
This section caters to the basic information of the bank account that is being created.
Field Description:
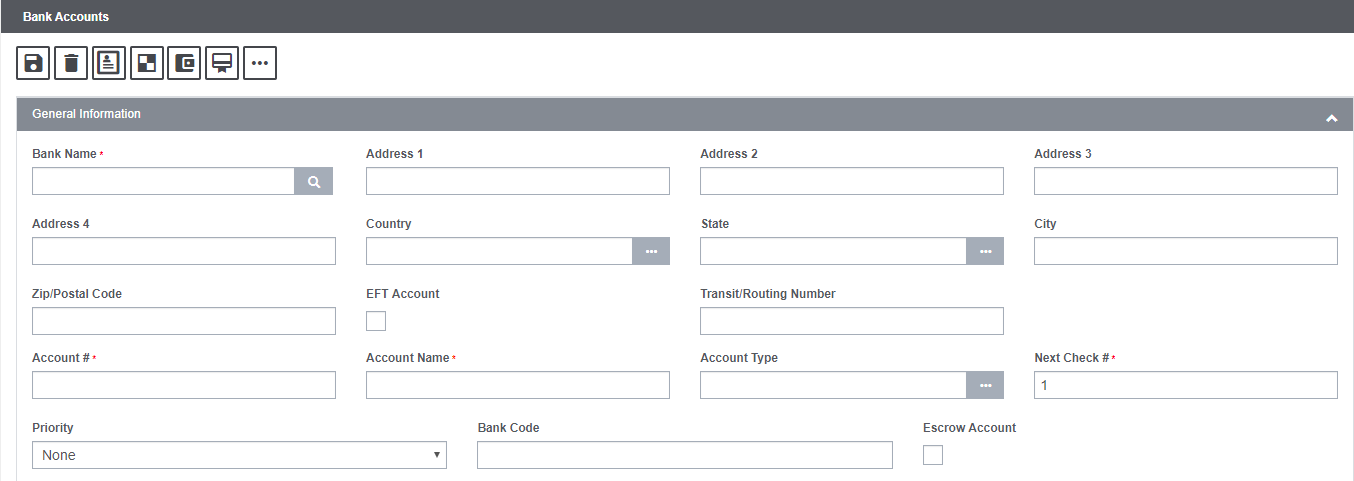
Bank Name: Enter the name of the bank associated with the entity.
Address: Enter the address, zip/postal code, state and country of the bank.
EFT Account: Select the checkbox if the account is an EFT account.
Transit/Routing Number: Enter the unique transit/routing number.
Account #: Enter the account number associated with the entity. Enter the banking status from the Code Selection window.
Account Name: Enter the name of the account holder in this field.
Account Type: Enter the account type or select the ![]() button to select the account type from the Code Selection window. EFT Account Types include:
button to select the account type from the Code Selection window. EFT Account Types include:
- CA (Checking Account)
- CDA (Cert of Deposit Account)
- JA (Joint Account)
- SA (Savings Account)
Next Check#: Enter the number for the next check.
Priority: Set the priority for the bank account from the dropdown list.
Bank Code: Enter the bank code in this field.
Escrow Account: Select the checkbox if the account is an Escrow account.
2.2 Account Owner Accordion
This section of the screen compiles the information pertaining to the account holder of the bank account.
Field Definition:
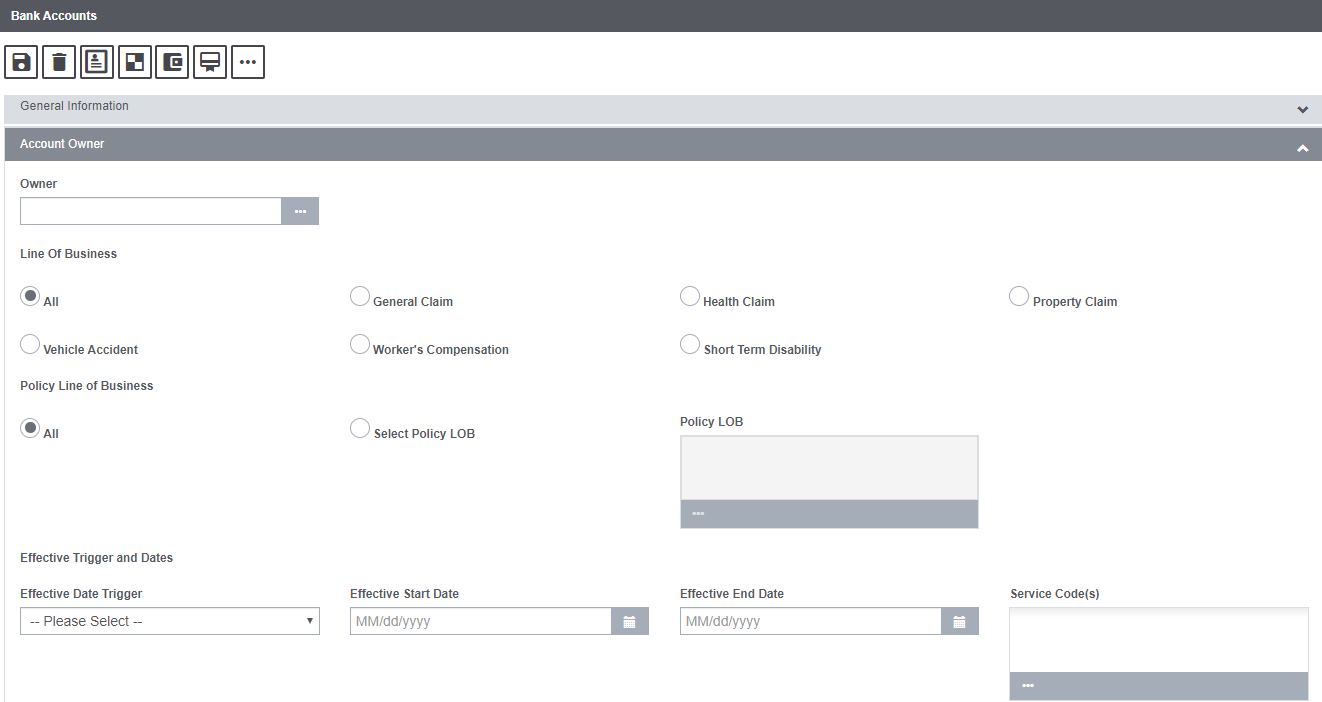
Owner: Select the account owner from the Organization Hierarchy by selecting the ![]() icon.
icon.
Line of Business: Choose the Line of Business associated with the bank account by selecting the respective radio button. If the radio button labelled, All, is selected, then, the all the available LOB will be selected in one go.
Policy Line Of Business: The field features various radio buttons for different Policy LOBs. Select the Policy LOB by selecting the respective radio buttons. If the radio button labelled, All, is selected, then, the all the available LOB will be selected in one go.
Effective Trigger and Dates
Effective Date Trigger: Assure Claims uses the trigger date that is selected in this field, to determine whether the Bank Account can be used for a particular Claim. For example, if an Event Date is selected, then, the system uses the Bank Account for a claim only if it’s Event Date falls within the Effective Date Range you specify. The Effective Date Trigger drop down list includes the following options:
- Select Current System Date, if you want to use today’s date (as it displays on your computer) as the date trigger.
- Select Event Date, if you want to use the Event Date as the date trigger.
- Select Claim Date, if you want to use the Claim Date as the date trigger.
Effective Start Date: Enter the date or select the ![]() button to select the date when the entity becomes effective.
button to select the date when the entity becomes effective.
Effective End Date: Enter the date or select the ![]() button to select the end date until this banking information remains effective for the entity.
button to select the end date until this banking information remains effective for the entity.
Service Codes: Enter the industry standard code for identifying balances and service charges that display on bank account analysis statements, or select the to select from the Code Selection window.
3.0 Toolbar buttons on the Bank Account screen
The Bank Account screen features a number of toolbar buttons.

The functionality of Some of the key buttons are discussed in details below:
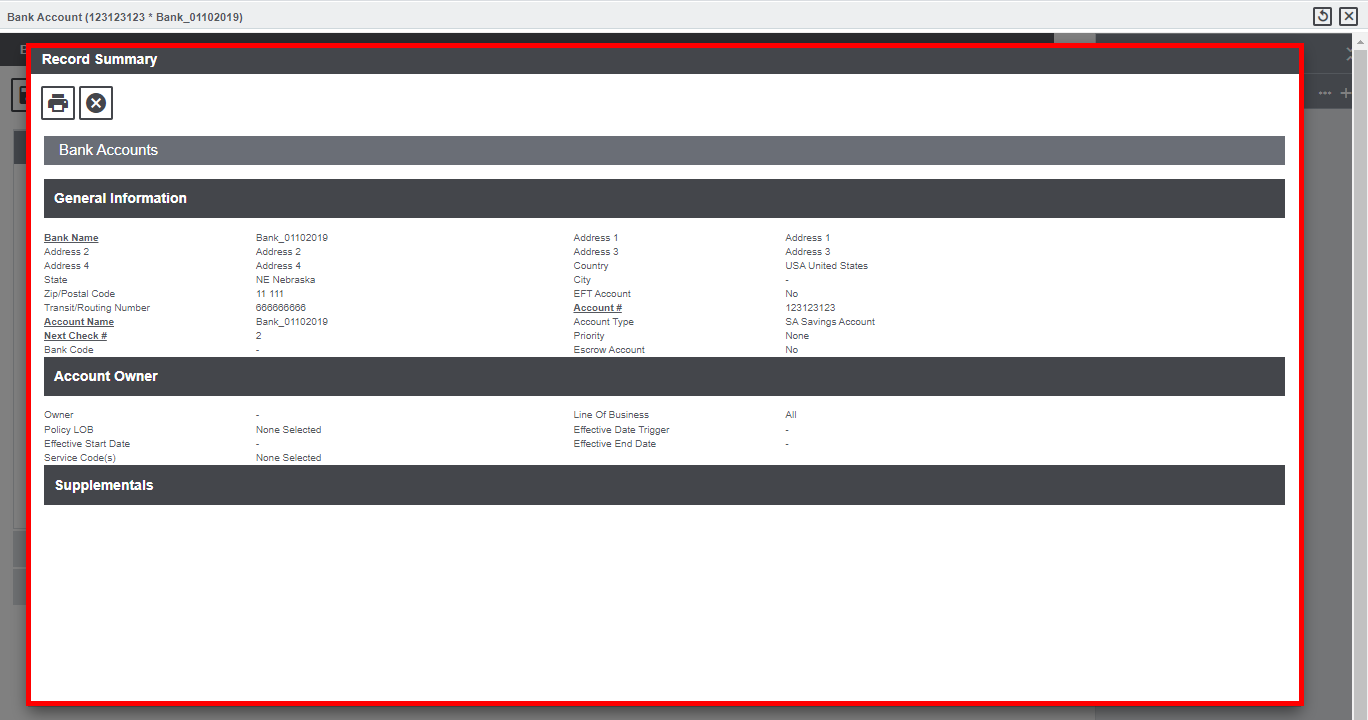
3.1 Record Summary feature
The Record Summary window displays the summarized record of the selected Bank Account.
Follow the steps mentioned below to open the Record Summary window of a particular Bank Account. Go to Claims zone > Select Funds option from the main menu > Select Bank Account option from the dropdown list. This will open the Bank Account screen, select the Lookup option from the toolbar menu to open the list of existing Bank Accounts. Select the relevant Account to open the respective screen. From the toolbar, select the Record Summary ![]() button to pop open the Record Summary window
button to pop open the Record Summary window ![]() . The data entered in the various accordions of the Bank Account screen is compiled and displayed on the Record Summary window.
. The data entered in the various accordions of the Bank Account screen is compiled and displayed on the Record Summary window.
3.2 Check Stock feature
Check Stock feature on the Bank Account screen offers an easy option to configure the look and feel of the checks as well as the information that is displayed on them. Assure Claims recommends setting up the check stock for each bank account against the checks that are to be entered.
To open the Check Stock window, first, go to the Bank Accounts window for which the check stock is to be set. Next, the Check Stocks ![]() button from the toolbar menu. This will open the Check Stocks window that features four tabs. The various tabs are discussed in detail below:
button from the toolbar menu. This will open the Check Stocks window that features four tabs. The various tabs are discussed in detail below:
3.2.1 Check Stocks Window: Basic Options Tab
The Basic Options tab of the Check Stocks window defines the basic design and appearance of the check stock.
Field Definitions:
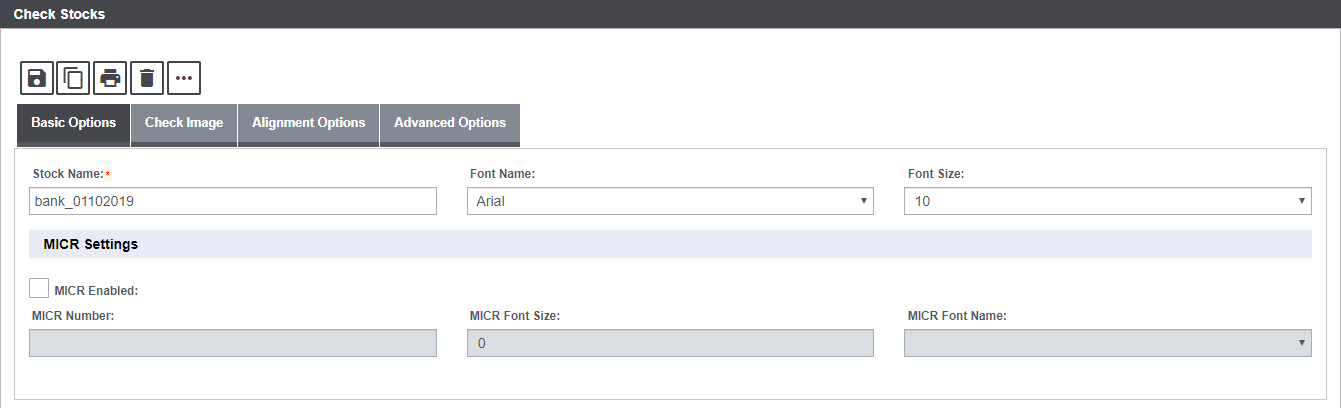
Stock Name: Enter a unique name for the check stock.
Font Name: From the dropdown list select the font you want to use on the check.
Font Size: From the dropdown list select the font size you want to use on the check. Assure Claims displays a preview of how the fonts will look on your check.
MICR Enabled: Select the check box to print the series of numbers that a bank uses to track checks.
Note: Magnetic Ink Character Recognition (MICR) is a font set used to print information on financial documents like checks.
3.2.1.1 MICR Settings
MICR Number: If you selected the MICR enabled check box, enter the MICR number.
MICR Type: Select one of the following:
- Select the RxLaser (hardware cartridge or DIMM ) option if you want to use a hardware cartridge or a DIMM chip to print the MICR numbers. You have to install the hardware cartridge or DIMM chip on each printer you will use to print checks.
- Select the True Type Font (software generated) option, if you want to use system fonts contained in your computer.
MICR Font Name: From the dropdown list, select the MICR font name you want to use.
MICR Font Size: From the dropdown list, select the MICR font size you want to use.
3.2.2 Check Stocks Window: Check Image Tab
Use the Check Image tab to define the background of the check and other graphic information that will print on the check.
Field Definitions:

None or Pre-Printed Check Stock: Select the option if you do not want background images or graphics to print on the check.
Windows Metafile (software generated): Select the option if you want background images or graphics to print on checks from a Windows Metafile ( .emf file). Customized Windows Metafiles with images your organization uses are saved on your system. Contact your system administrator for the location of the Windows Metafiles.
Visio 2007 emf: Select this option if the emf image you are using was generated from Visio 2007.
Regular Check: If you selected the Windows Metafile option:
- Select the Set Image button to open the file browser and select a Windows Metafile image to use on regular checks.
- Select the View Image button to preview the check with the Metafile image in the View Check Image window.
Non-Negotiable or Void: If you selected the Windows Metafile option:
- Select the Set Image button to open the file browser and select a Windows Metafile image to use on non-negotiable or void checks.
- Select the View Image button to preview the check with the Metafile image in the View Check Image window.
Use Special Check: Select the check box if you will issue special checks (different from regular checks or non-negotiable or void checks). If you select this option, these special checks will automatically be used when the check amount exceeds the amount you specify in the Activate When Amount >= field.
Activate When Amount Greater than or Equal To: If You want to print special checks when the check amount is greater than or equal to a certain dollar amount, enter that dollar amount here.
3.2.3 Check Stocks Window: Alignment Option Tab
Use the Alignment Options tab to define data alignment on checks. Enter X and Y coordinates to specify exactly where you want an element to display on the check. As you increase an X coordinate, the element moves to the right. As you increase the Y coordinate the element moves down. Check with your check stock supplier to get exact measurements.
Note: If you do not want data listed on this tab to display on your checks, enter coordinates that fall outside the check perimeter.
Field Definitions:
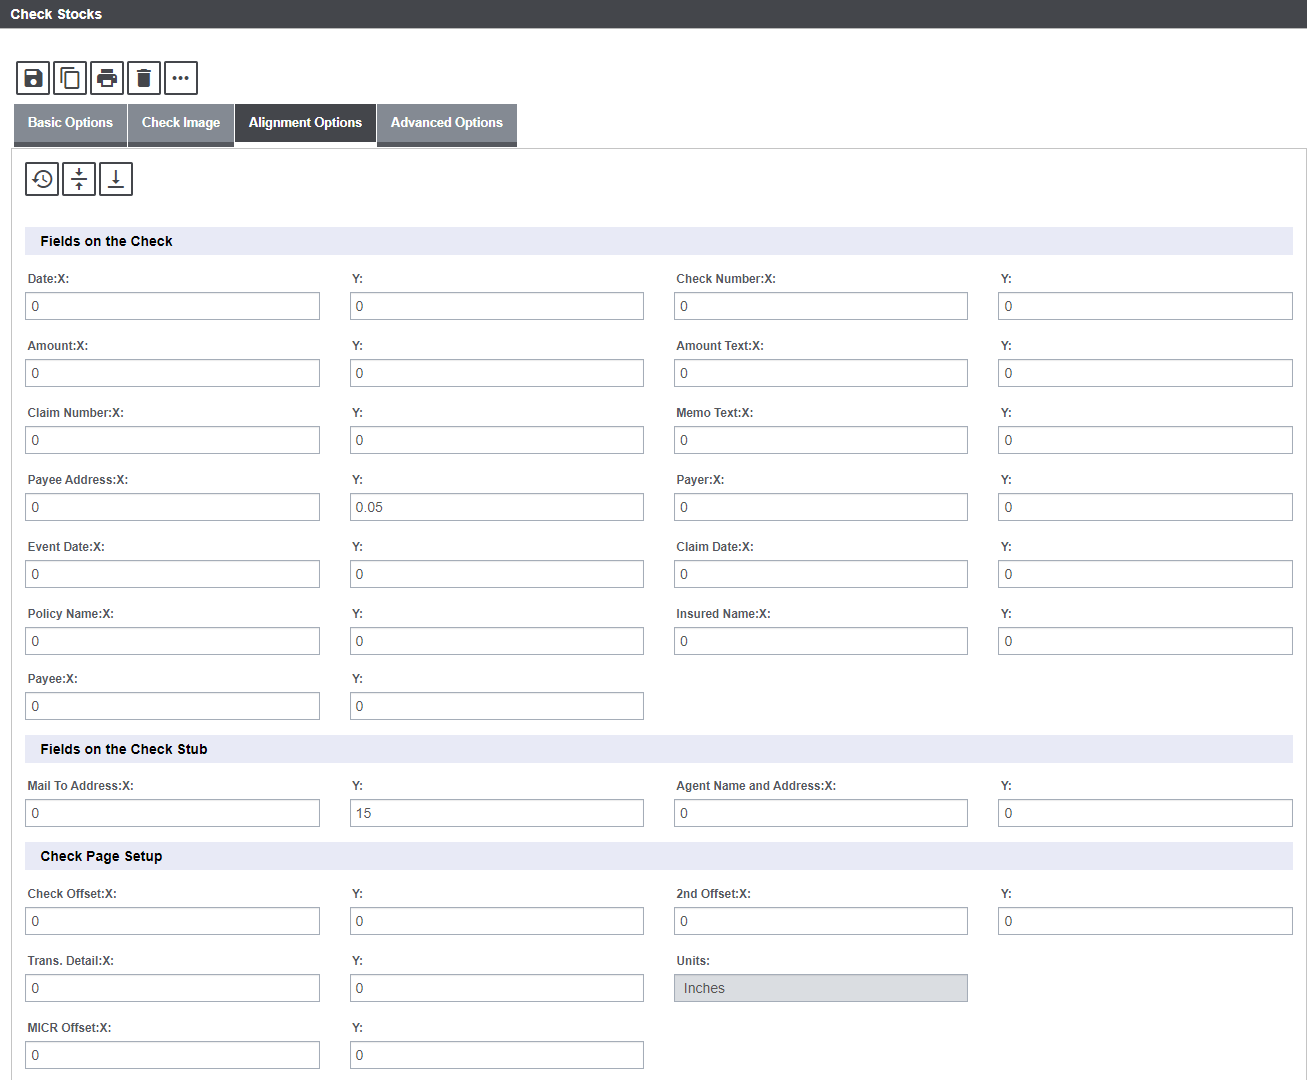
Date: Enter the X and Y coordinates for where you want the date to display on the check.
Check Number: Enter the X and Y coordinates for where you want the check number to display on the check.
Amount: Enter the X and Y coordinates for where you want the check amount to display on the check.
Amount Text: Enter the X and Y coordinates for where you want the check amount text to display on the check.
Claim Number: Enter the X and Y coordinates for where you want the claim number to display on the check.
Memo Text: Enter the X and Y coordinates for where you want the memo text to display on the check.
Trans. Detail: Enter the X and Y coordinates for where you want the transaction details to display on the check.
Payer: Enter the X and Y coordinates for where you want the payer name to display on the check.
Payee: Enter the X and Y coordinates for where you want the payee name to display on the check.
Check Offset: For 2-part checks, enter the X coordinate for where you want the address to display and Y coordinates for where you want the fold line to display.
MICR Offset: Enter the X and Y coordinates for where you want the MICR number to display.
2nd Offset: For 3-part checks, enter the X coordinate for where you want the transaction details to display and a Y coordinates for where you want the second fold line to display.
Note: For 2-part checks enter 0 in both X and Y fields.
Units: Displays the unit such as, Centimeters or Inches, for X and Y coordinates based on the configuration settings done by your System Administrator.
Restore Defaults: Select Restore Defaults > Restore Defaults to set all alignments to default values.
Check in Middle: Select Restore Defaults > 3 Part Checks > Check in Middle to place the check in the middle of a 3 part check and restore defaults.
Check at the Bottom: Select Restore Defaults > 3 Part Checks > Check at the Bottom to place the check at the bottom of a 3 part check and restore defaults.
3.2.4 Check Stock – Advanced Option Tab
Use the Advanced Options tab to specify details about permanent data that displays on all checks.
Field Definitions:
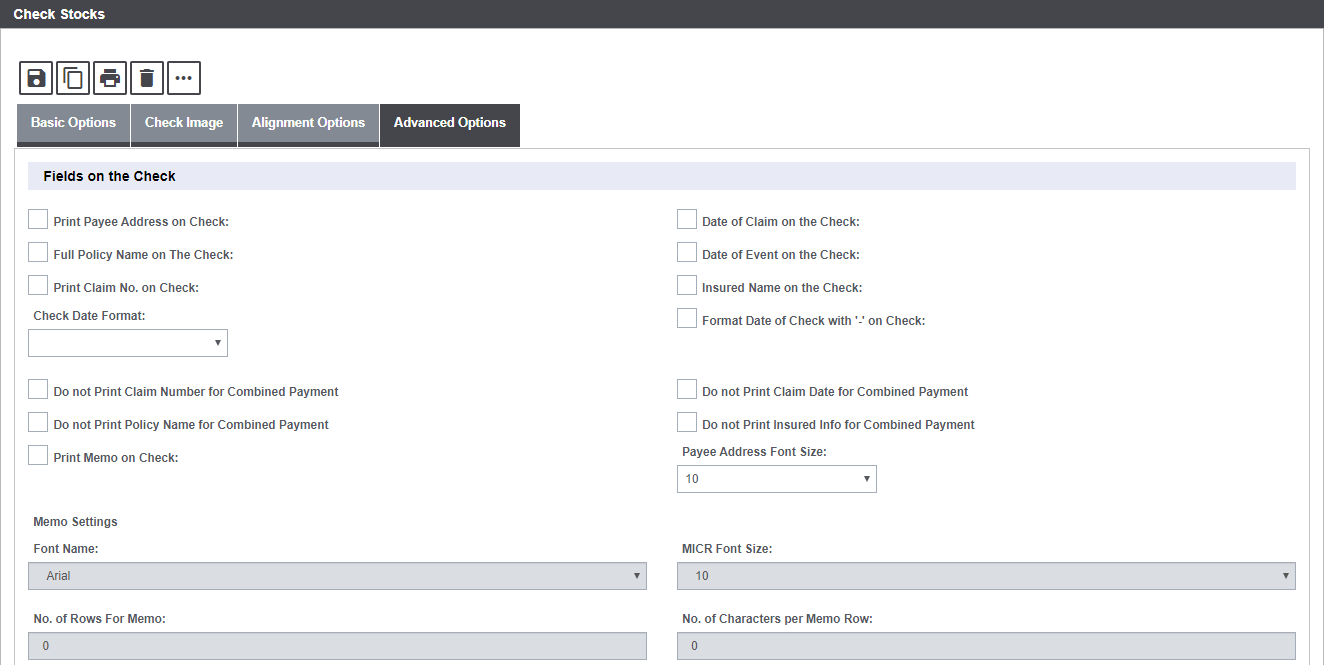
Fields on the Check:
Print Payee Address on Check: Select the check box, if you want the payee’s address to print on the check.
Full Policy Number on The Check: Select the check box if you want the policy number to be printed on the check.
Print Claim No. on Check: Select the check box, if you want the claim number to display on the check.
Date of Claim on the Check: Select the check box, to print the date of claim on the check.
Format Date of Check with ‘-‘ on Check: Select the checkbox, if you want ‘-‘ to be used as a separator in the check date.
Check Date Format: From the dropdown select the format in which the date is printed on the check.
Insurer Name on the Check: Select the check box, if you want the insurer name to be displayed on the check..
Print Memo on Check: Select the check box, if you want a memo to print on checks.
Date of Event on the Check: Select the checkbox, to print the date of the Event on the check.
3.2.4.1 Memo Settings:

Note: This section gets enabled only when you select the Print Memo on the Check checkbox.
Font Name: If you selected Print Memo on Check, select the font you want to use to print the memo.
MICR Font Size: Select the font size for the memo.
No. of Rows for Memo: Enter the maximum number of text rows the memo can extend to.
No. of Characters per Memo Row: Enter the maximum number of characters in a row.
3.2.4.2 Pay to The Order Of Settings:
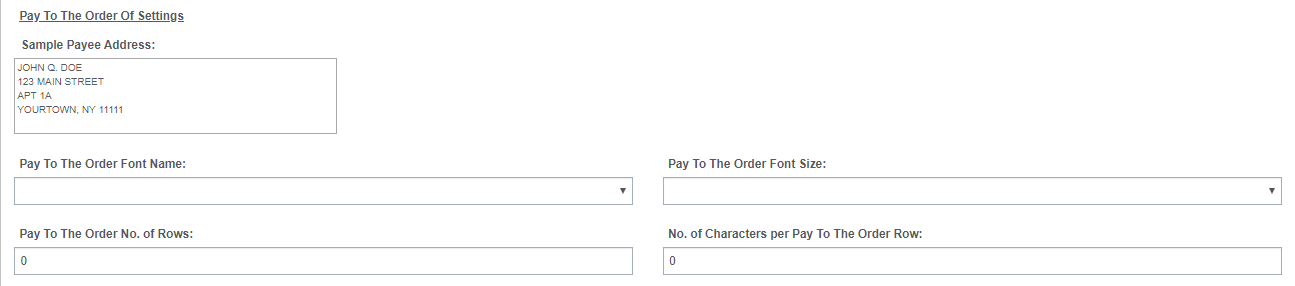
Pay To The Order Sample Text: Enter a sample text which you can use to view how the text displays on the printed check sample and then adjust the settings as needed.
Font Name: Enter the text font in which the Pay to The Order Of text will be printed on the check.
Pay To The Order No. of Rows: Enter the number of rows in which you want the Pay to The Order Of text to be printed on the check.
Pay To The Order Font Size: Enter the size of the font in which the text is printed on the check.
No. of Characters per Pay To The Order Row: Enter the maximum number of characters of the Pay to The Order Of text that can display in a row on the printed check.
3.2.4.3 Check Page Setup

Suppress $ Sign: Select the check box, if you do not want a dollar sign to print on checks.
Print Claim insurer Instead of Payer: Select the check box, if you want the insurer paying for the claim to print on the check in place of a payer.
Pre-numbered Check Stock: Select the check box, if you want a check number to print on the check.
Payer Level For Checks: From the dropdown list, select SysParm Client to use the payer name your system administrator set up in Utilities. Select one of the organizational hierarchy levels to use the organization you selected as the payer.
Note: If you selected to roll up checks in Utilities, and if you select different payer levels for checks made out to the same payee, RISKMASTER will print separate checks for each payer level.
3- Part Check Address Settings: This field offers 4 options to choose from. The various radio buttons in this field is explained below:
Note: This field is enabled only if the Check option in the Middle button on the Alignment Options tab is selected.
Blank: Select the button, if on the 3-part check you want the uppermost part to contain details, the middle part to contain the check, and the lowermost part to remain blank.
Payee Address: Select the button, if on the 3-part check you want the uppermost part to contain details, the middle part to contain the check, and the lowermost part to contain the payee address.
Payment Detail: Select the button, if on the 3-part check you want the uppermost part to contain details, the middle part to contain the check, and the lowermost part to contain payee details.
3.2.5 Check Stocks Toolbar Buttons
The Check Stocks window features a number of buttons in the toolbar menu.

Select Clone ![]() button to create a duplicate copy of an existing Check Stock.
button to create a duplicate copy of an existing Check Stock.
Select the Print Sample ![]() button to print the created Check Stock.
button to print the created Check Stock.
Additionally, the Check Stock can be saved or removed by selecting the Save ![]() and Delete
and Delete ![]() buttons respectively.
buttons respectively.
3.3 Balance Reconciliation
The Balance icon on the Bank Account screen enables bank reconciliation. Bank Reconciliation is the process by which the bank account balance in an entity’s books of account is reconciled to the balance reported by the financial institution in the most recent bank statement.
To use the feature, open an existing account, followed by the Balance ![]() button from the toolbar of the Bank Account screen to open the Bank Account Reconciliation window.
button from the toolbar of the Bank Account screen to open the Bank Account Reconciliation window.
Field definitions:
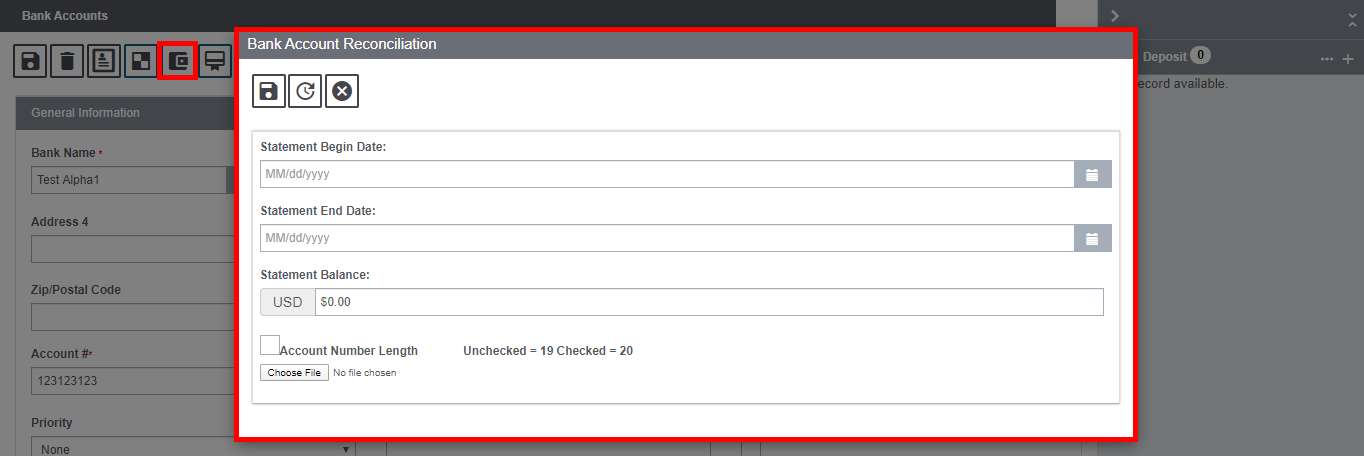
Statement Begin Date: Enter the date from which you want the Bank Statement to begin.
Statement End Date: Enter the date on which you want the Bank Statement to end.
Statement Balance: Enter the final balance listed on the bank account.
Select File To Process: Select the Browse button, to open the Choose file window and select the file that the bank provides with your banking record for this period.
Account Number Length: Select the check box, if the bank account number is 20 digits long.
Process File: Select the button to reconcile the bank account.
Cancel: Select the button to close the Bank Account Reconciliation window without saving the record.
3.4 Account Balance Information
You can view the details of the balance in your bank account, for a statement period, after the bank account is reconciled.
Select the bank account for which you want to view account balance information. From the Bank Accounts window, select the Account Balance ![]() button. The Account Balance Information window opens.
button. The Account Balance Information window opens.
To view the account balance information for a certain period, from the Statement Dates field, select the button to select from a list of prior statement periods.
The fields on the Account Balance Information window display the information for the selected statement period, as shown below.

A. Balance Per Bank Statement: Displays the balance in the bank account for the statement period you select.
Statement Dates: Displays the date range for which you want to view the balance information.
B. Prior Balance: This field shows the prior balance amount of the bank account.
C. Deposits in Transit: Displays the amount that is due for credit to the bank account.
# of Deposits: Displays the number of deposits made to the bank account.
D. Released Payments: Displays the payment amount that has already been released.
# Payments: Displays the number of payment that has their Status of Payment marked Released.
E. Insufficient Payments: Displays the payment amount that has their Status of Payment marked as Insufficient Payment. This happens when the payment exceeds the Reserve amount.
# Payments: This field displays the number of payment that has their Status of Payment marked as, Insufficient Payment.
F. Outstanding Checks: Displays the number of checks that are outstanding for payment from the bank account.
# of Checks: Displays the number of checks for which payment was made from the bank account.
G. Cleared Checks: The field shows the check amount that was marked as Clear.
H. Sub Total [C-(F+G)]: Displays the sub total of the balance amount in the bank account.
J. (Reconciliation Total) Deposits: Displays the total amount of deposits to the bank account based on your bank account reconciliation.
I. Balance Per Books (System) [B+H+J+L]: Displays the balance in your bank account based on bank’s electronic records.
K. (Reconciliation Total) Checks: Displays the total amount of checks paid from the bank account based on your bank account reconciliation.
Out Of Balance [A-H]: Displays the difference in the balance amount based on the records in your RISKMASTER system and your bank’s electronic records.
L. (Reconciliation Total) Adjustments: Displays the total adjustment made to your bank account based on your bank account reconciliation.
Reconciled Items [J+L-K]: This field displays the total amount of deposits in the amount and the adjustment made to the bank account that was left after the checks were paid from the account.
4.0 Bank Account Deposit
The right-hand pane of an existing Bank Account screen features a child-node labeled, Deposit. The Bank Account Deposit window records the deposits pertaining to an account. You can track these deposits and automate the process of reconciling the bank statement.
To open a Deposit window, open an existing Bank Accounts screen. Next, select the child-node from the right-hand pane labeled, Deposit. Existing deposits can be previewed as shown below. The label has two icons, namely, View All and Add ![]() .
.
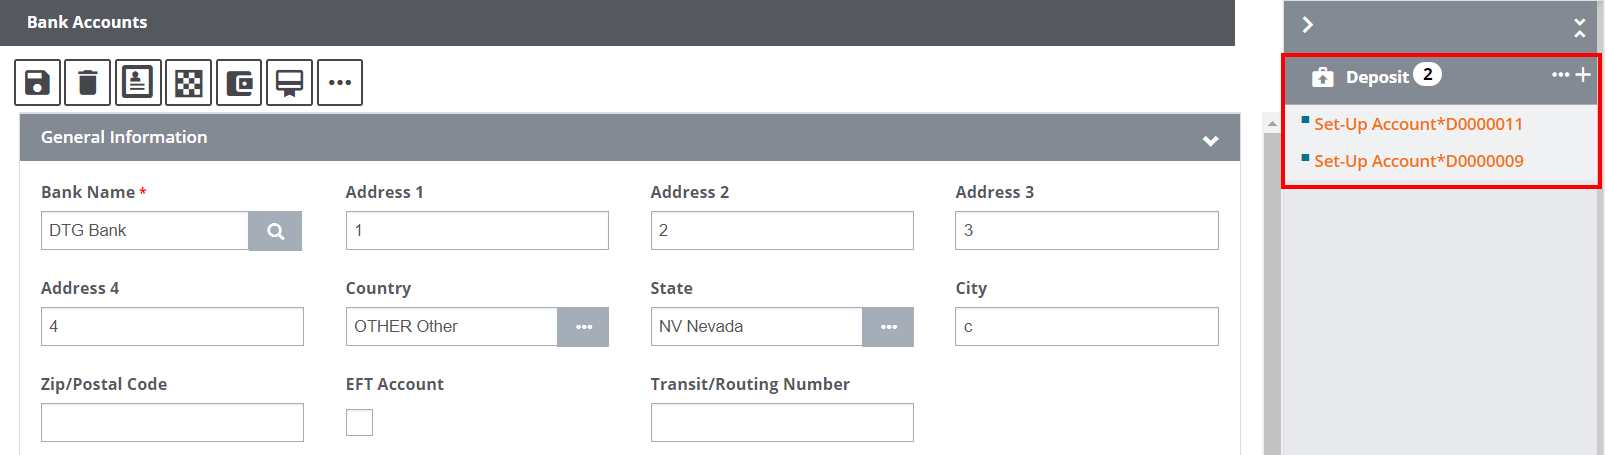
The existing deposits are displayed as clickable links as shown in the image above. Select the same to open the respective Deposit screen.
Select the View All icon to open a pop up window that complies all the existing Deposits as shown below:
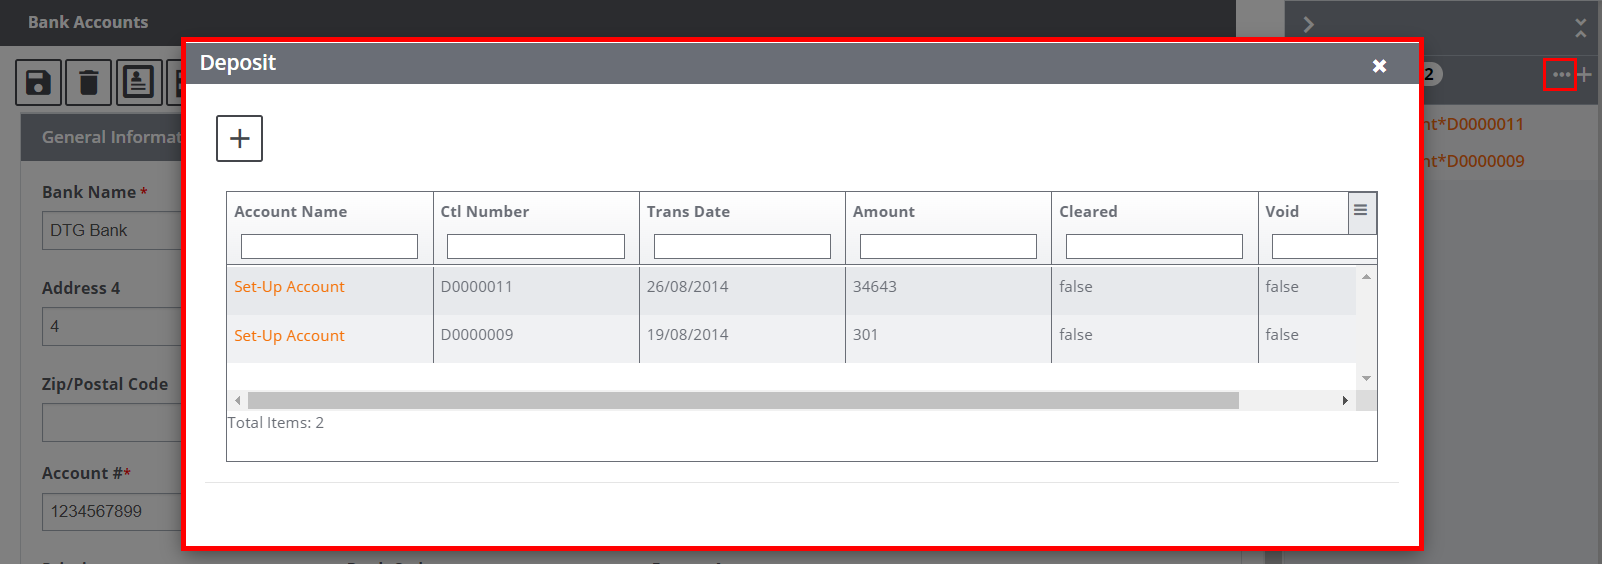
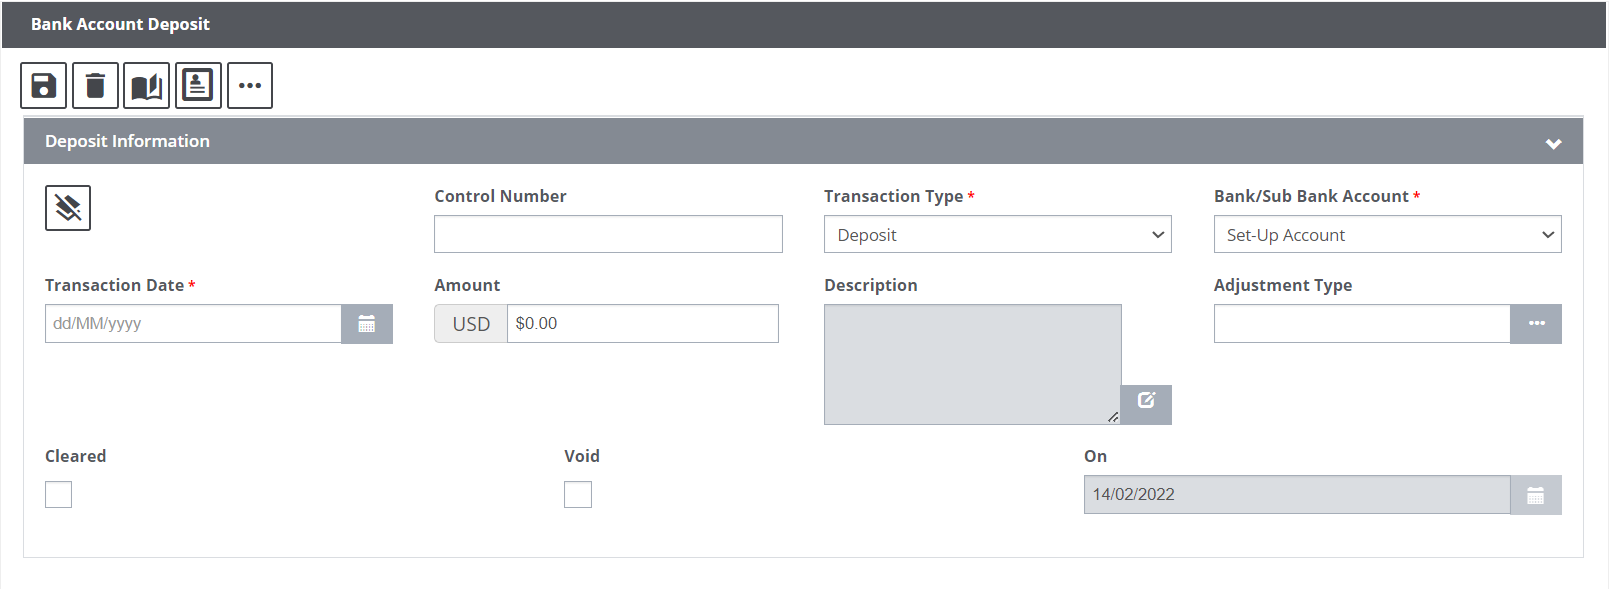
Additionally, to add a new deposit, select the Add button. This will open the Bank Account Deposit screen.
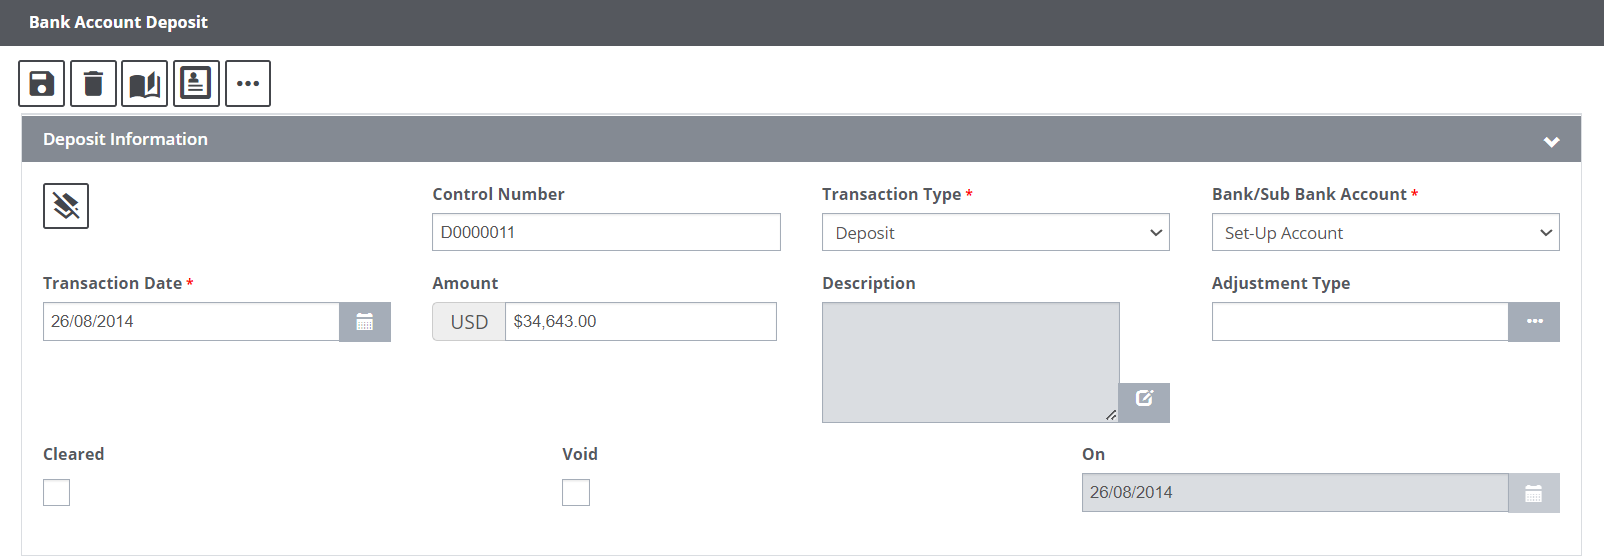
4.1 Bank Account Deposit – Field Descriptions:
Control Number: Enter the internal tracking number for the deposit.
Transaction Type: From the dropdown list, select the transaction type.
Bank/Sub Bank Account: From the dropdown list, select the account that you want to debit.
Transaction Date: Enter the date on which you made the deposit or select the button to select from a calendar.
Amount: Enter the dollar amount of the deposit.
Description: Select the ![]() button to open the Editor and enter a short description for the deposit.
button to open the Editor and enter a short description for the deposit.
Note: To record bank deposits, you must have the necessary permissions. Contact your supervisor or system administrator for more information about your permissions.
Adjustment Type: If you are changing a deposit amount, select the search button to select from the Code Selection window.
Cleared: Select the checkbox to indicate that the check has appeared on the bank statement.
Void: Select the checkbox to remove the deposit from the account and retain a record of it.
On: This field displays the date on which you cleared or voided the deposit in this field.
Clear Multiple Deposit: The Bank Account Deposit screen features a Clear Multiple Deposit ![]() icon on the top left corner. This enables you to clear multiple deposits in one go. For this, select the icon to open the Bank Account Deposit window.
icon on the top left corner. This enables you to clear multiple deposits in one go. For this, select the icon to open the Bank Account Deposit window.
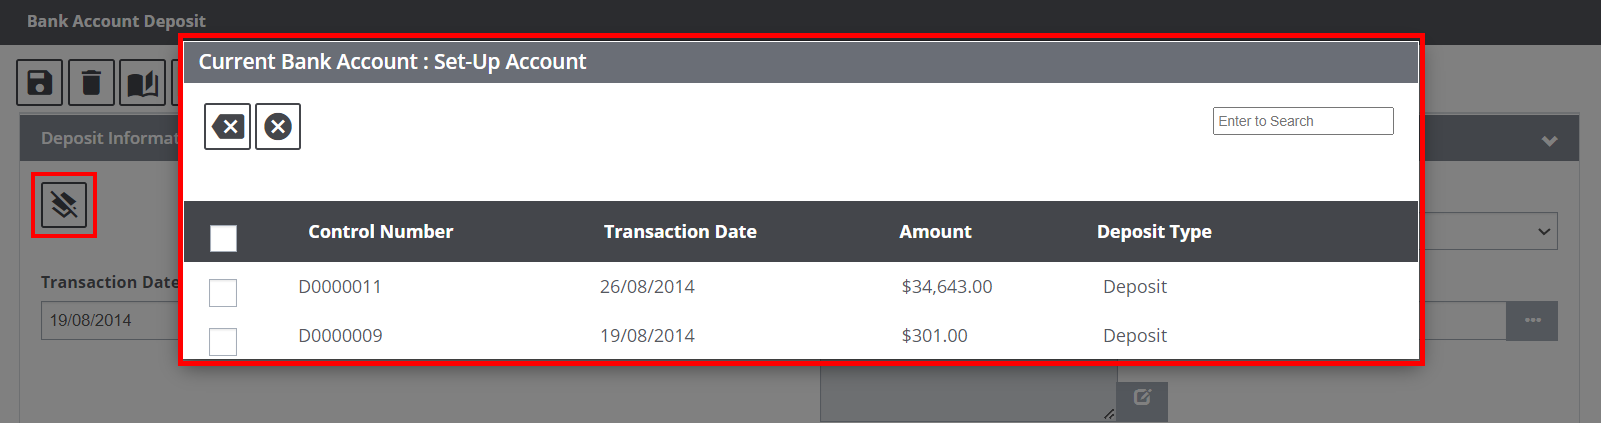
Select the adjacent checkboxes of the deposits that are to cleared followed by OK. The selected Deposits will be marked as Clear.
4.2 Bank Account Deposit – Toolbar Menu
The Bank Account Deposit window offers some toolbar buttons.

They are discussed in detail below.
4.2.1 Bank Account Deposit – Attach Diary
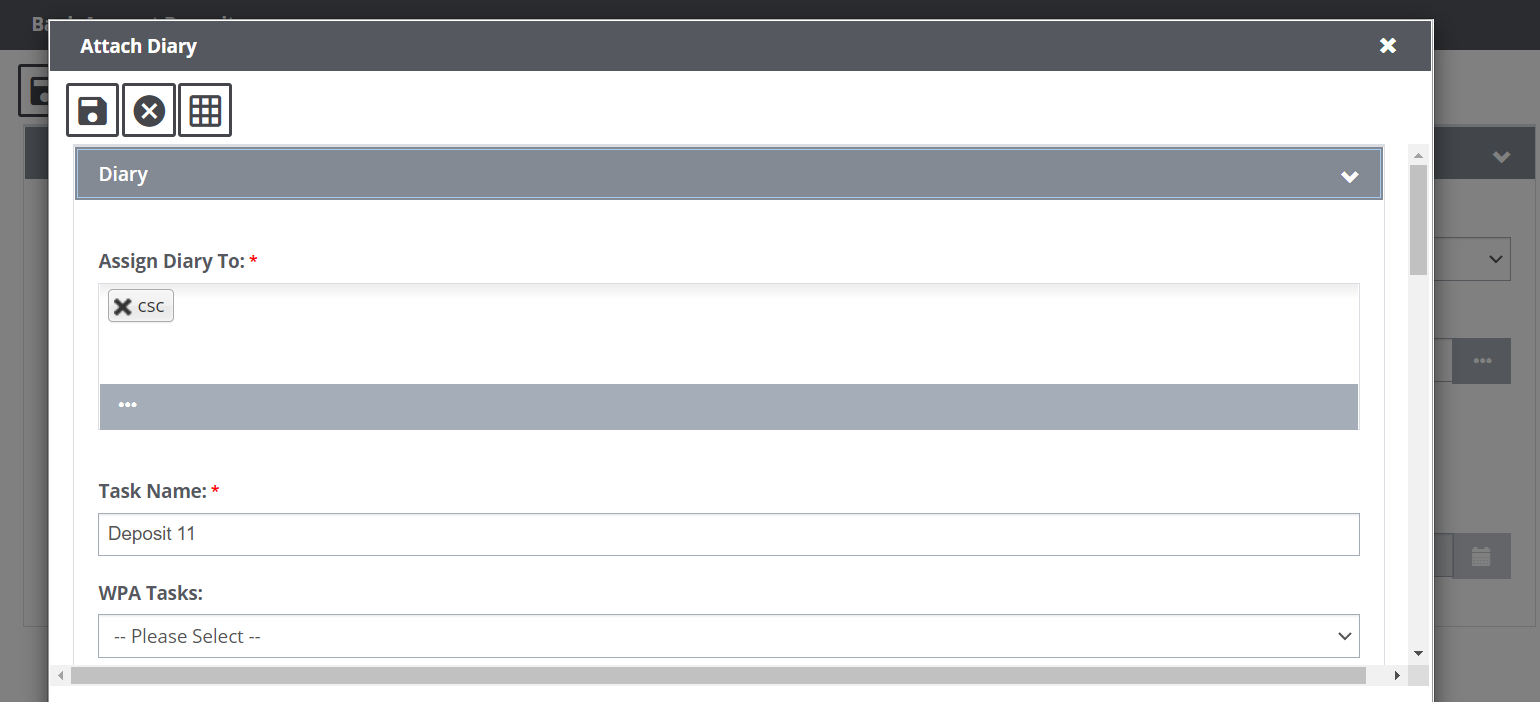
Select the Diary ![]() icon to add a new diary to the respective deposit. Selecting the icon will pop open the Attach Diary window as shown below.
icon to add a new diary to the respective deposit. Selecting the icon will pop open the Attach Diary window as shown below.
Field Descriptions:
Assign Diary To: Select the user(s) to which the diary is to be assigned.
Task Name: Enter a unique name for the Diary.
WPA Tasks: Select a relevant WPA task from the dropdown list.
4.2.2 Bank Account Deposit – Record Summary
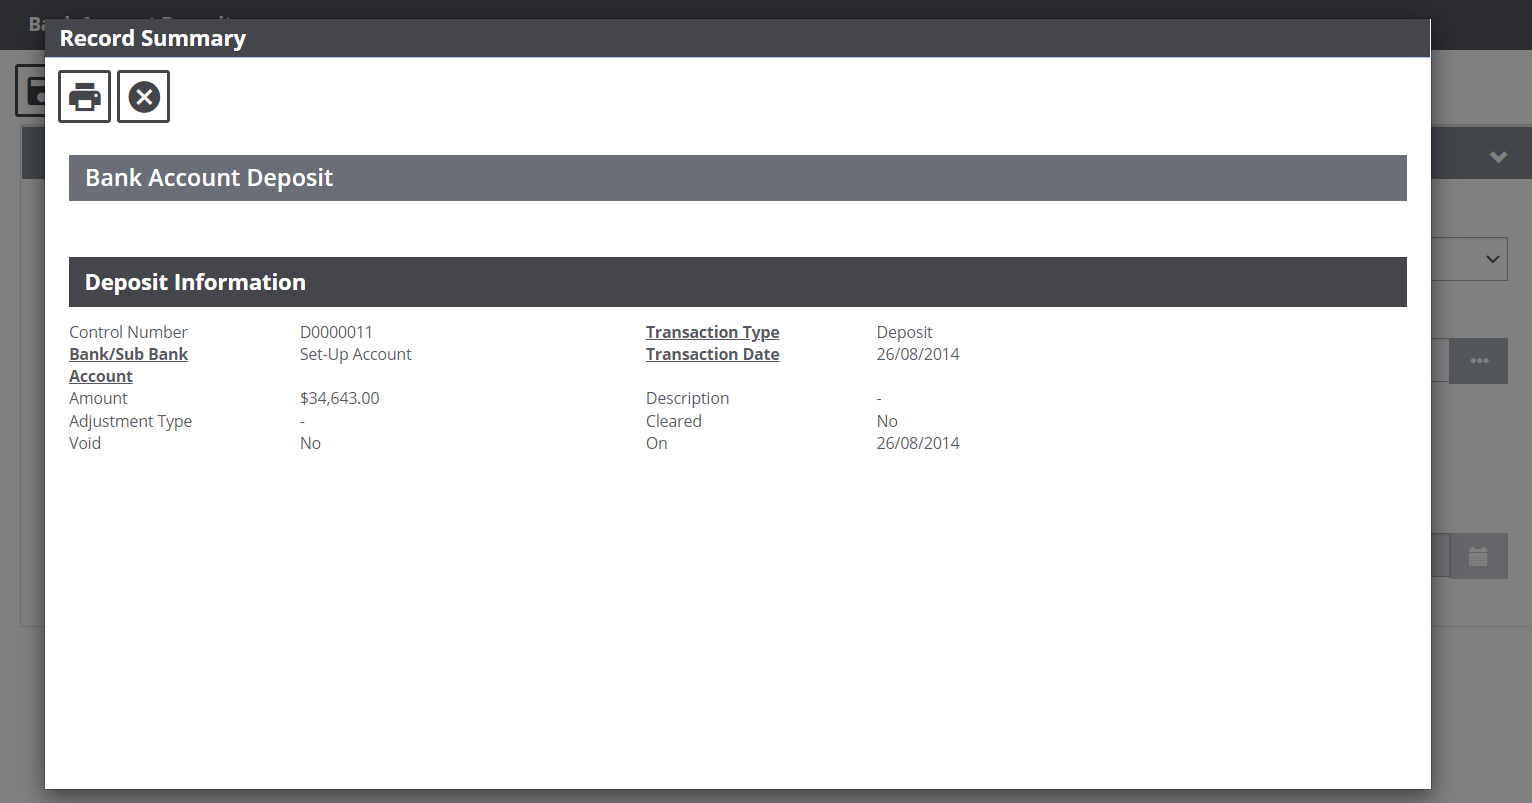
Select the Record Summary ![]() icon from the toolbar menu of the Bank Account Deposit window. This will pop open the Record Summary window that showcases a summarized report for the respective Deposit.
icon from the toolbar menu of the Bank Account Deposit window. This will pop open the Record Summary window that showcases a summarized report for the respective Deposit.
5.0 Sub Bank Account
Sub Bank accounts can be used to break down an account into multiple smaller accounts for better tracking of detailed budgets and expenses. Sub-accounts are basically smaller accounts that sit under your main bank account. Assure Claims provides an easy option to create multiple sub-bank account within the main bank account.
For this, a one-time setting needs to be done from the Utilities zone. Go to Utilities > General System Parameter Setup > Funds Setting > Enable Use Sub Bank Account setting.
Once this setting is enabled, the right-hand pane of an existing Bank Account screen will display a child-node labeled, Sub Accounts. To open a Sub Bank Account window, open an existing Bank Accounts screen. Next, select the child-node from the right-hand pane labeled, Sub Accounts. The child node has two icons, namely, View All and Add ![]() .
.

The existing sub accounts are displayed as clickable links as shown in the image above. Select the same to open the respective Sub Bank Account screen.
Select the View All icon to open a popup window that compiles all the existing Sub Accounts as shown below:

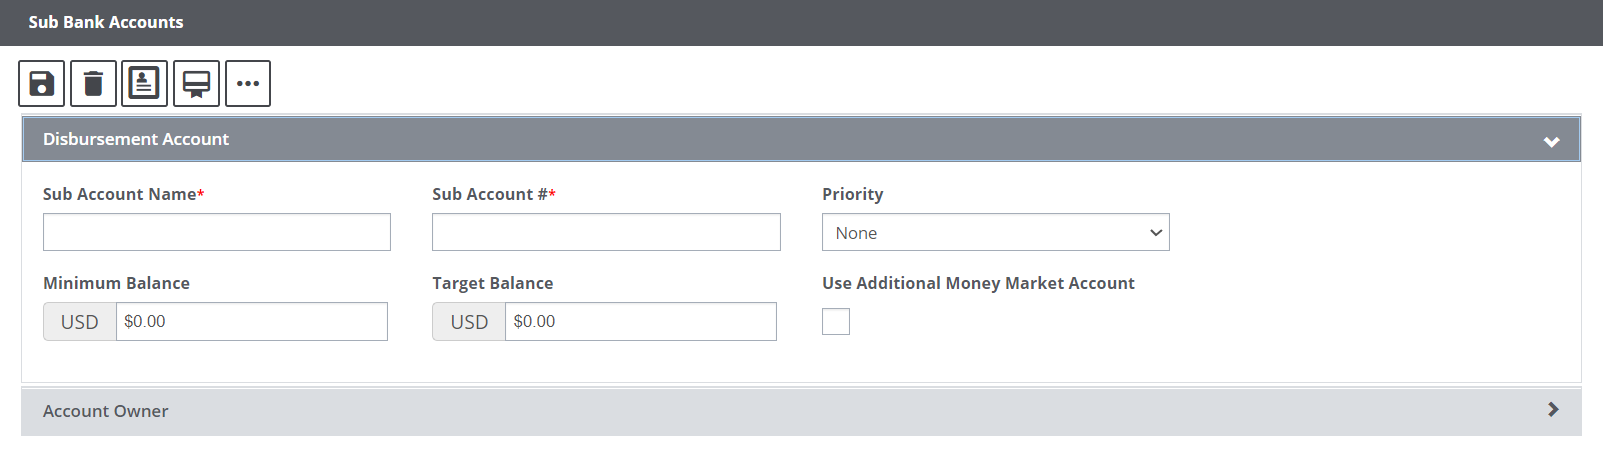
Additionally, to add a new sub account, select the Add button. This will open the Sub Bank Account screen. The window features two accordions. These accordions are discussed in detail.
5.1 Sub Account – Disbursement Account accordion
This section compiles the basic information of all the paid out or disbursed funds of the account.
Field Description:
Sub Account Name*: Enter the name of the Sub Bank Account.
Sub Account #*: Enter the account number of the sub account.
Priority: Set the priority for the sub bank account by selecting a relevant option from the dropdown list.
Minimum Balance: If required, enter the minimum balance amount necessary for the respective sub account. This is an optional field.
Target Balance: If required, enter the target or maximum balance amount necessary for the respective sub account. This is an optional field.
Use Additional Money Market Account: Select the checkbox to enable a money market account, that is, a deposit account which pays interest based on current interest rates in the money markets.
5.2 Sub Account – Account Owner accordion
This section of the screen compiles the information pertaining to the account holder of the sub account.
Field Definition:

Owner: Select the Account Owner from the Organization Hierarchy by selecting the lookup ![]() icon.
icon.
Line of Business: Choose the Line of Business associated with the sub bank account by selecting the respective radio button. If the radio button labeled, All is selected, then, all the available LOB will be selected in one go.
Policy Line Of Business: The field features various radio buttons for different Policy LOBs. Select the Policy LOB by selecting the respective radio buttons. If the radio button labeled, All is selected, then, all the available LOB will be selected in one go.
Effective Trigger and Dates
Effective Date Trigger: Assure Claims uses the trigger date that is selected in this field, to determine whether the Sub Account can be used for a particular Claim. For example, if an Event Date is selected, then, the system uses the Sub Account for a claim only if its Event Date falls within the Effective Date Range you specify. The Effective Date Trigger dropdown list includes the following options:
- Select Current System Date, if you want to use today’s date (as it displays on your computer) as the date trigger.
- Select Event Date, if you want to use the Event Date as the date trigger.
- Select Claim Date, if you want to use the Claim Date as the date trigger.
Effective Start Date: Enter the date or select the ![]() button to select the date when the entity becomes effective.
button to select the date when the entity becomes effective.
Effective End Date: Enter the date or select the ![]() button to select the end date until this banking information remains effective for the entity.
button to select the end date until this banking information remains effective for the entity.
Service Codes: Enter the industry-standard code for identifying balances and service charges that display on sub account analysis statements, or select the to select from the Code Selection window.